Stickdog Pedigree's Manual

Stick Dog Pedigrees is a software application intended for use by dog breeders to manage breeding programs. It allows you to do the following:
- Create, edit, and manage information about dogs in a single view - the Dog Directory. The following information about each dog may be recorded in the directory:
- General information including formal name, titles, whelping date, breeder, and owner
- Traits including conformation traits measuring adherence to breed standard
- Dam and sire (ancestral relationships)
- View the pedigree for a dog in any one of three graphical representations - Traditional Chart, Stick Dog Color Chart, and Symbols Chart. The application uses information stored in the directory, including ancestral data, to render pedigrees on demand. This capability saves you time and effort because dogs appearing in multiple pedigrees are entered only once into the directory and reused automatically by the software as and when needed to render a pedigree.
- Create breeding plans more easily by leveraging trait information stored in the directory together with the Stick Dog Color Chart and Symbols Chart functions.
- Expand your directory by utilizing the import/export feature to exchange pedigrees with other breeders.
- Create hardcopy printouts of the Traditional Chart, Stick Dog Color Chart, and Symbols Chart for any dog. The Traditional Chart may be used to print out unofficial pedigree certificates.
Pedigree Charts
The following subsections describe the purpose of three charts supported by the application in relation to breed planning.
Traditional Chart
The Traditional chart is the most a popular of the three that, unfortunately, as a breeding tool has many shortcomings. Most notable is the importance it places on memory and knowing the names and titles of the ancestors, none of which is heritable. The custom has been for breeders to recognize and associate names and titles with what could be remembered about each ancestor. This approach lacks reliability and it does not capture the information needed to plan a breeding.
Most Traditional Pedigrees show scribbled notes around the edges and in the margins. Words such as "beautiful coat" and "wonderful type" become the information that is used. This approach fails to collect what is relevant or specific to making improvements. In short, breeders have no way to learn from their mistakes. See Figure 1 below.
Ch WeLove DuChein's R-Man, ROM, OFA
Ch. Kismet's Sight For Sore Eyes ROM, OFA, DNA certified
Ch  Kismet's Sweetheart Deal, ROM, OFA CH O'Danny Boy of Heinerburg, ROM, OFA, DNA certified
Ch  Schokrest San Diego, OFA
Magic Moment of Heinerburg OFA Cartel's Amber v Heinerburg, OFA
Figure 1: Traditional pedigree
Two other charts were developed to compensate for the limitations of the Traditional chart. One is the Stick Dog Color Chart (Figure 2). Its focus is on the seven traits of conformation. The other is the Symbols Chart (Figure 3). It is used to track and analyze health, performance, and other traits of interest.
Stick Dog Color Chart
The Stick Dog Color Chart focuses on seven traits of conformation allowing breeders to see the strengths and weaknesses of each ancestor based on the breed standard.
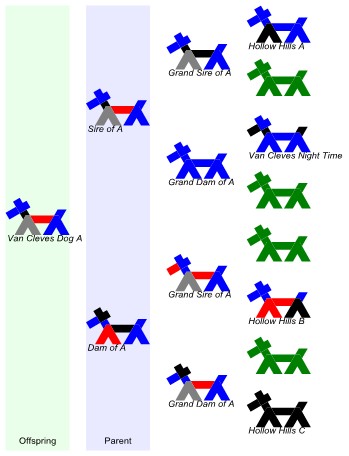
Figure 2: Stick Dog Color Chart Pedigree
The logic underlying this pedigree is that each ancestor is represented as a stick figure of coded information. Each ancestor is drawn as a stick figure with seven structural parts: ears, head, neck, front, back, rear, and tail. Each part is coded for its quality using four mutually exclusive colors. Each color signifies the rank or quality of the trait based on the breed standard. Notes may be added to each stick figure to supplement and clarify the color codes.
| Codes | Rank for Quality |
|---|---|
| Blue | Correct based on breed standard |
| Black | Could be improved |
| Red | Is a fault |
| Grey | A serious fault or disqualification |
| Green | Missing information |
The rules used to code the quality of a trait are straightforward. When a trait is coded with a first place color (blue), it is viewed to be correct or ideal based on the breed standard. For example, if the ears on a sire were coded blue and those on the dam were coded black, the breeder would know that the sire's ears were correct but the ears on the dam were not correct and lacking in some way. Thus, the color- coding of each ancestor identifies their qualities along with their specific strengths and weaknesses. The color codes also show if there are trends or problems on the sire or dam side of the pedigree.
Symbols Chart
Breeders interested in health, temperament, or special traits need to use this pedigree. It captures and displays the strengths and weaknesses of each ancestor and all of their littermates. Breeders can code the carriers of health problems or some special trait of interest on the sire or dam side of the pedigree. Knowing where, and how often traits occur increases the probability that improvements can be made and problems controlled or eliminated.

Figure 3 - Symbols Pedigree Chart
The Symbols Chart gets its name because symbols rather than names are used to identify each ancestor. The inclusion of littermates at all levels except the oldest generation further distinguishes this pedigree from the others. Its great advantage is that it produces a record of information that can be used to make improvements and eliminate problems.
Squares are used to represent the males and circles to represent the females. The littermates for each ancestor are also represented as either a circle or a square. As information is collected about each individual, it is coded using designated colors that represent specific traits or diseases. Because breeders are interested in many traits and diseases, they will use several colors to code this pedigree. The repetition of a color, key word or phrase usually signals that a genetic trend or pattern may be present.
Quick Installation Guide
Minimum System Requirements
- Windows 10/8/7/Vista/Windows XP (Professional and Home; note that Microsoft no longer supports XP)
- 1 gigahertz (GHz) 32-bit (x86) or 64-bit (x64) processor
- 512 megabytes (MB) RAM for Windows XP 32-bit, 1 gigabyte for 64-bit Windows XP
- 2 GB RAM for 64-bit Windows Vista/7/8/or 10
- Internet access required for license validation
- Screen resolution of 1280x800 (WXGA)
- 50 MB free disk space*
* If the .NET Framework is not already installed, an additional 850MB (32-bit Windows) or 2GB (64-bit Windows) of free disk space will be required.
Note: If Stick Dog Pedigree software is already installed on your computer, refer to section "Upgrading Stickdog Pedigree's" before continuing.
Advanced users may refer to one of the Quick Install sections below for guidance. For detailed instructions, see section "Detailed Installation Guide".
Install Stickdog Pedigree from a CD
If you have the CD
- Insert your Stickdog Pedigree CD into the CD-ROM drive on your computer.
- If your computer doesn't auto launch the installation process, open file (windows) explorer, click on the cd-rom drive and run the setup.exe program located in the root directory of the CD.
- Follow the on-screen instructions to complete the process.
If you don't have the CD, you can download the image from our website and burn it to a blank CD then follow the instructions above.
Install Stickdog Pedigree from a zip file
- Download and save the zip file from our website
- Extract the file
- Launch the setup.exe located in the extracted folder.
- Follow the on-screen instructions to complete the process.
Detailed Installation Guide
Please note that these dialog boxes may look different than yours, depending on which operating system your running. The steps are similar, however. Additionally, you may need to choose to allow this program to make changes to your system.
- Check your system meets the minimum requirements.
- Log in to Windows. When installing on Windows XP, it will be necessary to know the password of the Administrator account when installing under an account without administrator privileges.
- Launch the setup.exe program from a CD, or extract the zip file downloaded from our website and run the setup.exe program from there.
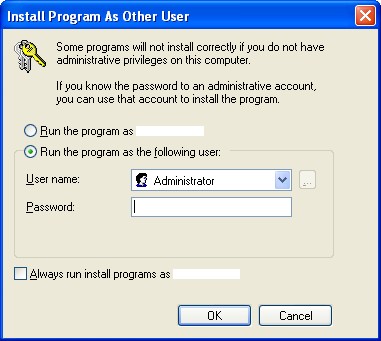
- If the "Install Program As Other User" dialog appears, enter the user name and password of an account with administrator privileges and click OK.
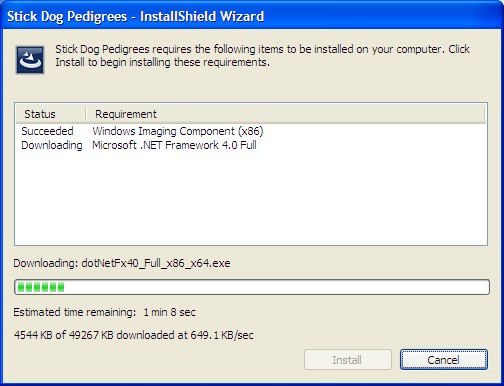
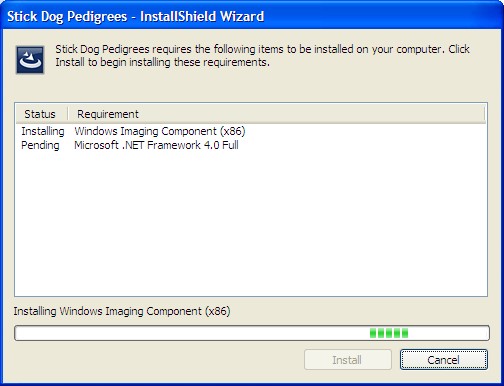
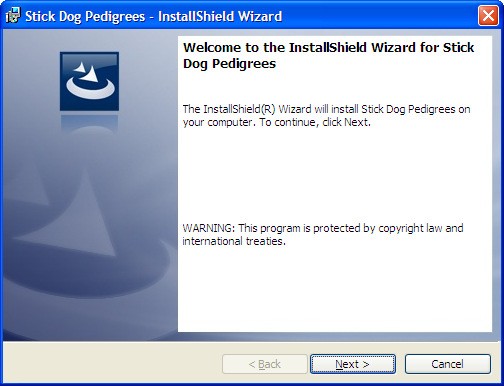
- When the setup program starts it normally displays the Welcome screen shown below on the left. If this is the case, proceed directly to step 9. If the prerequisite Microsoft .NET Framework software is not installed on the computer, the setup program will display the Requirements Installation screen shown below on the right. Click Install to begin installation of the required prerequisite software. Stick Dog Pedigrees is depends on the Microsoft .NET Framework version 4 and cannot run without it.


- If the Microsoft .NET Framework software is not included in the installation media, Setup will download it automatically prior to installation.
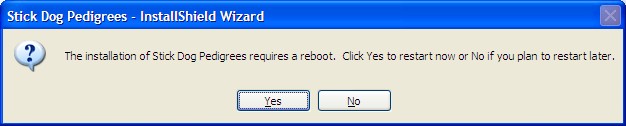
- After the Framework installation completes, the Wizard will request a system reboot. Click Yes to reboot the system.
- Log in to Windows with the same user account used in step 2. The Welcome screen will automatically appear upon logging in. If it does not appear automatically, manually restart the setup program as described in step 3 in order to resume the process.
- At the Welcome screen click Next.
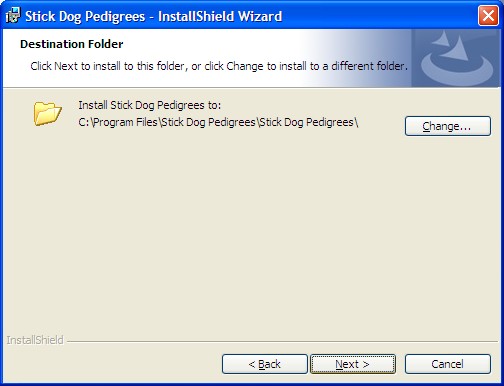
- At the "Destination Folder" screen click Next to accept the default installation folder (recommended) or click Change... to specify a different folder (advanced users only).
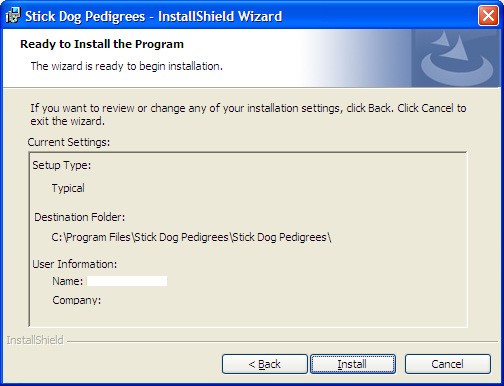
- At the "Ready to Install the Program" screen, click Install.
- If the "User Account Dialog" appears (Windows Vista/7/8/10 only), click Yes to authorize the install.
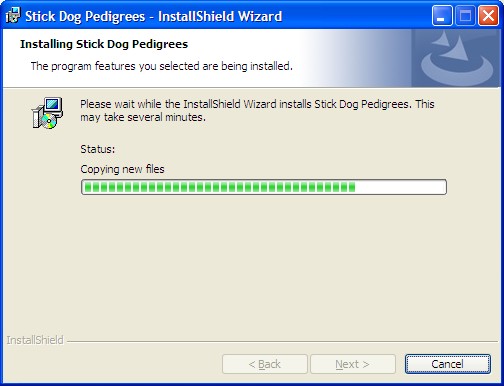
- Wait for the Wizard to complete installation of Stick Dog Pedigrees.
- Upon successful installation the Completed screen appears. Click Finish to close the Wizard.
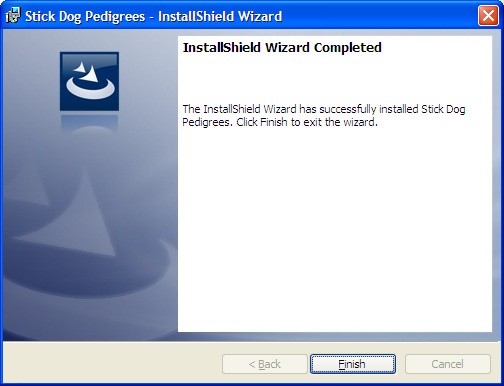
Application installation is now complete.
30 Day Free Trial Peroid
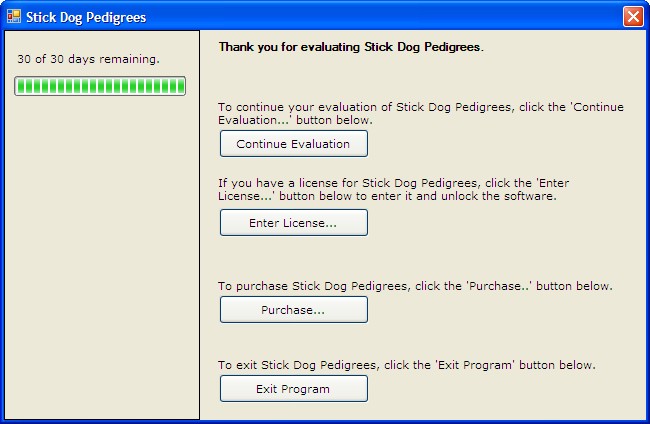
After initial installation, the application will run in evaluation mode. Evaluation mode imposes the following restrictions:
- Application use is limited to a 30-day trial period after which a valid license code must be entered to continue using the application.
- Print functionality is disabled.
Each time the application is launched, the Evaluation dialog is displayed indicating the number of days left in the trial period. The trial period begins when the application is started for the first time after initial installation. To use the application in evaluation mode click Continue Evaluation. Note that this option will be disabled after 30 days and that reinstalling the software will not reset the trial period.
To remove the aforementioned restrictions, the software must be activated using a valid license code. After activation, the Evaluation dialog will no longer appear each time the application is started. For instructions on how to activate the software, see section "How to Activate the Software" below for more information.
How to Activate the Software
- Purchase a valid license code. License codes have the form XXXX-XXXX-XXXX-XXXX-XXXX-XXXX- XXXX-XXXX where X may be any numerical digit 0-9 or alphabetical character A-Z. A license may be purchased in our store.
- Make sure the computer is connected to the Internet. The software will use the connection to contact a license service to validate the license code and register the activation.
- Start the application. When the Evaluation dialog appears, click Enter License ...
- Type or paste the license code obtained in step 1 into the text box. Click Apply License. The application will connect via the Internet to validate the activation. The process should take no more than 30 seconds depending on the speed of the Internet connection.
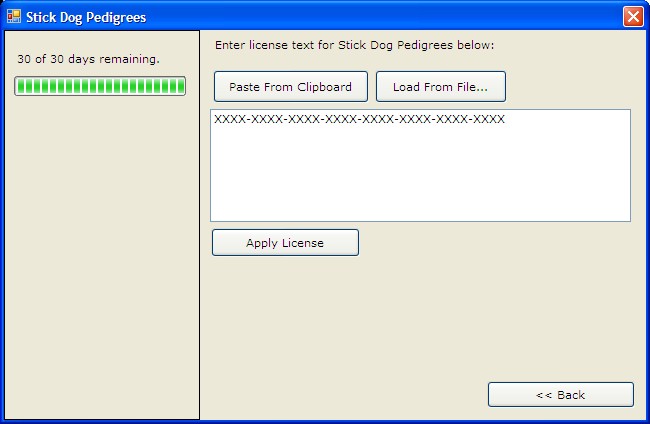
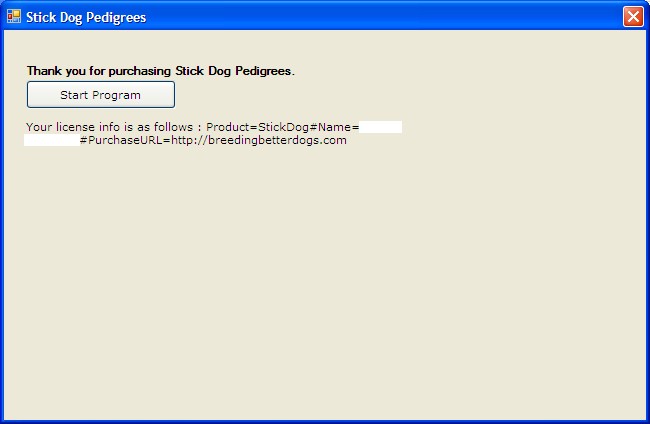
- Upon successful activation, the dialog will display information associated with the license code including the name of the person who purchased the license. Click Start Program to start the Stick Dog Pedigrees application.
Application Overview
Documents and Forms
Like Microsoft Word and Excel, Stick Dog Pedigrees (hereafter referred to as "the application") is a document oriented application. The application supports four different types of documents described in the table below. Of these, only Dog Directory is used on a regular basis. Breed Template and Domain Data documents store configuration data that does not change often.
| Document Type | File Extension | Description |
|---|---|---|
| Dog Directory | ddml | This is the primary document type supported by the application. The Dog Directory document type stores a set of dog records for a single breed. Information contained in this file may be used to view the pedigree for any dog. Most users typically only require a single Dog Directory document per breed. This document type is also used to exchange pedigrees via the import/export function. |
| Standalone Pedigree (Deprecated) | pdml | Standalone Pedigree document type stores a set of dog records pertaining to a single pedigree. When opening files of this type, information is displayed using the Dog Directory form (see below for more information about forms) instead of the Standalone Pedigree form available in earlier releases. Internally, the application converts Standalone Pedigree documents into Dog Directory documents before displaying them. This change has come about because the functionality of the Standalone Pedigree form is now incorporated into the Dog Directory form. The application no longer supports creation of Standalone Pedigree type files. When saving an open document of this type, the application creates a new Dog Directory type document instead. |
| Breed Template | btml | Breed Template document type stores trait definitions and color coding profiles for use with the Symbols chart. Breed Templates are generally specific to a certain breed. Every Dog Directory document is configured based on a Breed Template selected at the time of creation. The application ships with a DEFAULT breed-template containing definitions for health related traits common to most breeds. |
| Domain Data | doml | Domain Data document type stores lists of breeds, titles, owners, and breeders. The application uses this information to enhance data entry by providing a standard set of options for the user to choose from when entering field values. It also stores the color settings used by the Stick Dog chart to represent the seven traits of breed standard conformation. Each Windows account is limited to a single Domain Data file that is automatically created the first time the application is started. |
The File | Open function may be used to open any type of document supported by the application. Open documents are displayed in separate forms, each represented by a tab in the main application window (see Figure 7). The document type is displayed in the tab.

Figure 7: Form tabs
Switching to an open document is achieved by clicking the corresponding form tab. Forms permit viewing and editing of documents. There are different types of forms supporting the various document types. Each has functionality and layout optimized for its supported document type.
The following screenshot shows the application with four documents open at the same time - two Dog Directory documents, one Domain Data document, and one Breed Template document. In the example given, the currently selected document is a dog directory named "Sample Directory.ddml". The file name of the selected document is displayed in the status bar at the bottom of the application window.
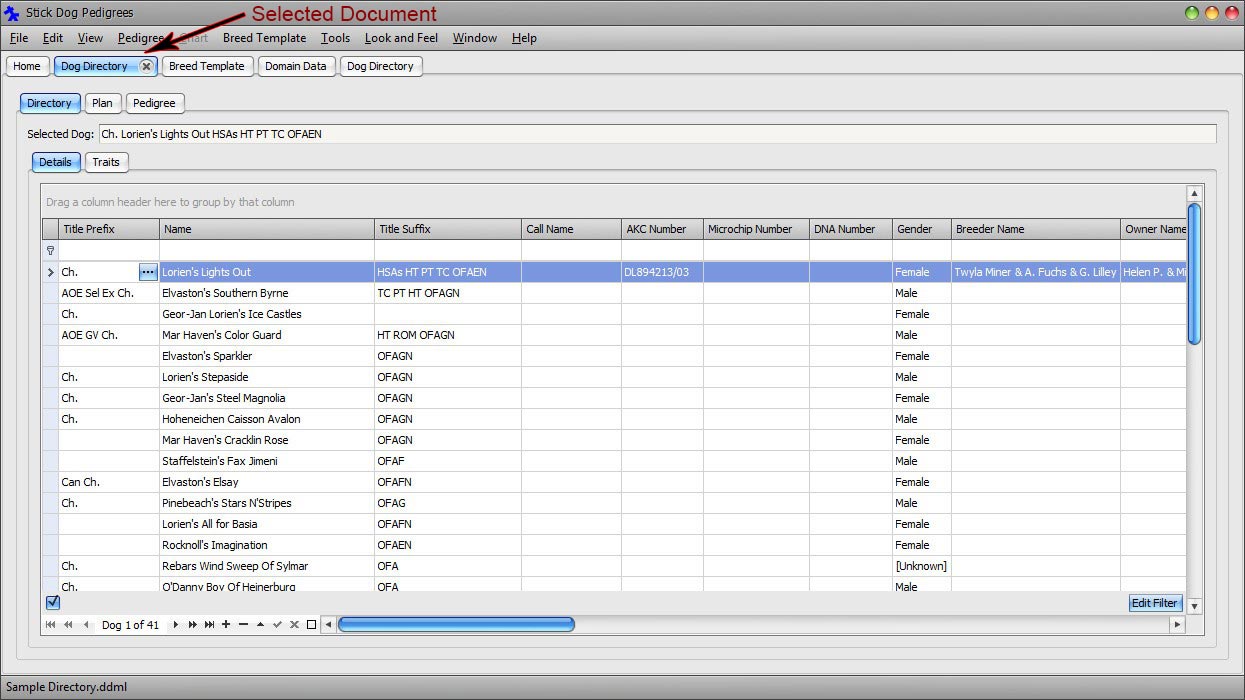
Figure 8: Selected document
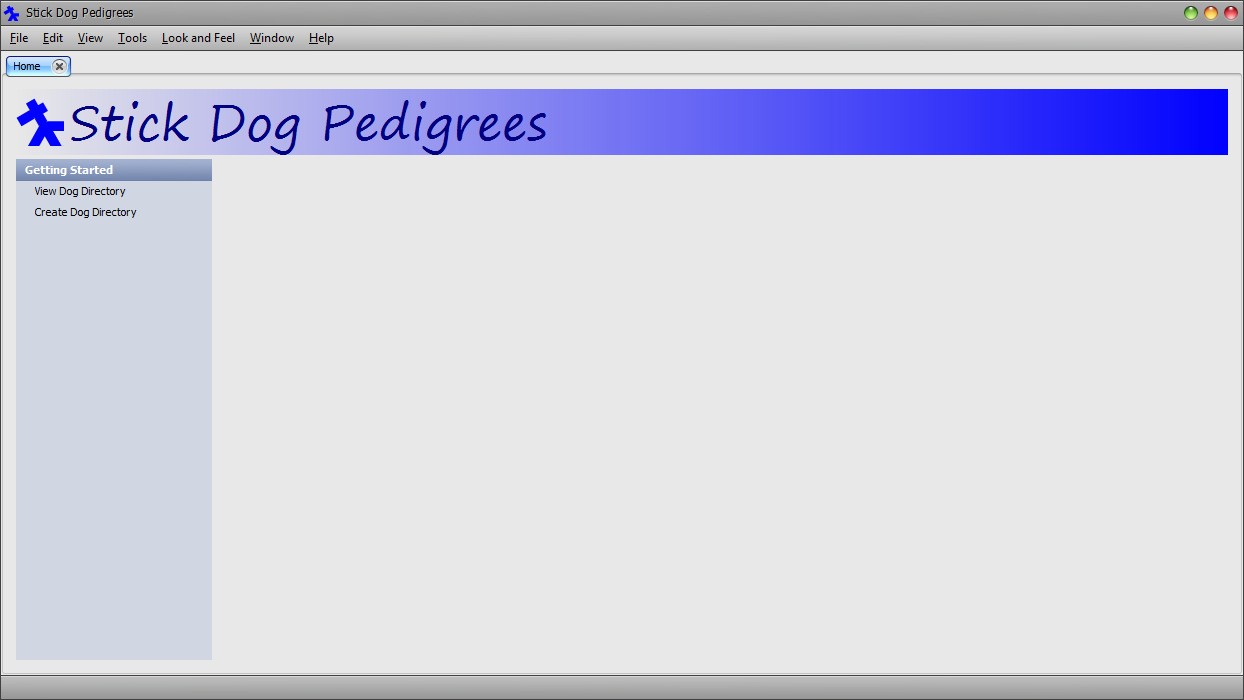
Not all tabs correspond to documents. The Home tab provides access to the Home screen. It is opened automatically when the application starts. It provides shortcuts to common functions. There can never be more than one Home screen open at the same time.
The following figures show the appearance of each form type.
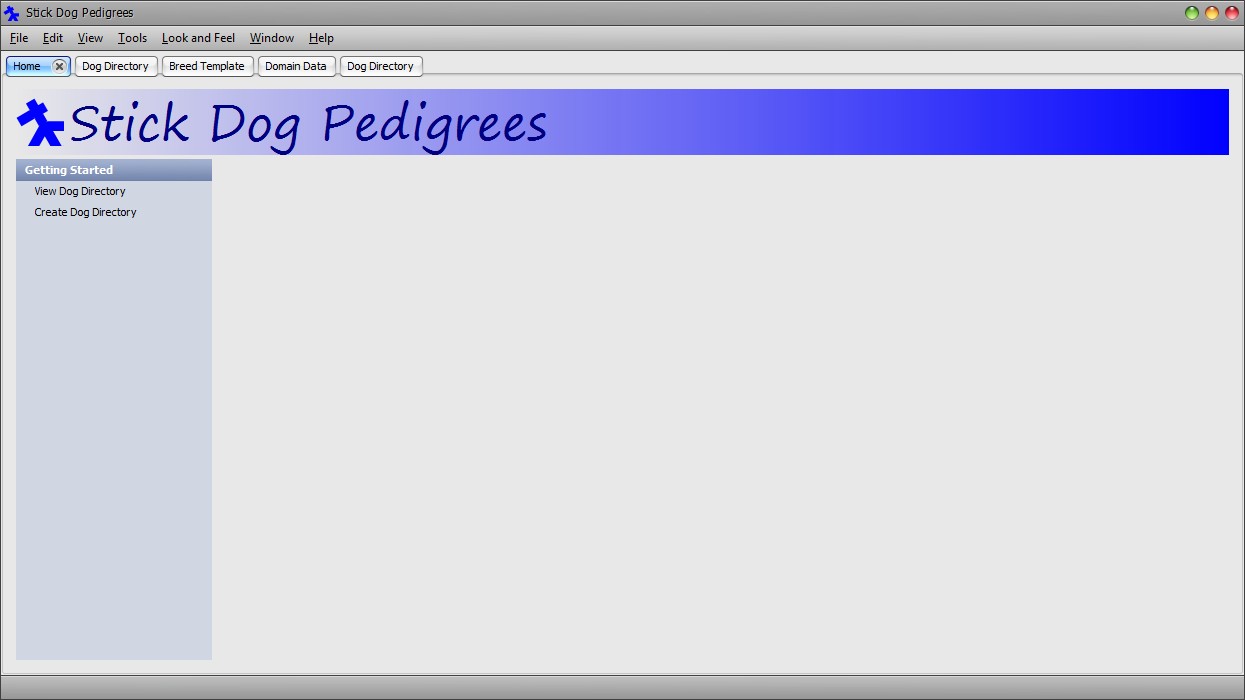
Figure 9: Home form
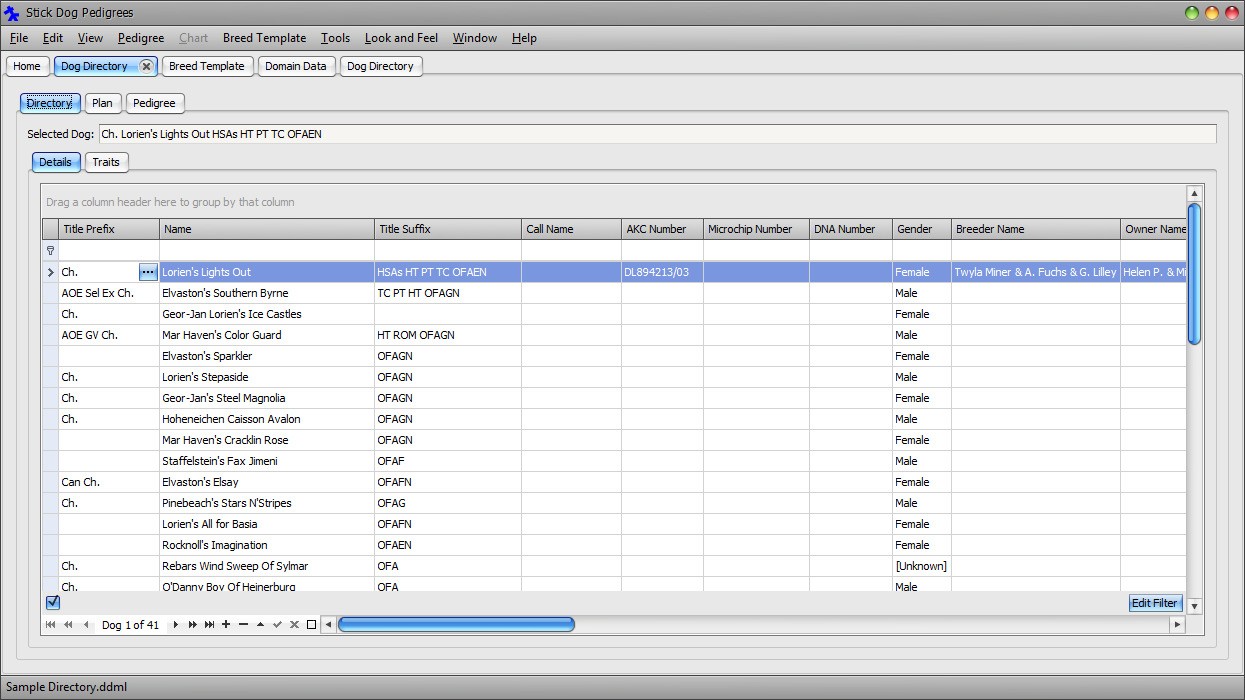
Figure 10: Dog Directory form - Dog Details List panel
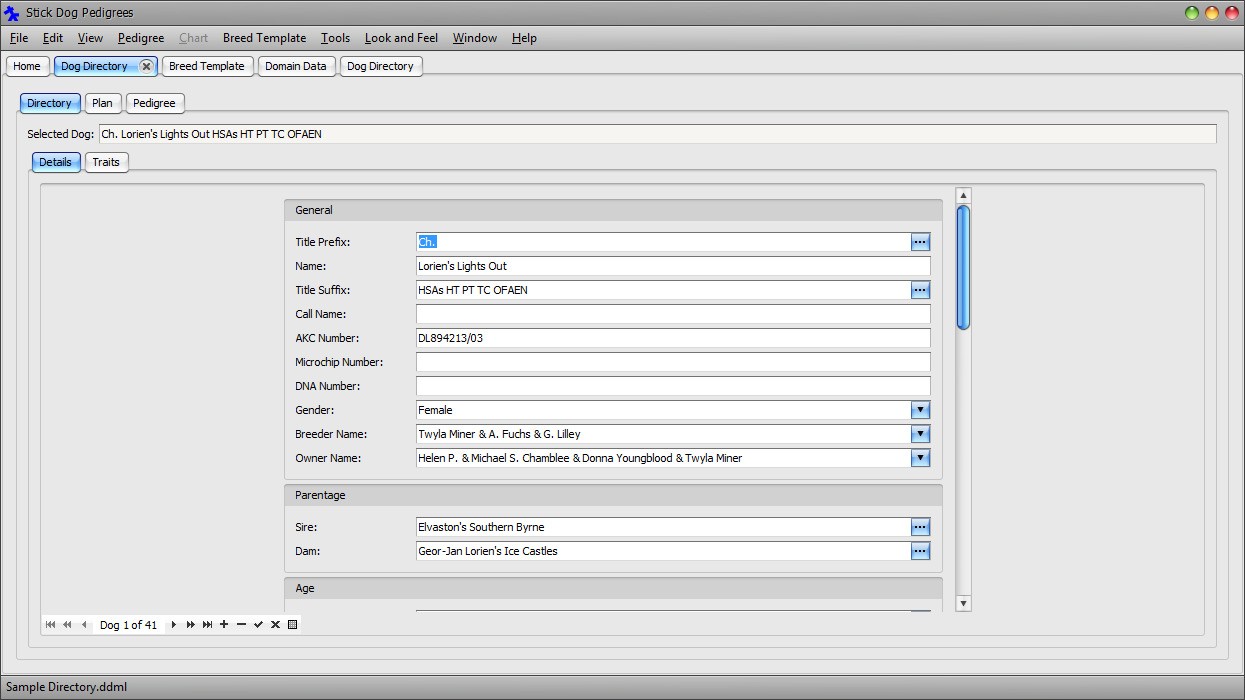
Figure 11: Dog Directory form - Dog Details Form panel
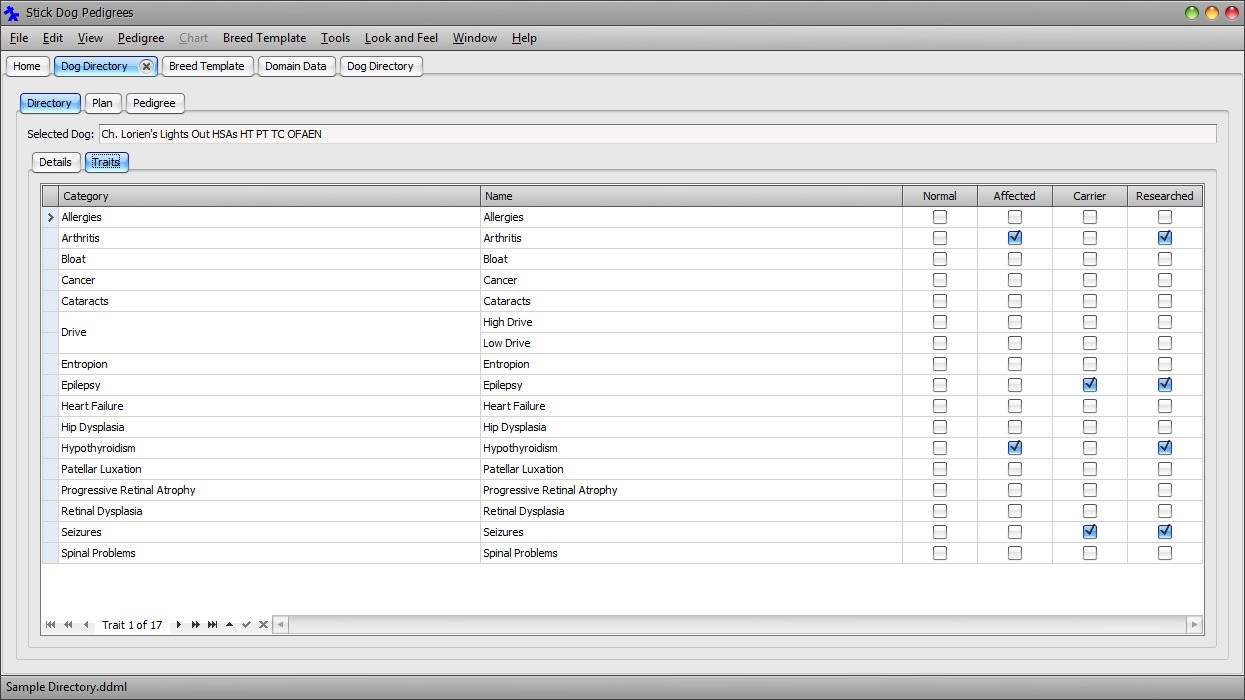
Figure 12: Dog Directory form - Dog Traits panel
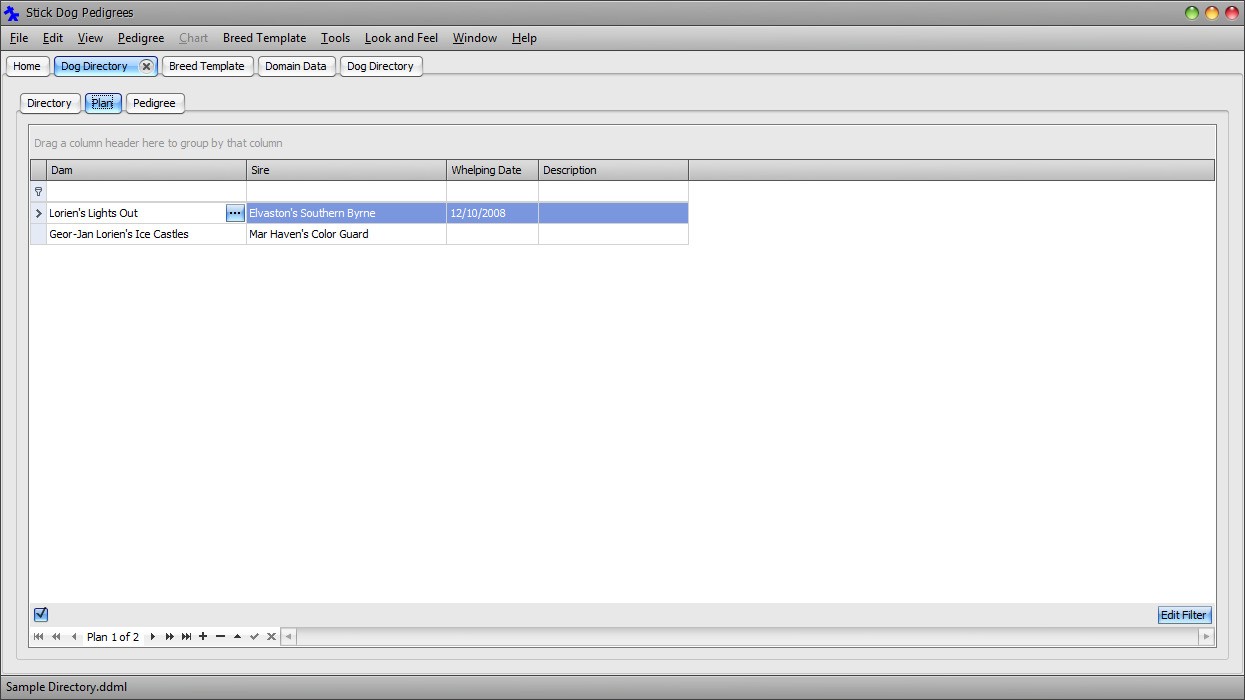
Figure 13: Dog Directory form - Plan List panel
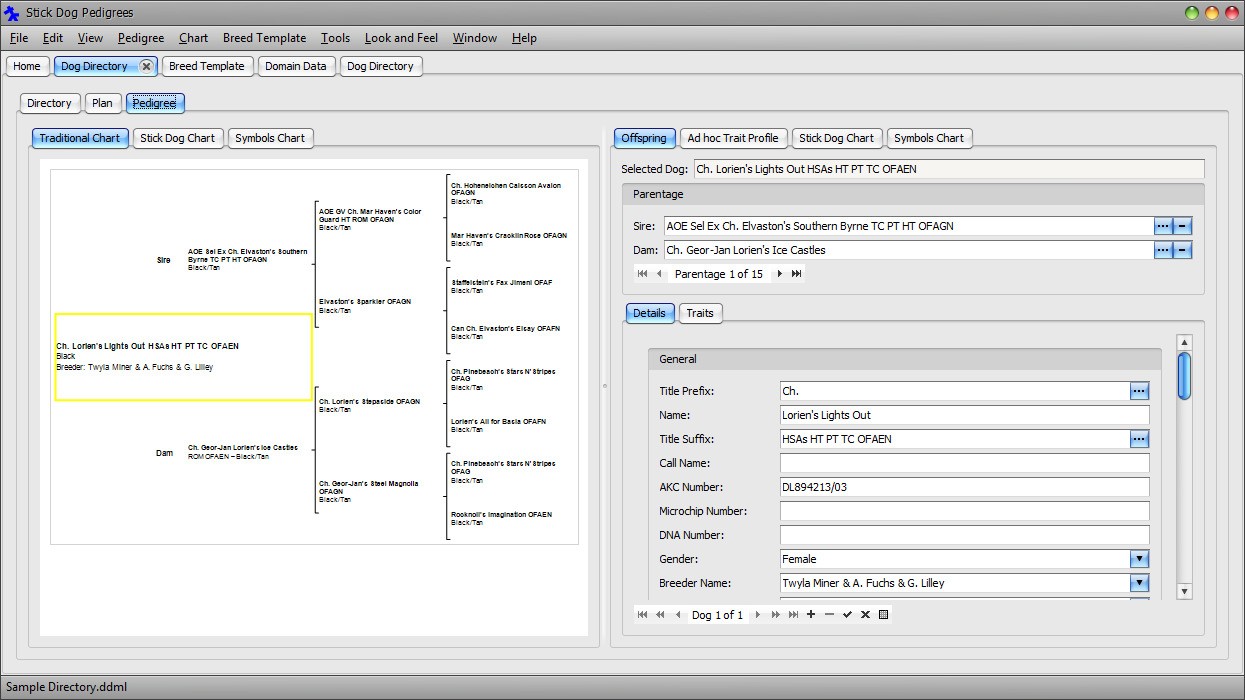
Figure 14: Dog Directory form - Traditional Chart and Offspring panels
Figure 15: Dog Directory form - Stick Dog Color Chart and Predicted Offspring panels
Figure 16: Dog Directory form - Symbols Chart and Stick Dog Chart panels
Figure 17: Breed Template form - Traits panel
Figure 18: Breed Template form - Trait Profiles panel
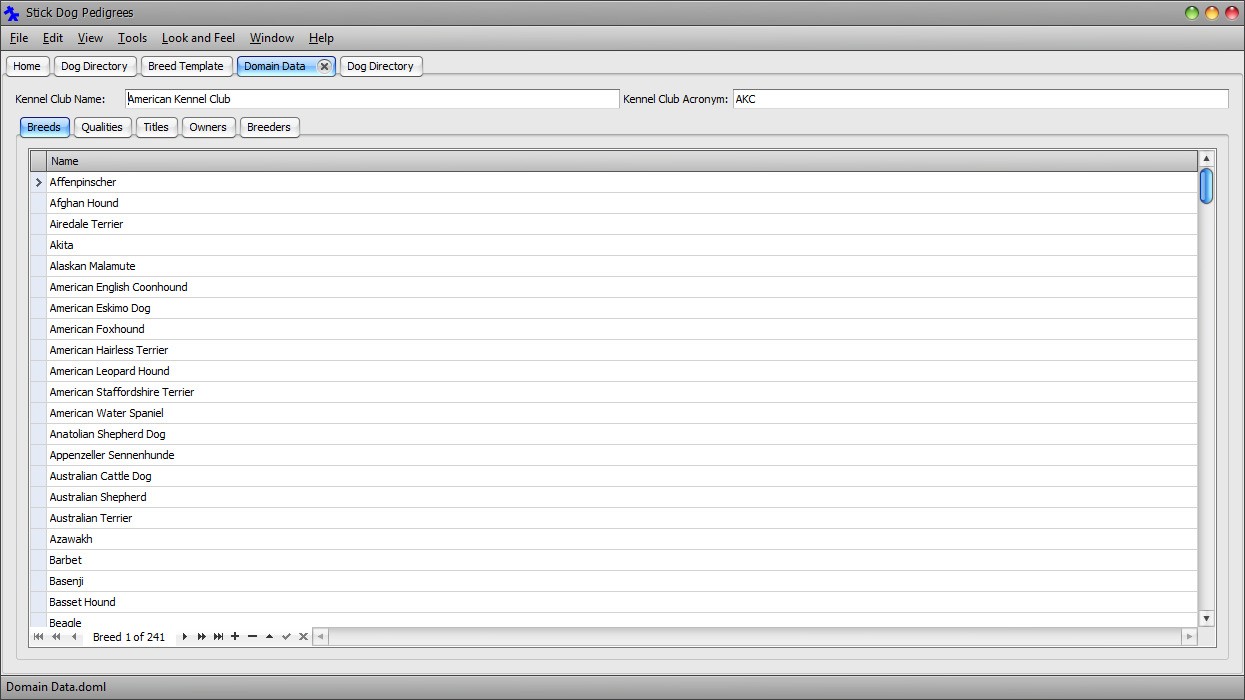
Figure 19: Domain Data form - Breeds panel
Stick Dog Document Library
The Stick Dog Document Library (or library for short) is the file system folder where the application stores document files by default. The default library location is a folder named "Stick Dog Pedigrees" located in the Windows Documents library ("My Documents" in Windows XP).
A different folder may be designated as the Stick Dog Document Library by setting the Library Path option in the Options dialog. A blank setting specifies the default library location previously described. To open the Options dialog click Main Menu → Tools → Options... .
Note: The Windows Documents library may be accessed from the Windows Start menu. In Windows 7 & Vista click Start → Documents. In Windows XP, click Start → My Documents. The Stick Dog Document Library is located in a folder named "Stick Dog Pedigrees" within the Windows Document library. In Windows 8, access it using File Explorer in Desktop mode.
Upgrading Stickdog Pedigree's
If Stick Dog Pedigrees is already installed on your computer, you must first uninstall it using Windows Control Panel.
Note: Uninstalling Stick Dog Pedigrees will also delete the file "Sample Directory.ddml" located in "My Document\Stick Dog Pedigrees" folder. Other files located in this folder will not be deleted.
Windows XP
- Click Start and then click Control Panel.
- Double-click on Add or Remove Programs.
- In the "Currently installed programs" box, click Stick Dog Pedigrees.
- Click Remove.
- Click Yes to uninstall Stick Dog Pedigrees when prompted.
- Install the new version of Stick Dog Pedigrees. Refer to section "How to Install Stick Dog Pedigrees" for further instructions.
Windows Vista/Windows 7/Windows 8
- Click Start and then click Control Panel.
- Locate the Programs icon and click Uninstall a program. If there is no Programs icon, click Programs and Features instead.
- Click Stick Dog Pedigrees item in the list.
- Click Uninstall.
- Click Yes to uninstall Stick Dog Pedigrees when prompted.
- If the "User Account Dialog" appears, click Yes to proceed.
- Install the new version of Stick Dog Pedigrees. Refer to section "How to Install Stick Dog Pedigrees" for further instructions.
Windows 10
- Right Click on the Start icon and then click Programs and Features.
- Click Stick Dog Pedigrees item in the list.
- Click Uninstall.
- Click Yes to uninstall Stick Dog Pedigrees when prompted.
- If the "User Account Dialog" appears, click Yes to proceed.
- Install the new version of Stick Dog Pedigrees. Refer to section "How to Install Stick Dog Pedigrees" for further instructions.
Hands-On Tutorial
This hands-on tutorial is designed to get you up and running as quickly as possible with the application. It covers all the main functional areas and provides tips on how to get the most out the software. By following this tutorial, you will gain sufficient understanding of the software to be able to manage your own pedigrees.
In the following text, each red square identifies a task to carry out. Blue squares identify notes providing additional information and tips about the application. It is recommended that you complete the tutorial using the application in order to be able to make the most of the software in the least amount of time.
Part 1: The Dog Directory Form
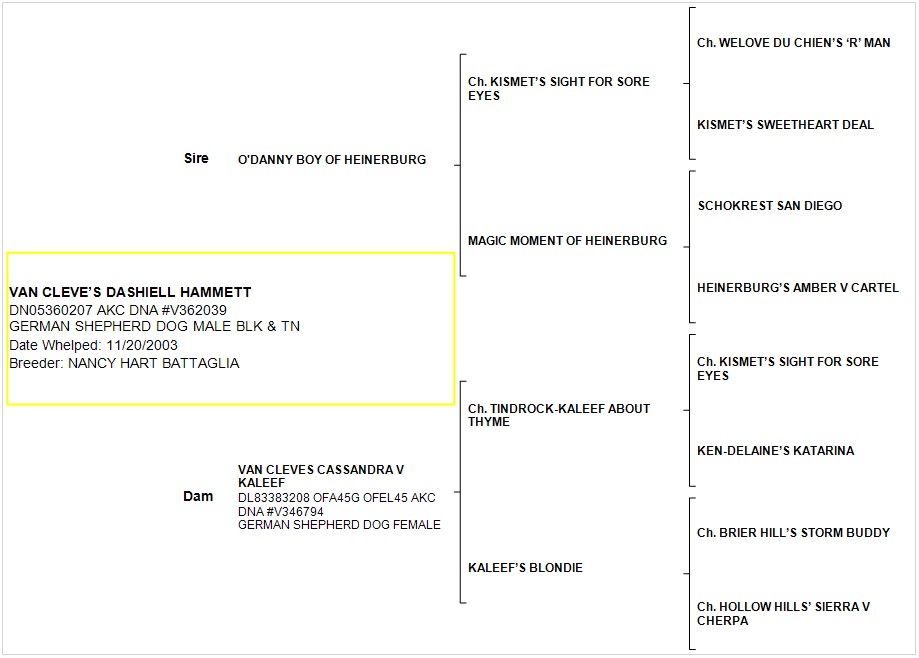
In this tutorial, you will enter two pedigrees into the application starting with the one shown in the figure below.

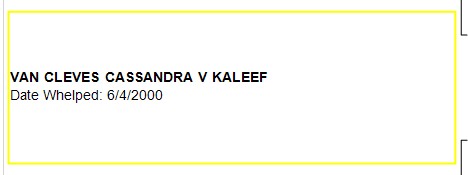
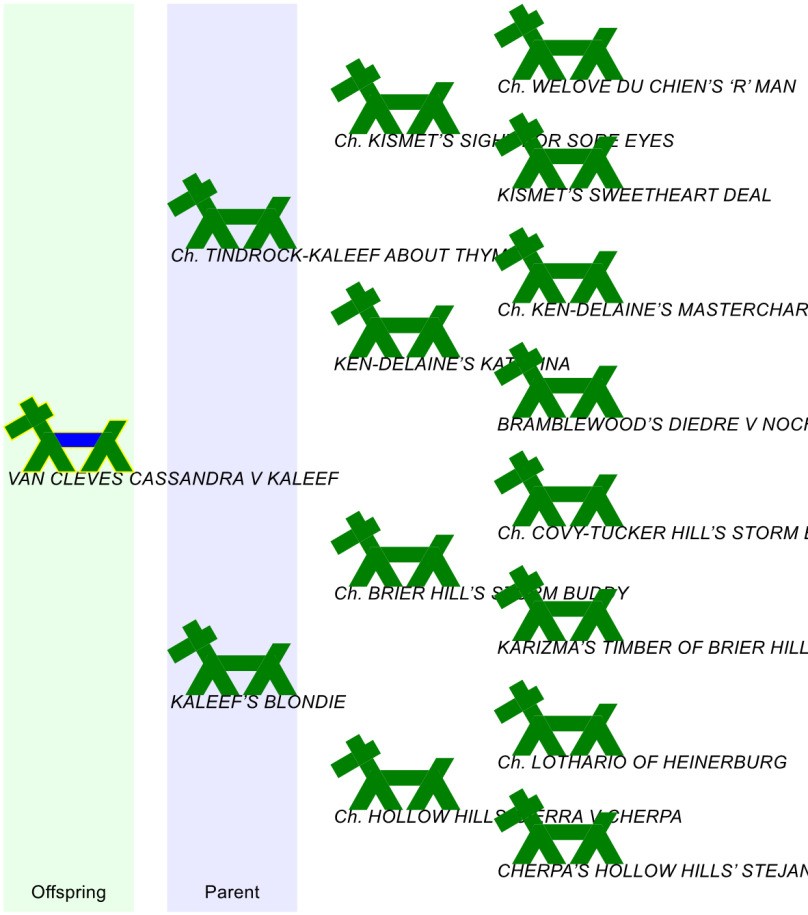
Figure 20: Pedigree for VAN CLEVES CASSANDRA V KALEEF
Start the Stick Dog Pedigrees application. For guidance on how to start the application, refer to section "How to Start the Application". If the Evaluation dialog appears, click "Continue Evaluation".
Upon startup, the application displays the Home screen.
We will begin by creating a new dog directory document for use with this tutorial.
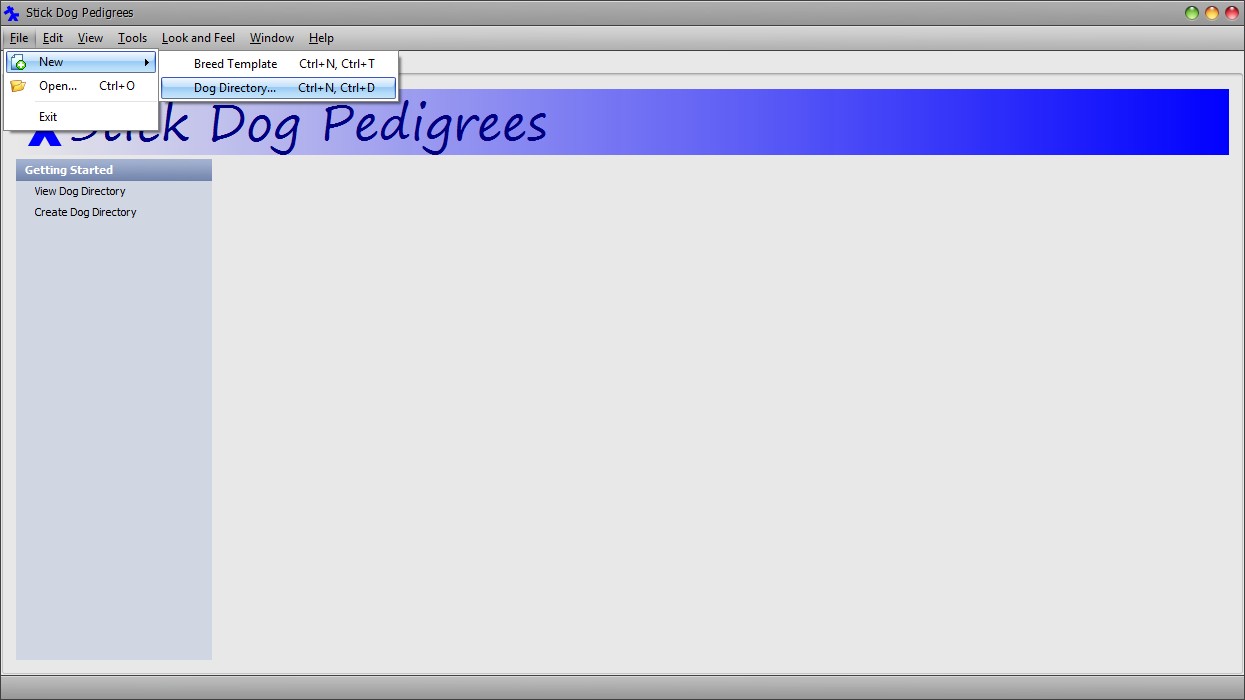
Click Main Menu → File → New → Dog Directory.
The Breed Template Selector dialog appears.
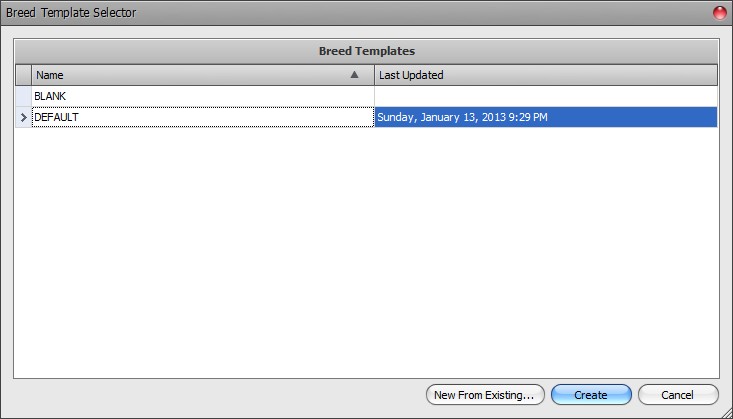
Click the row named "DEFAULT" to select the "DEFAULT" breed template.
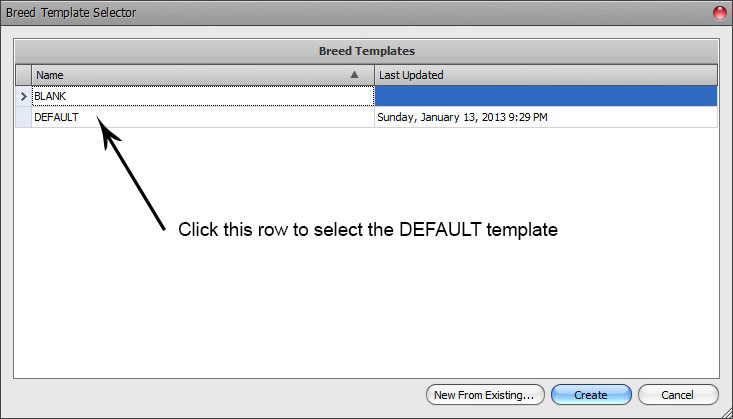
Click the Create button to create a new dog directory document based on the DEFAULT breed template.
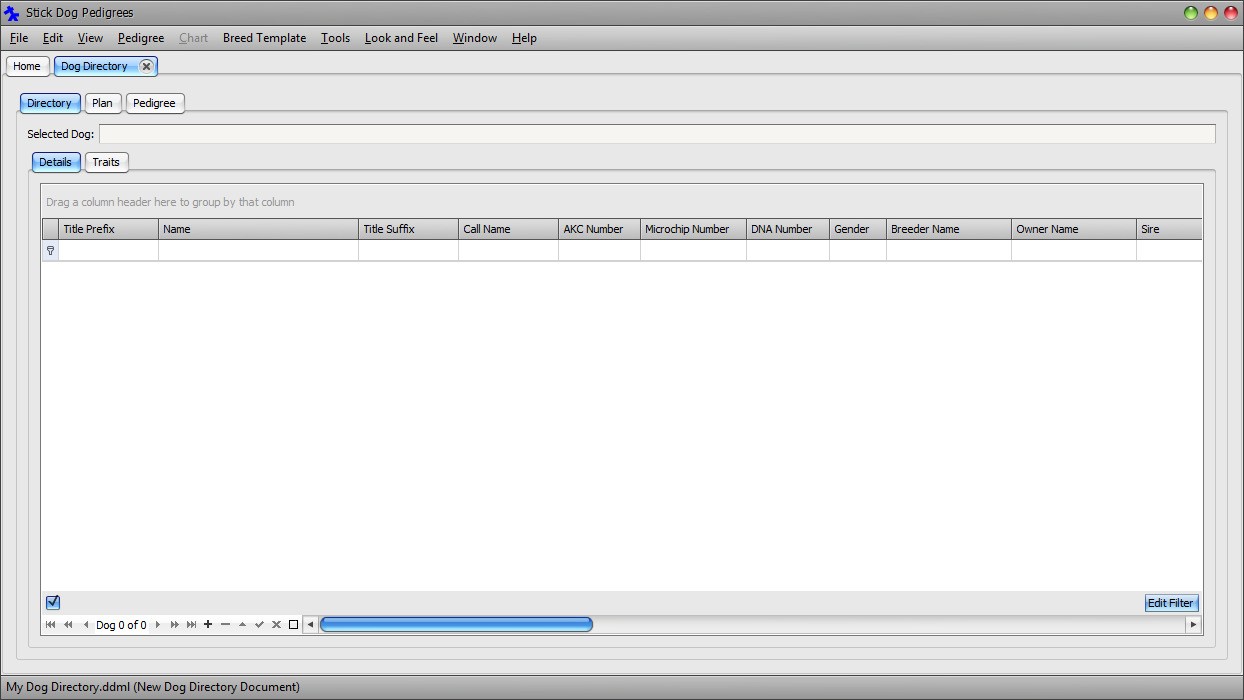
Figure 21: Empty dog directory document
Note:
- Always select the DEFAULT breed template when creating new directories unless you have another breed template in your library that is specific to the breed for which you are creating a directory. The DEFAULT breed template is the only template installed with the application. It contains health traits that are common to most breeds.
- The dog directory file will not be created until it is saved for the first time.
- To get the most out of the software it is important to establish a dog database. The best way to achieve this is to maintain a set of dog directory documents in your library, one per breed. When you start entering your own pedigrees into the application, follow the above procedure to create your own dog directory documents. If you handle only one breed, you can store all your pedigrees in a single dog directory document.
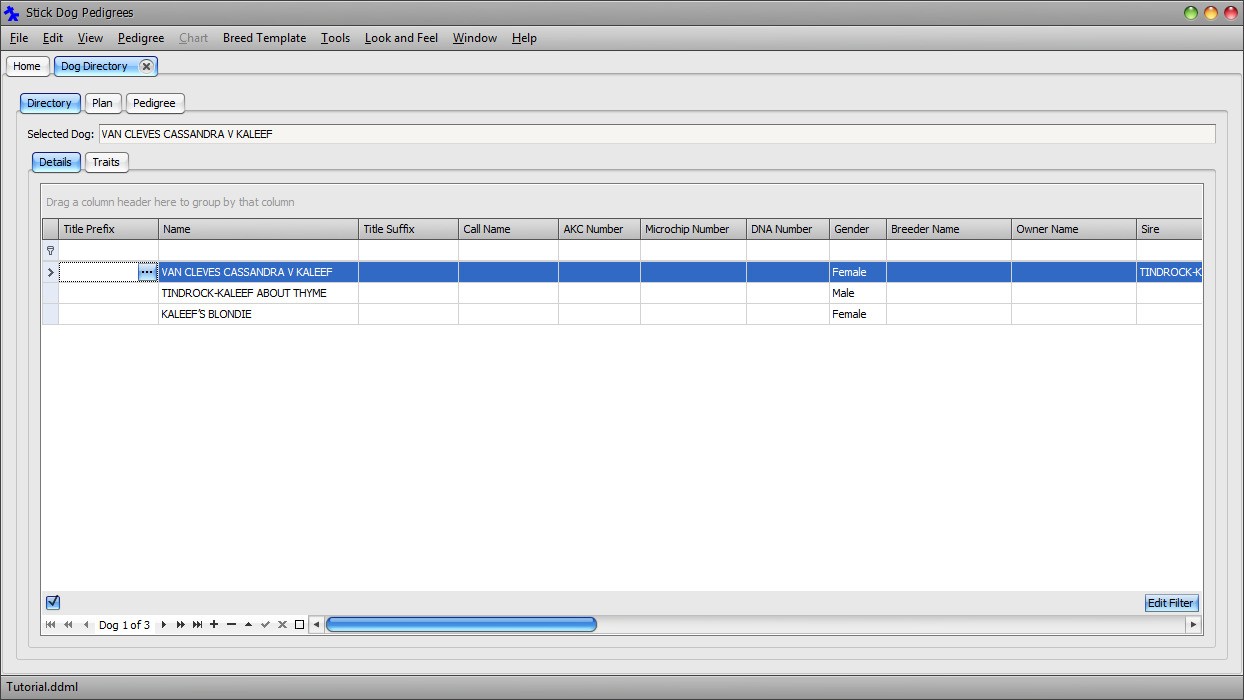
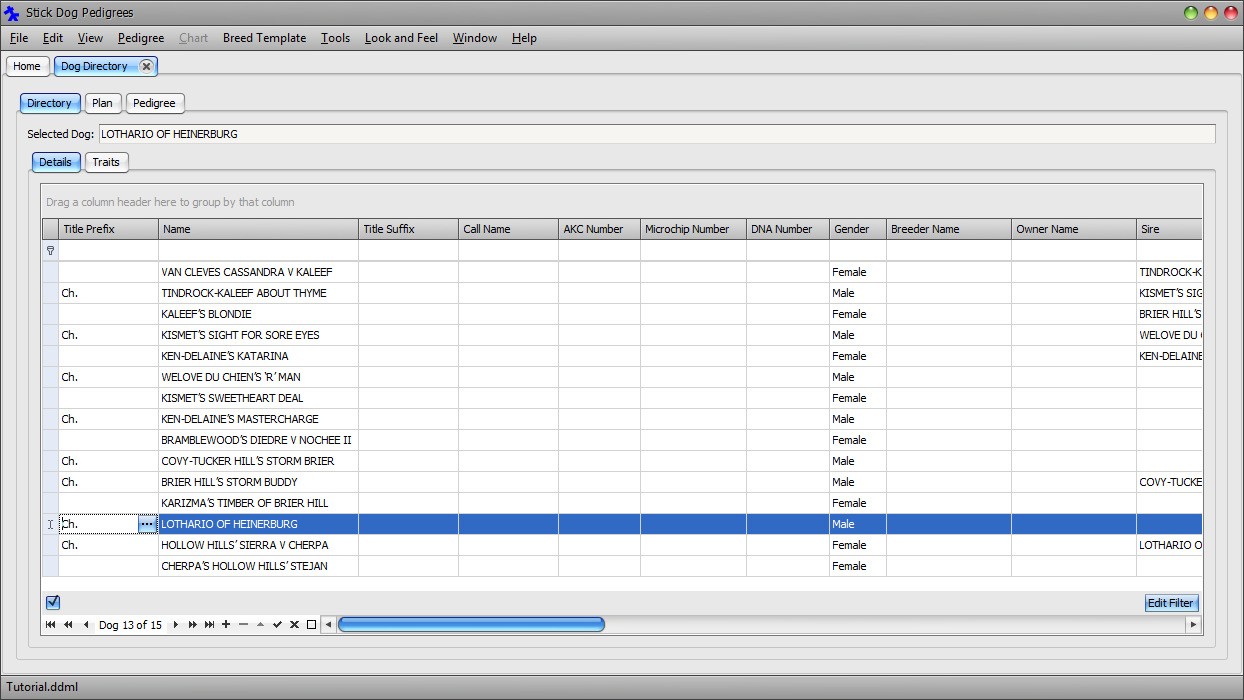
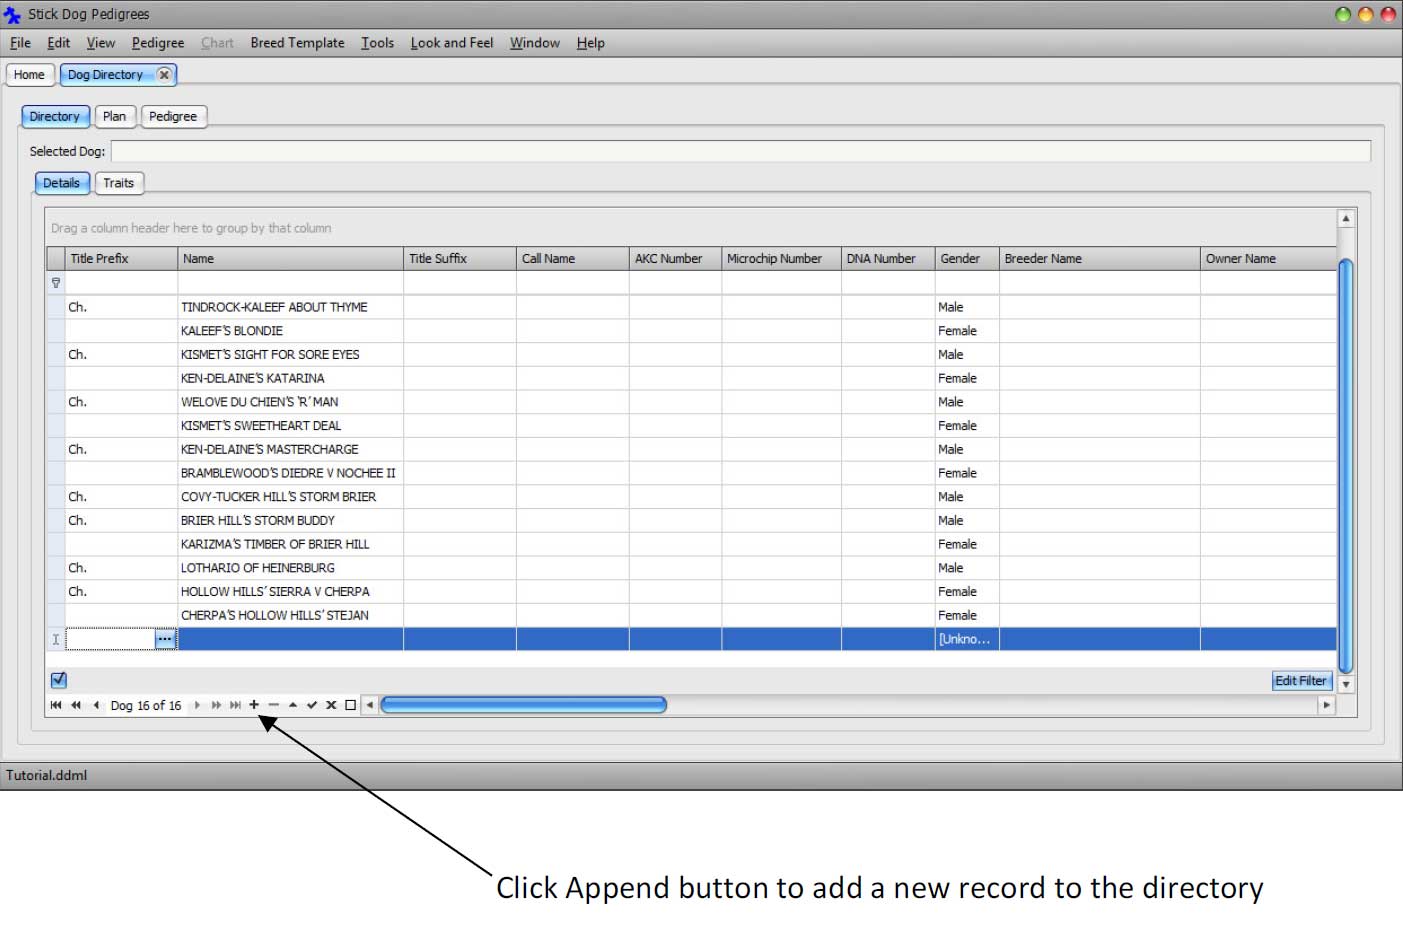
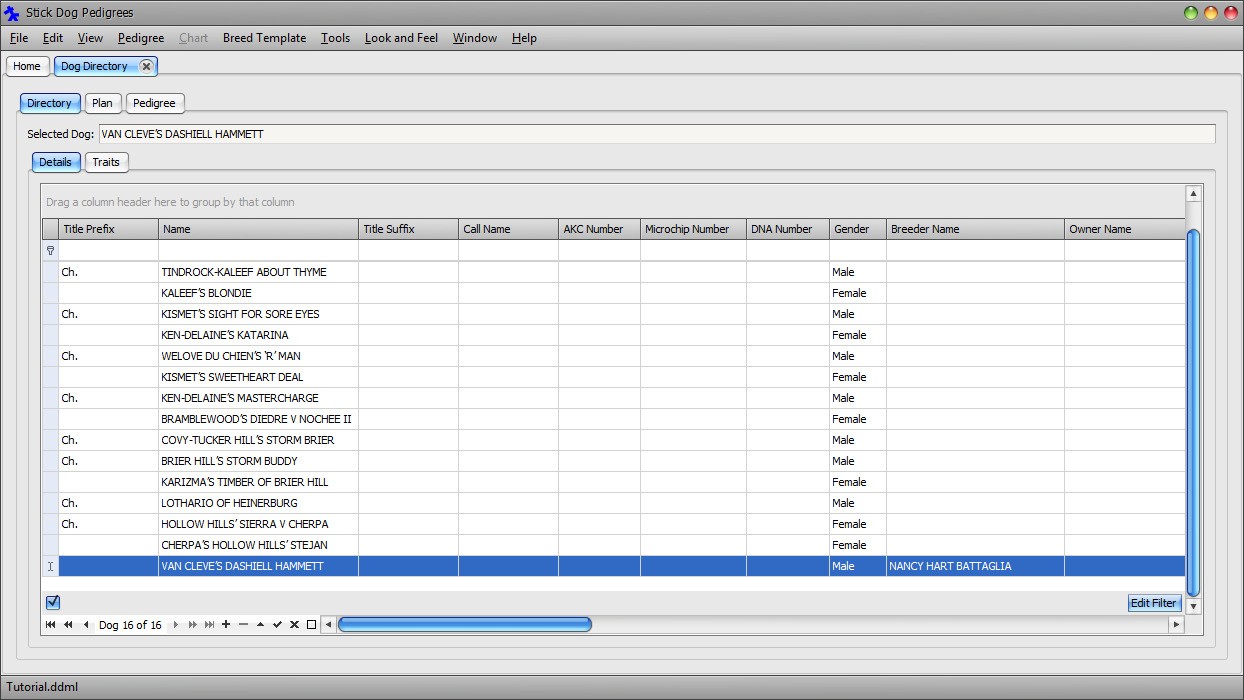
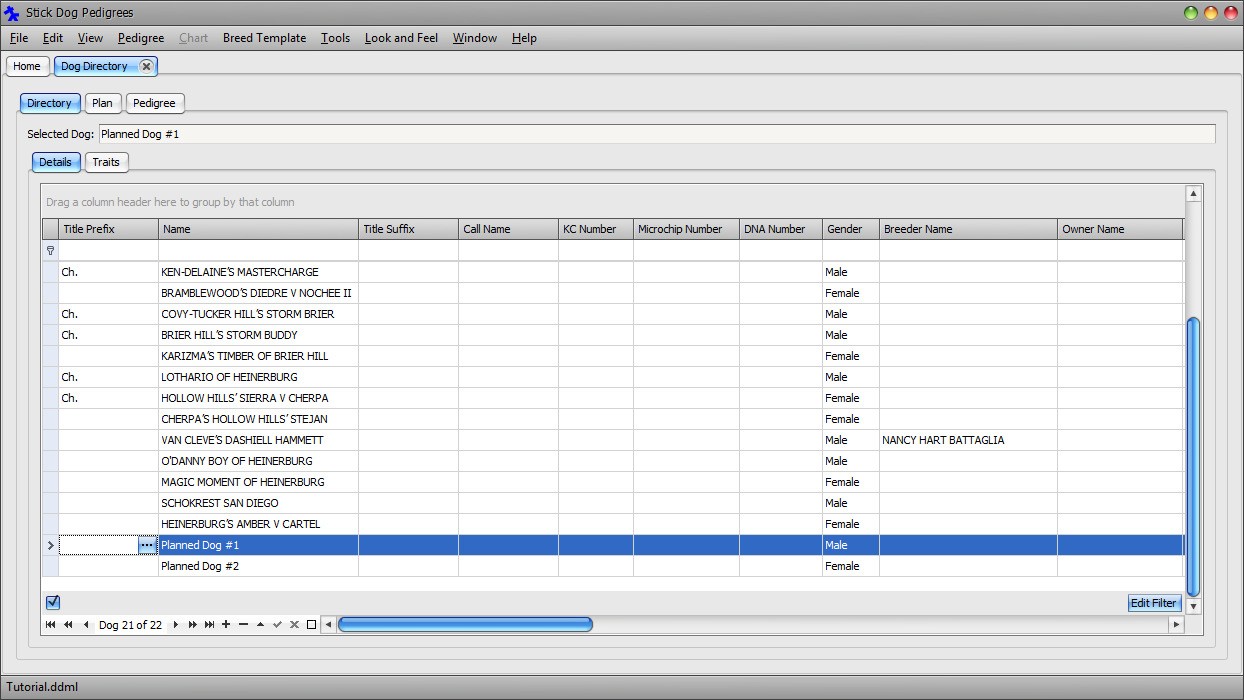
By default, the directory is displayed in grid view. Each row of the grid corresponds to a single dog record with the exception of the first row. The first row is the filter row and it is used for searching for records meeting specified criteria. Ignore the filter row for now. See Figure 10 for an example of what the directory form looks like when populated with many dog records.
Next, we will begin adding new records to the document for each member of the VAN CLEVES CASSANDRA V KALEEF pedigree shown in Figure 20. New records are added using the Dog Data Navigator located under the grid on the left hand side. See Figure 22.

Figure 22: The Data Navigator
The Data Navigator is comprised of twelve buttons providing record navigation and editing functionality.
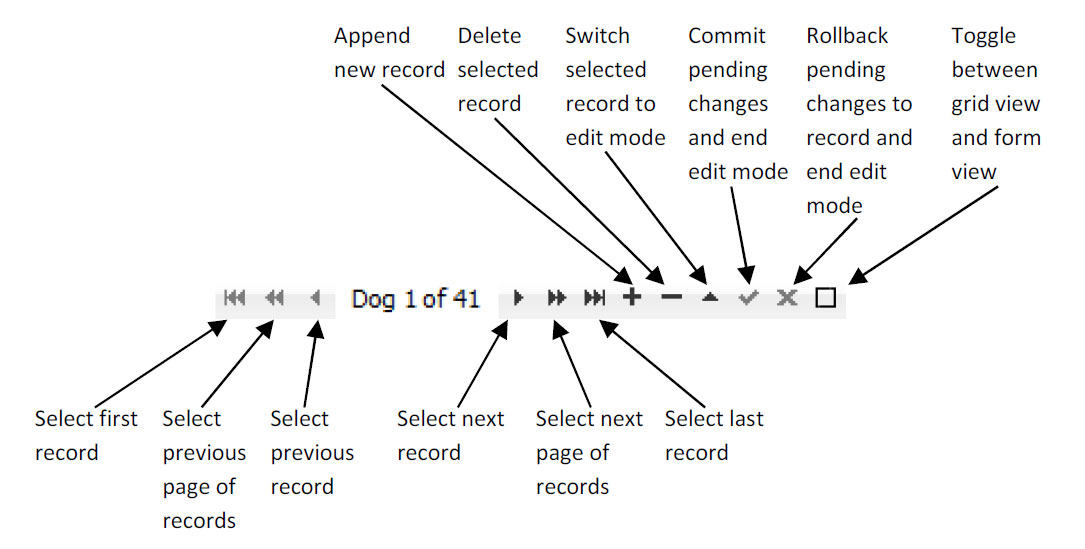
Figure 23: Data Navigator functions
Click the Append button (it looks like a plus sign) to add a new dog record to the directory.
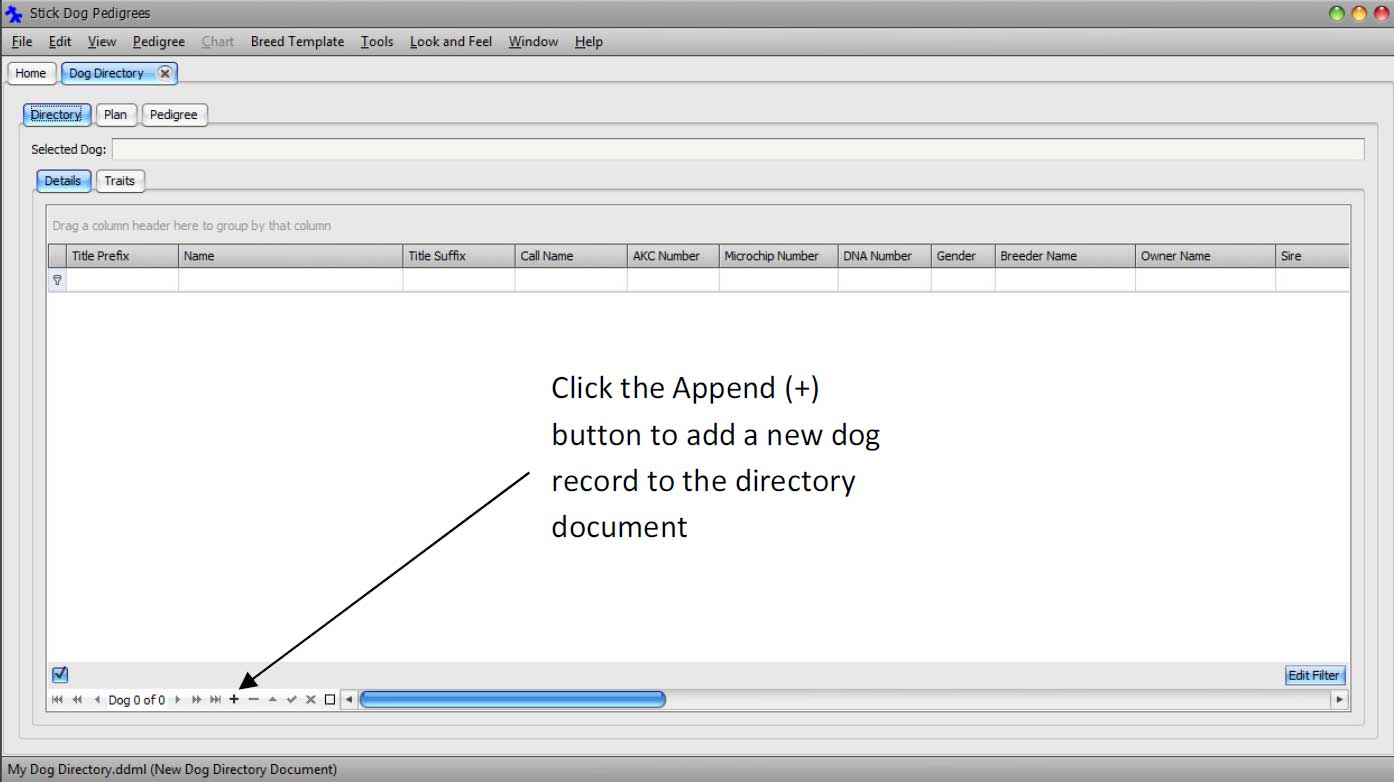
Upon clicking the Append button, a new blank dog record is added to the directory.
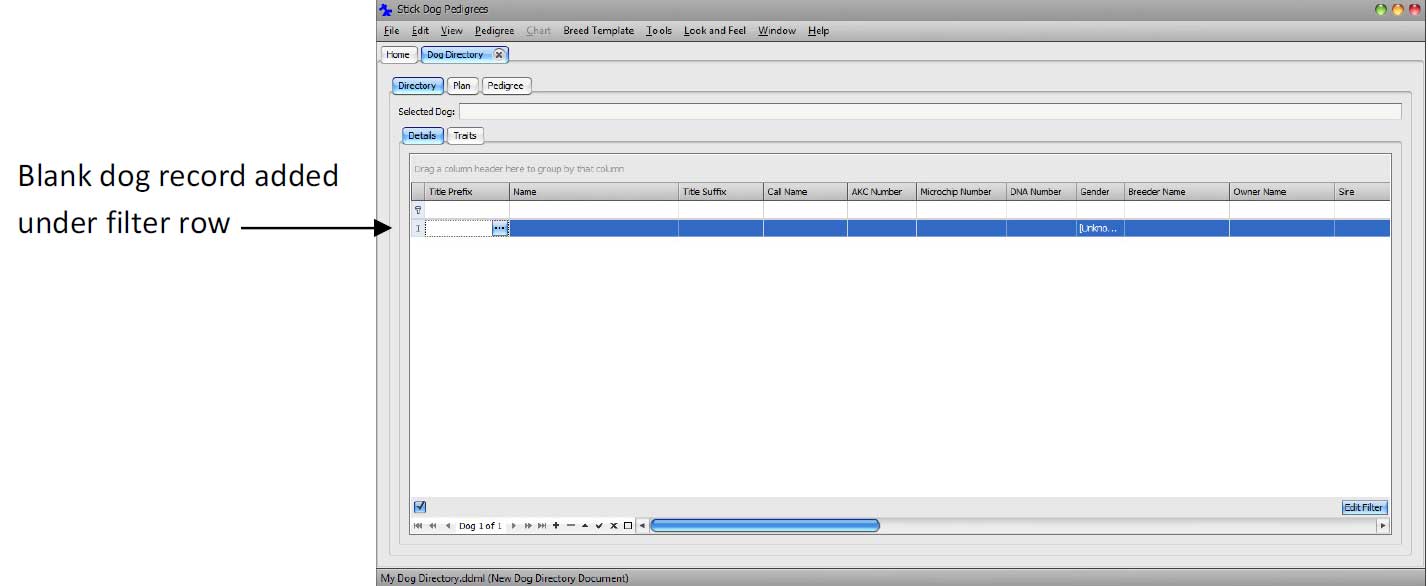
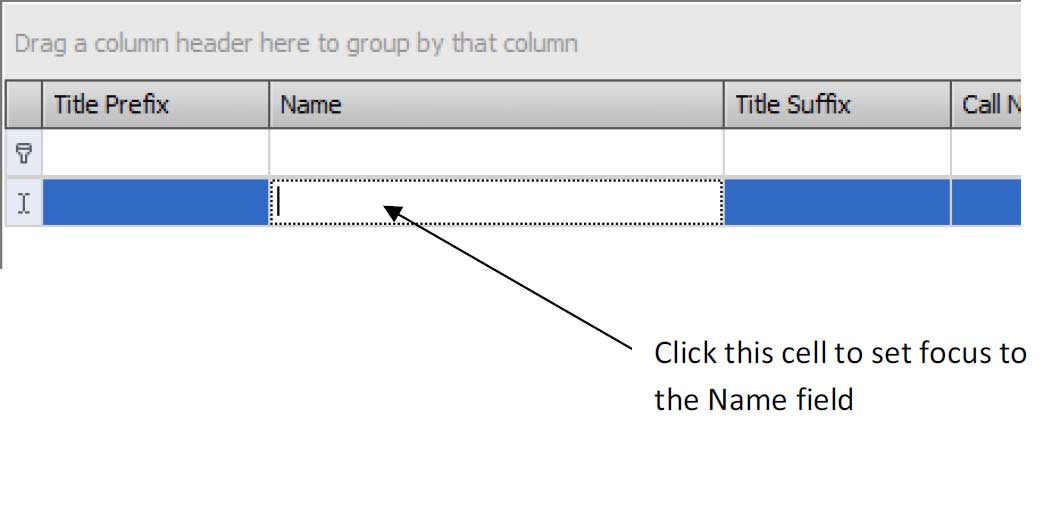
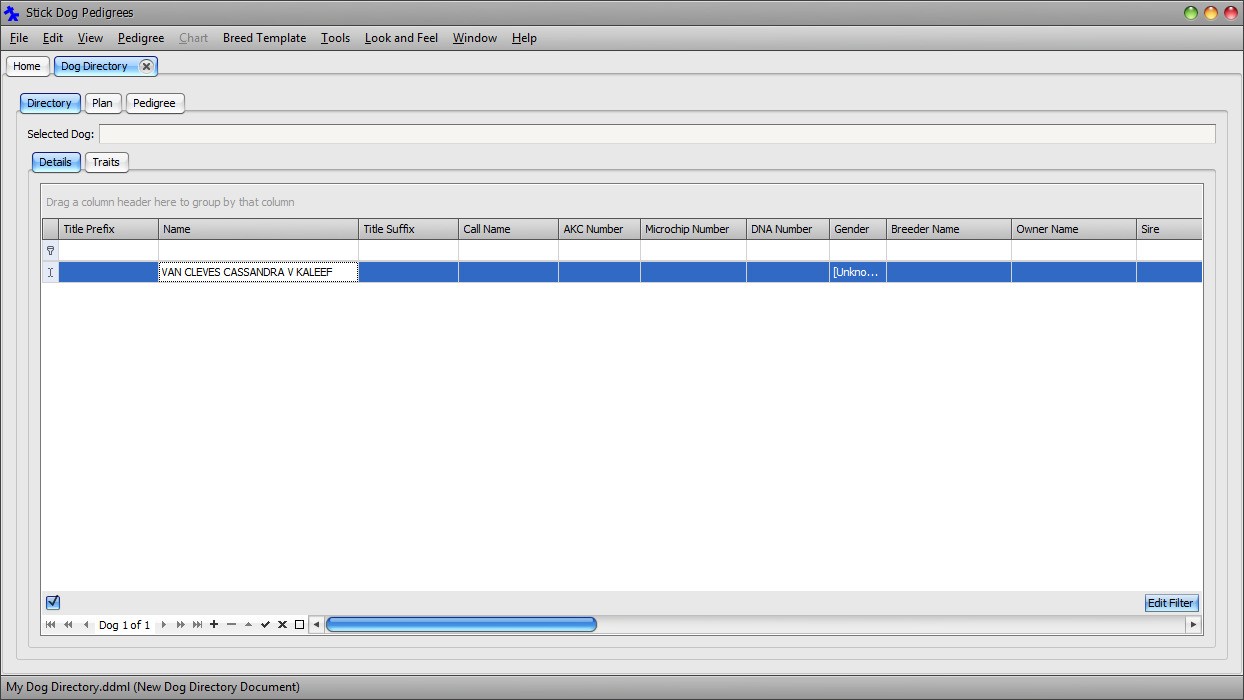
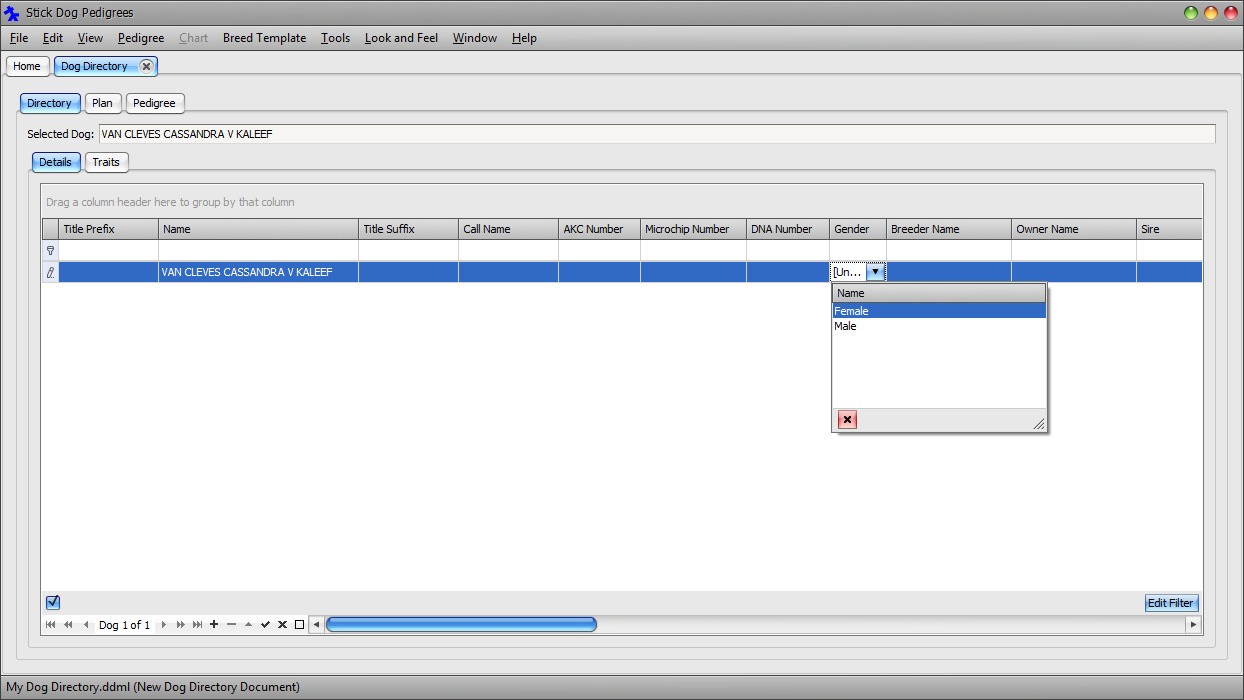
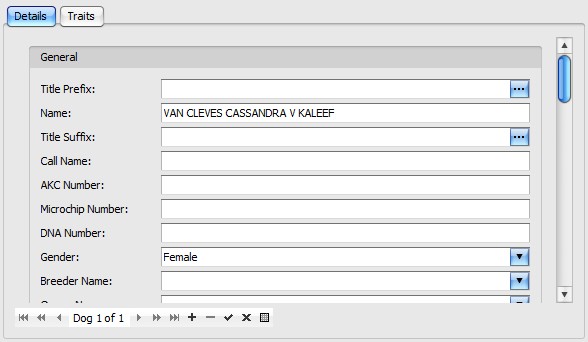
Set the focus to the Name field of the first (blank) dog record by clicking inside it. Setting focus to the field enables it to receive keyboard input. Type "VAN CLEVES CASSANDRA V KALEEF".
After entering the name of the first dog, the screen should like the figure below.
In order to resize the Name column to fit the entire name, right click on the Name column header and choose "Best Fit" option from the drop down menu (see Figure 24). Alternatively, you may drag the right border of the Name column header to the desired width.
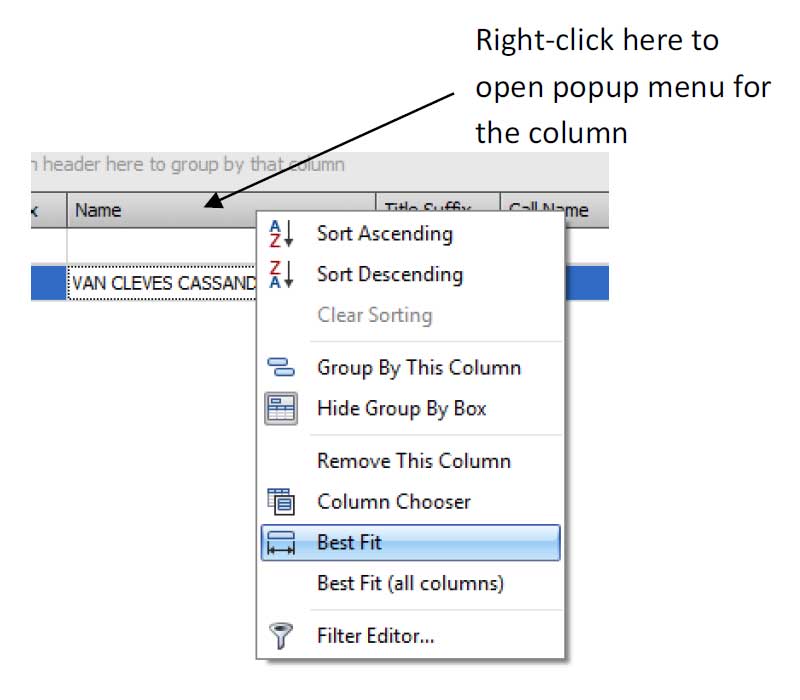
Figure 24: Column header popup
Set focus to the Gender field of the VAN CLEVES CASSANDRA V KALEEF record and change it from [Unknown] to Female. The Gender field has predefined set of possible values that may be selected from a dropdown list. If desired, resize the Gender column using the aforementioned procedure.
Note: You may navigate from one field to the next by pressing the Tab key. Use the Space key to display the dropdown list of possible field values. Alternatively, set focus by clicking the cell directly.
Enter the date "6/4/2000" into the Whelping Date field. You can either enter the value directly via the keyboard or select it from the popup calendar. Activate the calendar by clicking the dropdown button located on the right side of the field. If necessary, use the horizontal scrollbar under the grid to scroll the Whelping Date column into view. Scrolling occurs automatically when using the Tab key to navigate from one field to another.

Note: You may clear the contents of any field by giving it the focus and pressing Ctrl + 0.
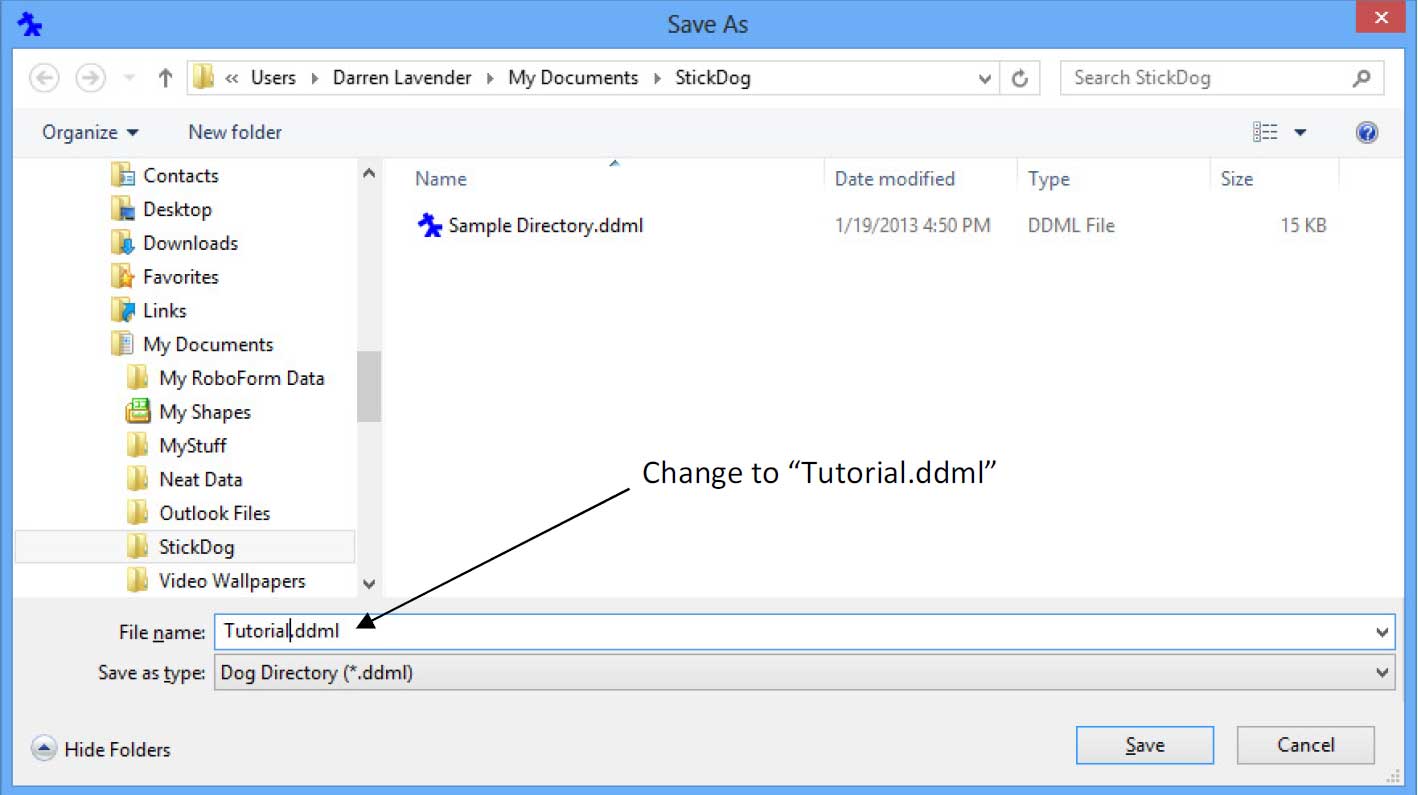
The basic information about VAN CLEVES CASSANDRA V KALEEF has now been entered. Save these changes to the file system.
Click Main Menu → File → Save

The Save As dialog appears. Change the file name to "Tutorial.ddml" and click Save.
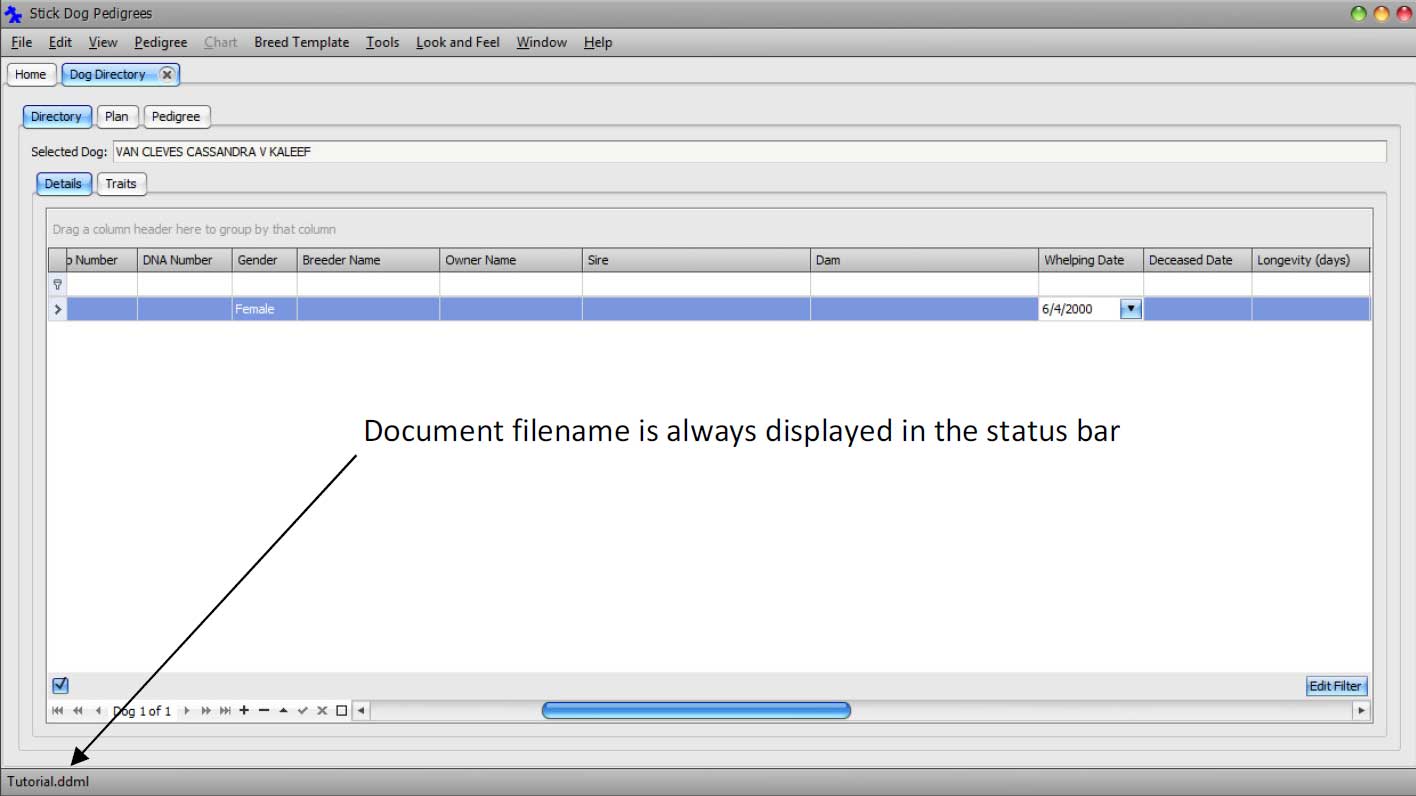
Upon saving the document, the status bar is updated to the new file name.
Note: Note The Save As dialog only appears when saving a new document for the first time. The application displays it in order to obtain a file name for the document.
The application works best if at least the following information is entered for each dog.
- Name
- Gender
- Whelping Date
Name is mandatory, Gender and Whelping Date are not mandatory. Note that most pedigree related functions do not work with dogs with missing (unknown) gender.
Let us proceed by entering the sire and dam of VAN CLEVES CASSANDRA V KALEEF. We will demonstrate how to do this using the Dog Details List panel (Directory tab). Later, we will complete the pedigree using the Pedigree panel in order to demonstrate how to work using a graphical layout instead of a grid layout. Both techniques yield the same result.
Using the Data Navigator introduced earlier, click the Append button to append a new dog record to the list. Enter the following information into the new record using the same approach taken for the first record.
Name: TINDROCK-KALEEF ABOUT THYME
Gender: Male
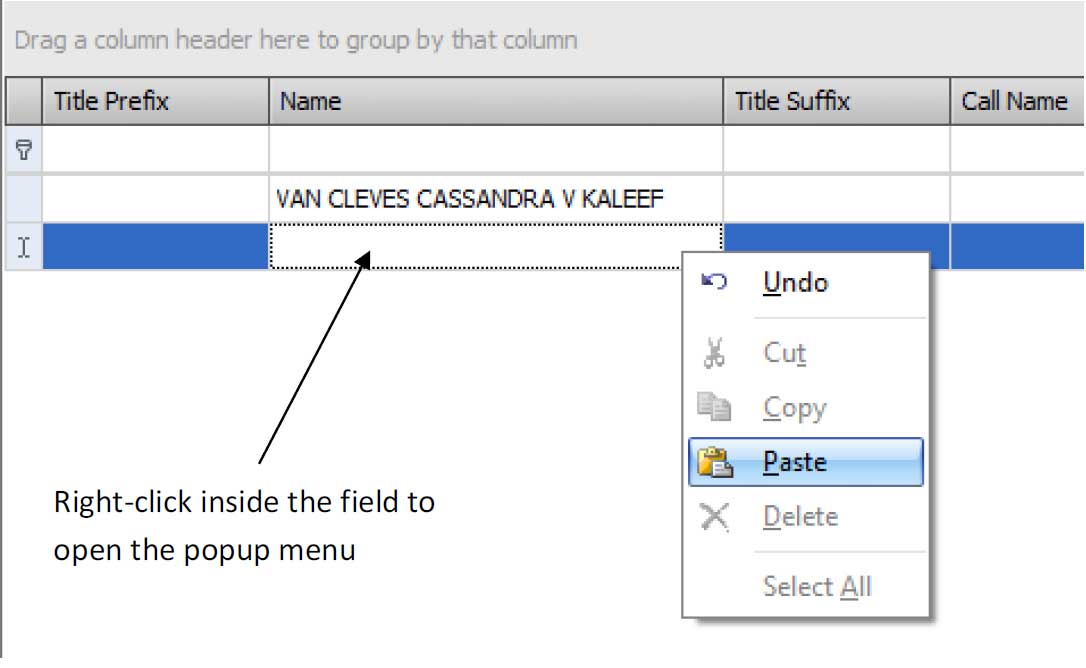
Note: You may use copy and paste to enter the name into the grid. After copying the text from this document into the clipboard, right click within the Name field and choose Paste from the popup menu.
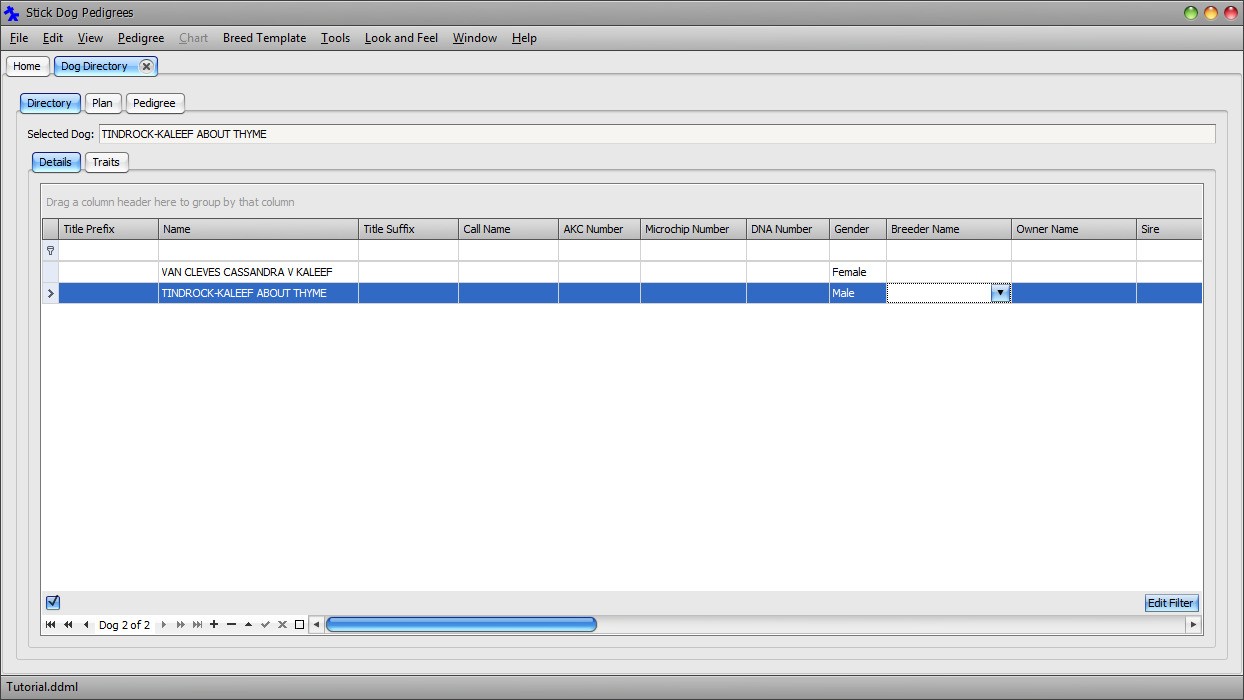
Click the Append button to append a third dog record to the list. Update the record with the following details.
Name: KALEEF'S BLONDIE
Gender: Female
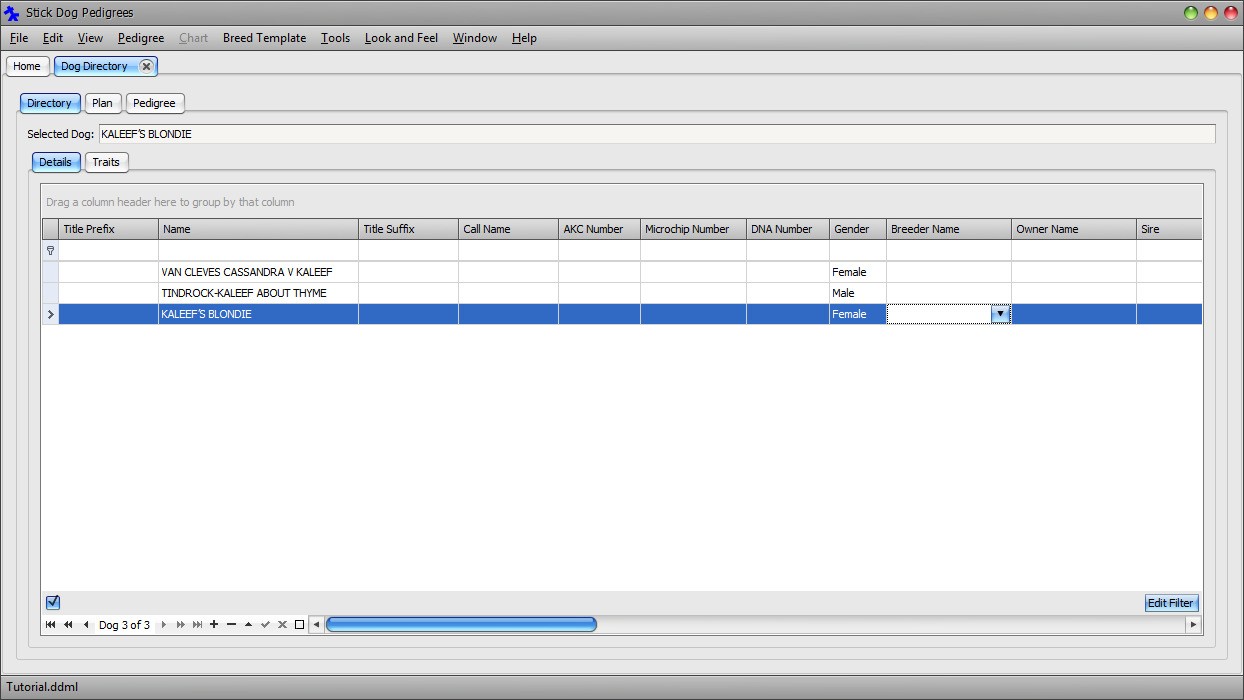
At this point, the directory contains three dogs, VAN CLEVES CASSANDRA V KALEEF together with her sire and dam. The application allows parent-child relationships to be recorded explicitly. As will be demonstrated later in this tutorial, entering these relationships enables the charting function to work automatically.
Note: Set focus to the Sire field of the VAN CLEVES CASSANDRA V KALEEF record. If necessary, use the horizontal scrollbar to scroll the Sire and Dam columns into view. Upon setting focus, a lookup button will appear at the right hand side of the field. Click the button to open the Sire Lookup dialog window.
Note: The Sire Lookup dialog window may appear immediately upon click the Sire field. This occurs when clicking on the right hand side of the field where the lookup button appears when the field has the focus.
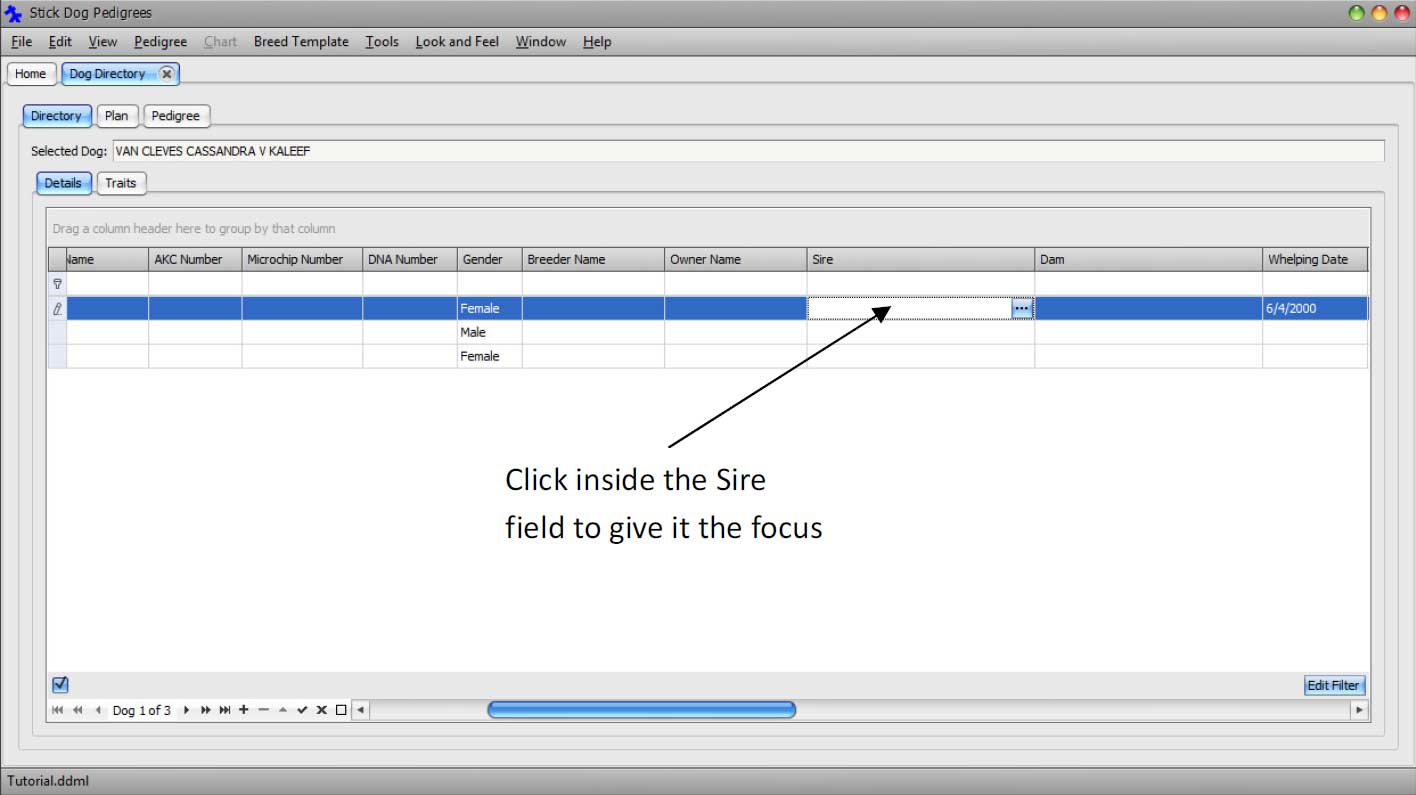
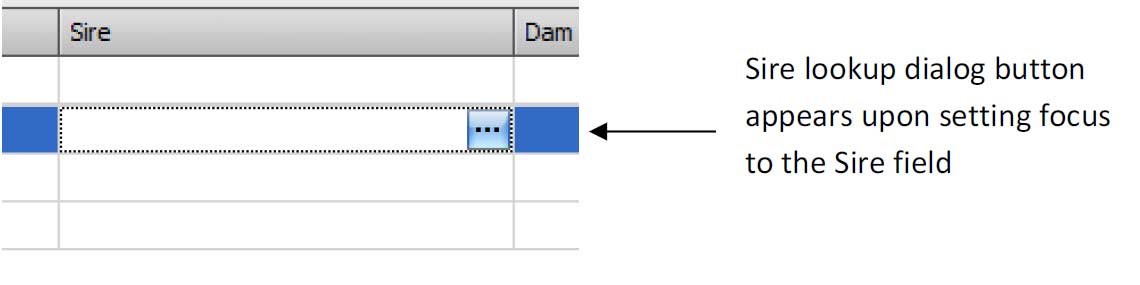
Upon clicking the lookup button, the Sire Lookup dialog window will appear.
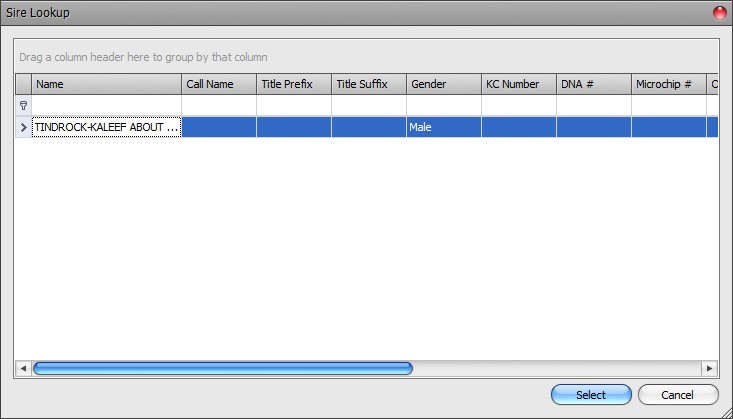
The Sire Lookup dialog displays all dog records in the directory that have Gender set to Male. In our case, only one male dog exists in the directory - TINDROCK-KALEEF ABOUT THYME.
Set focus to TINDROCK-KALEEF ABOUT THYME by clicking any field belonging to the record. Click the Select button on the bottom right of the dialog to set TINDROCK-KALEEF ABOUT THYME as the sire of VAN CLEVES CASSANDRA V KALEEF.

Follow a similar procedure to set the Dam field of the VAN CLEVES CASSANDRA V KALEEF to KALEEF'S BLONDIE.
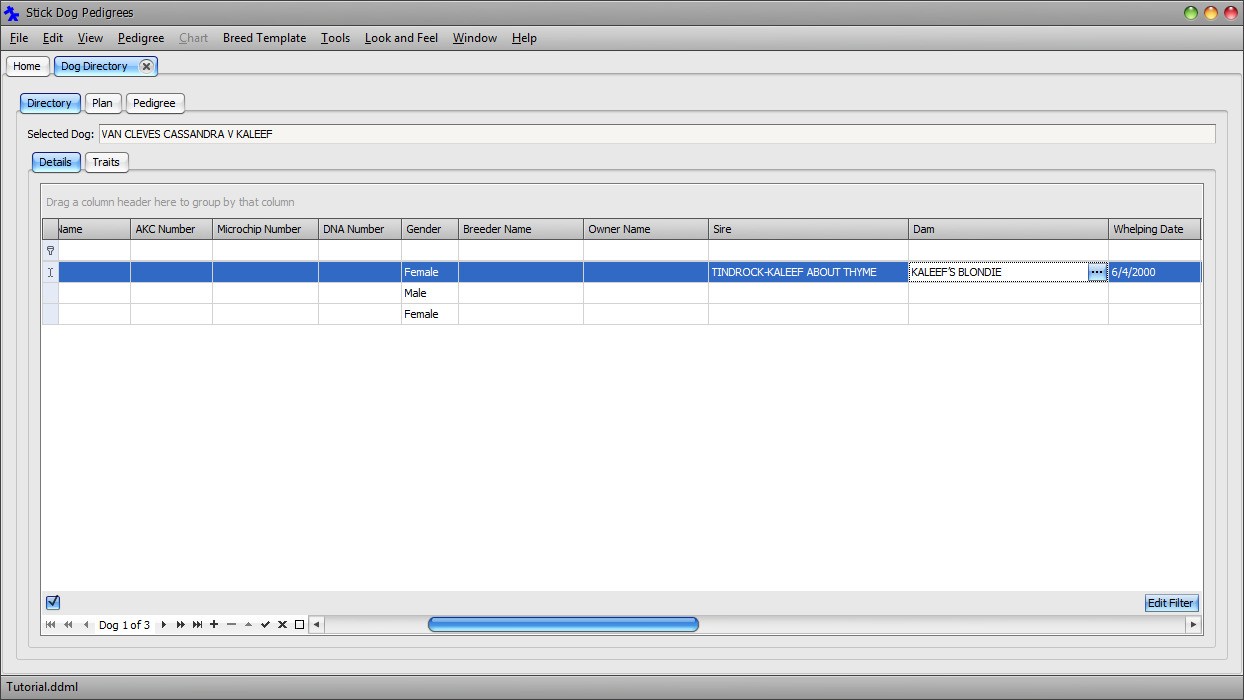
The application is now aware of the relationship between the three dogs.
Note: The relationship is implemented using record identifiers that are not visible to the user. Therefore, if the name of the sire or dam is changed, the link is not broken. Instead, the updated name is reflected in the Sire and Dam fields of each offspring.
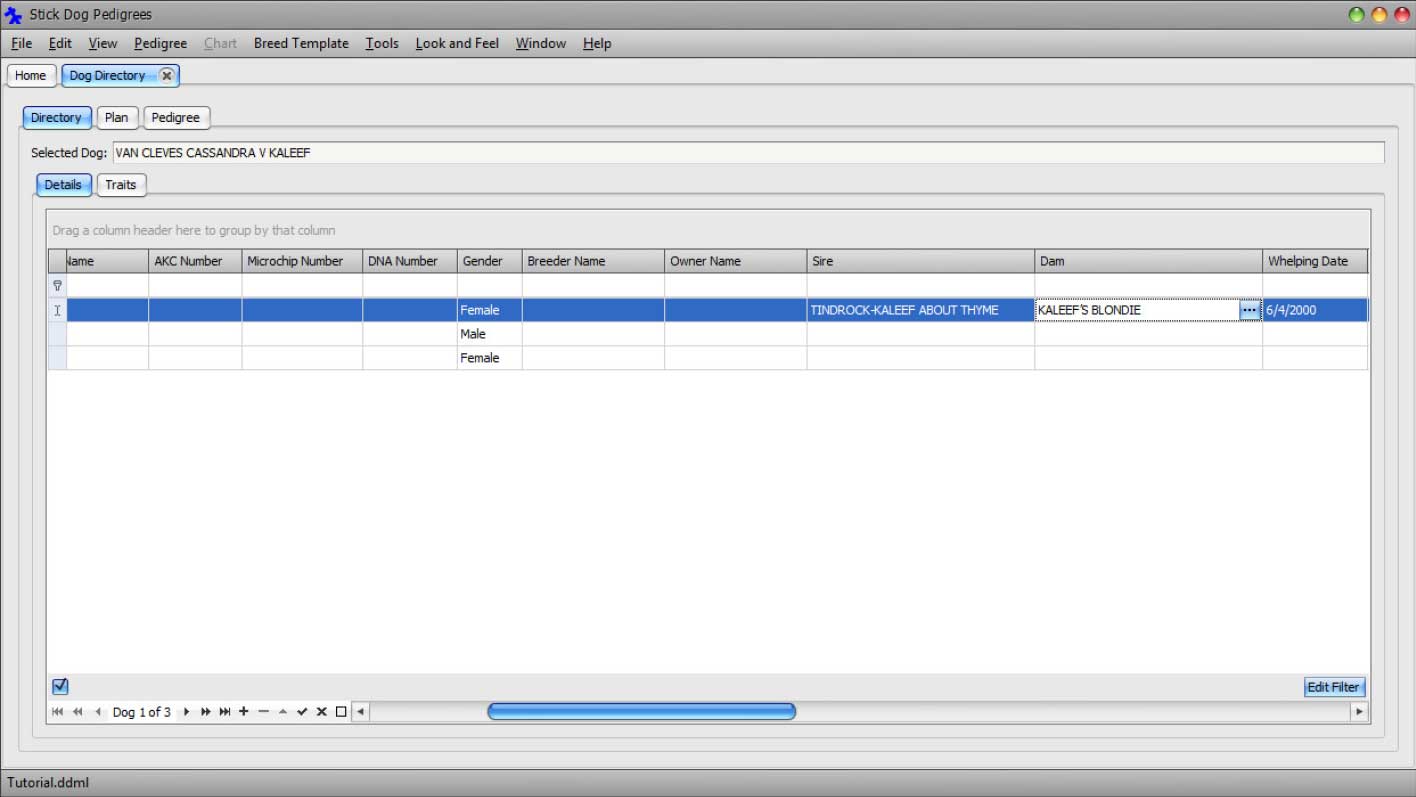
Save the changes to file by clicking Main Menu → File → Save.
It is possible to continue entering the remaining dogs in the pedigree by appending new records to the list and setting the Name, Gender, Sire, and Dam fields appropriately. However, there is another way. The contents of a dog directory document can be viewed, or updated, using the Pedigree panel. Unlike the Dog Details List panel, the Pedigree panel is optimized for editing a set of dogs belonging to the same pedigree. It displays a graphical representation of the pedigree making it easier to understand the relationships among dogs.
In Part 2 of the tutorial, we will use the Pedigree panel to finish entering the remaining dogs of the VAN CLEVES CASSANDRA V KALEEF pedigree.
Before proceeding to Part 2, click the close button on the right hand side of the Dog Directory tab. The location of the button is shown in Figure 25.

Figure 25: Document tab close button
The document tab is removed from the main application window.
Note: The application will always prompt you to save pending changes if you forget to save your document before closing it.
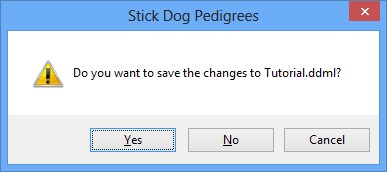
Clicking No in response to this message box causes changes to be discarded.
Part 2: Introduction to the Dog Directory Panel
We will start by opening the previously saved dog directory document created in part 1 of this tutorial.
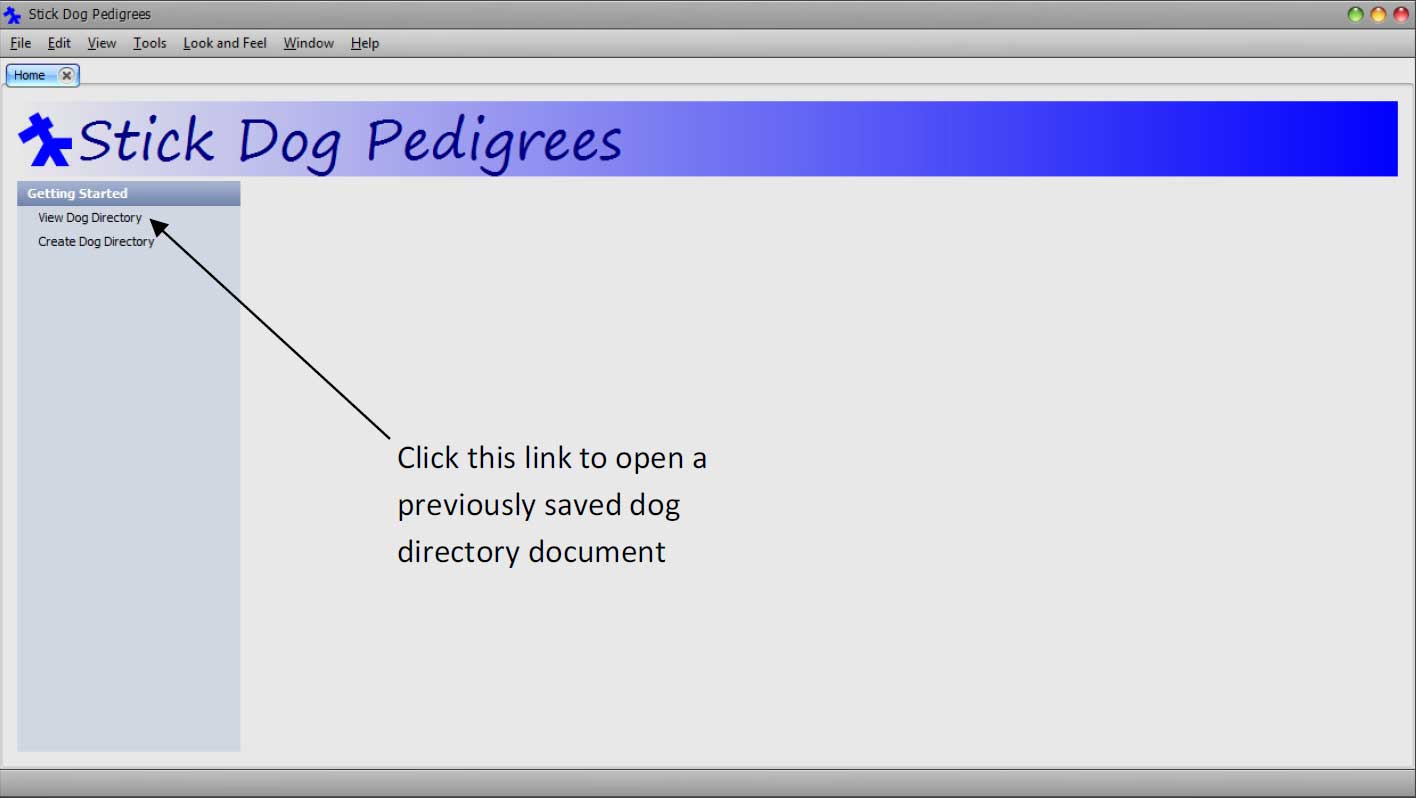
Switch to the Home screen and click "View Dog Directory" link inside the Getting Started menu. To switch to the Home screen, click the Home tab in the main application window. Alternatively, click Main Menu → View → Home to view the Home screen.
Note: An alternative way of doing this is to click Main Menu → View → Dog Directory.
If there is only one dog directory document in the library, the application opens it automatically, otherwise it presents the Dog Directory Selector dialog so that you can select a document to open.

If the Dog Directory Selector dialog appears, select Tutorial and click Open.
We will continue the tutorial by using the Pedigree panel to finish entering the remaining dogs of the VAN CLEVES CASSANDRA V KALEEF pedigree into the directory.
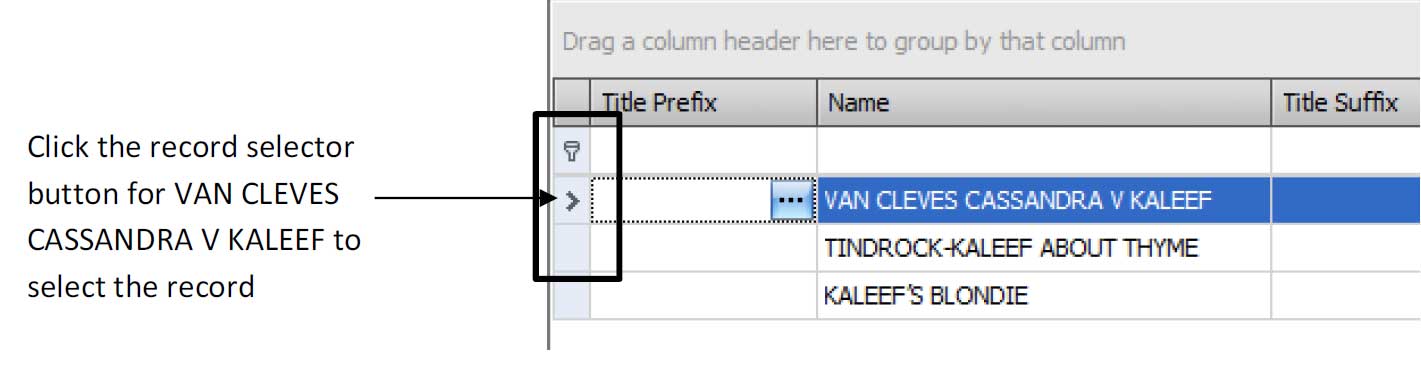
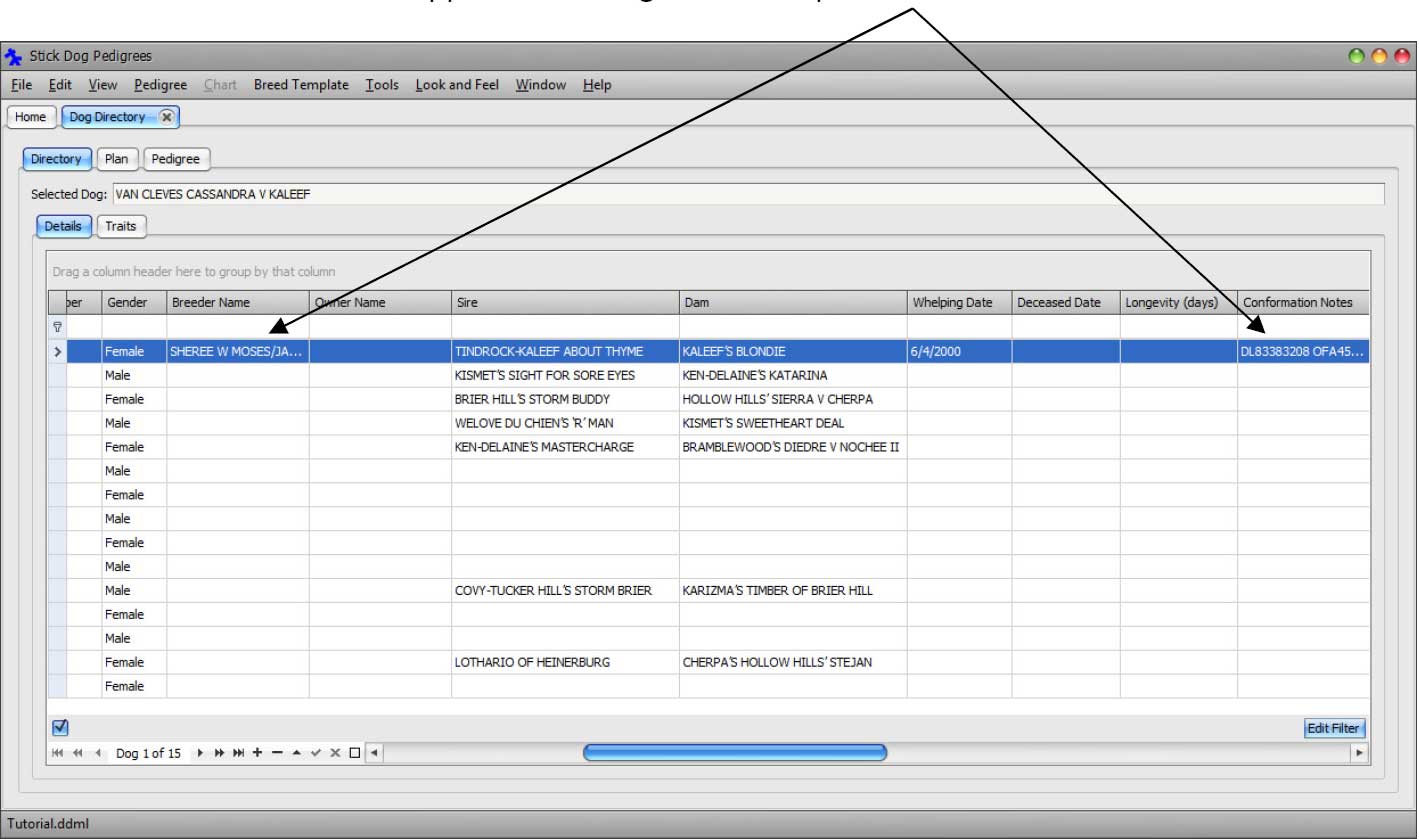
Select the VAN CLEVES CASSANDRA V KALEEF record by clicking the record selector button on the left hand side of the record. Each record in the grid has a selector button located immediately to the left of the first column.
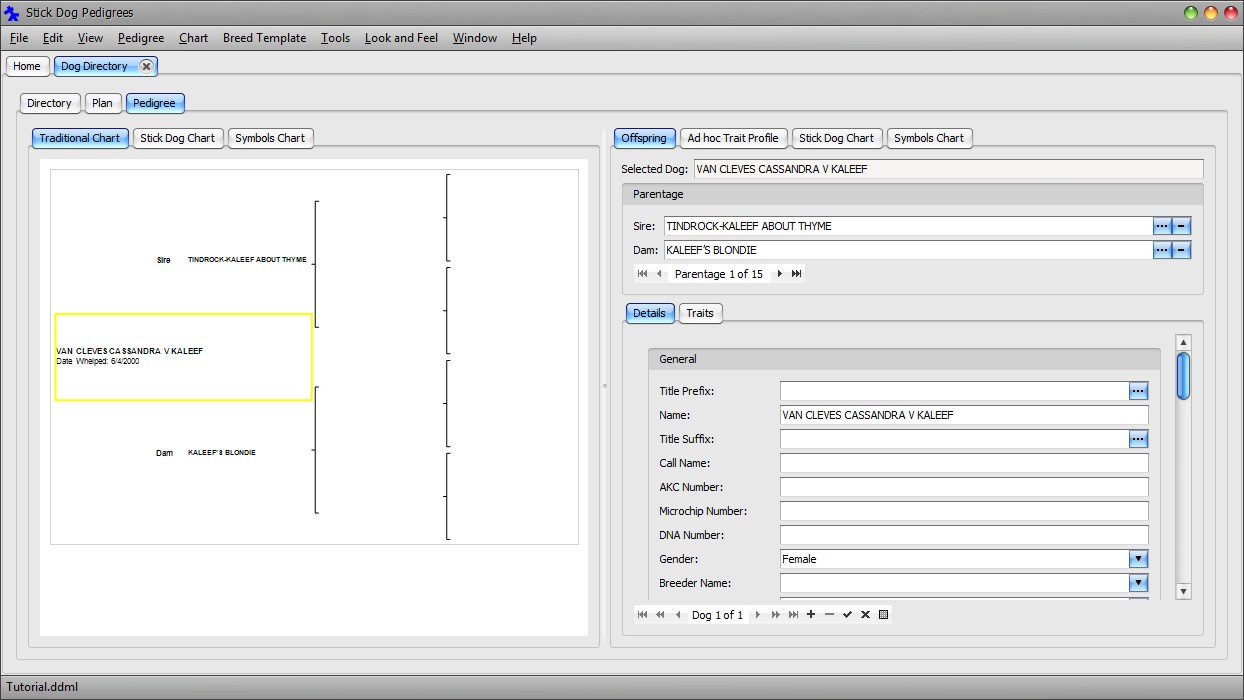
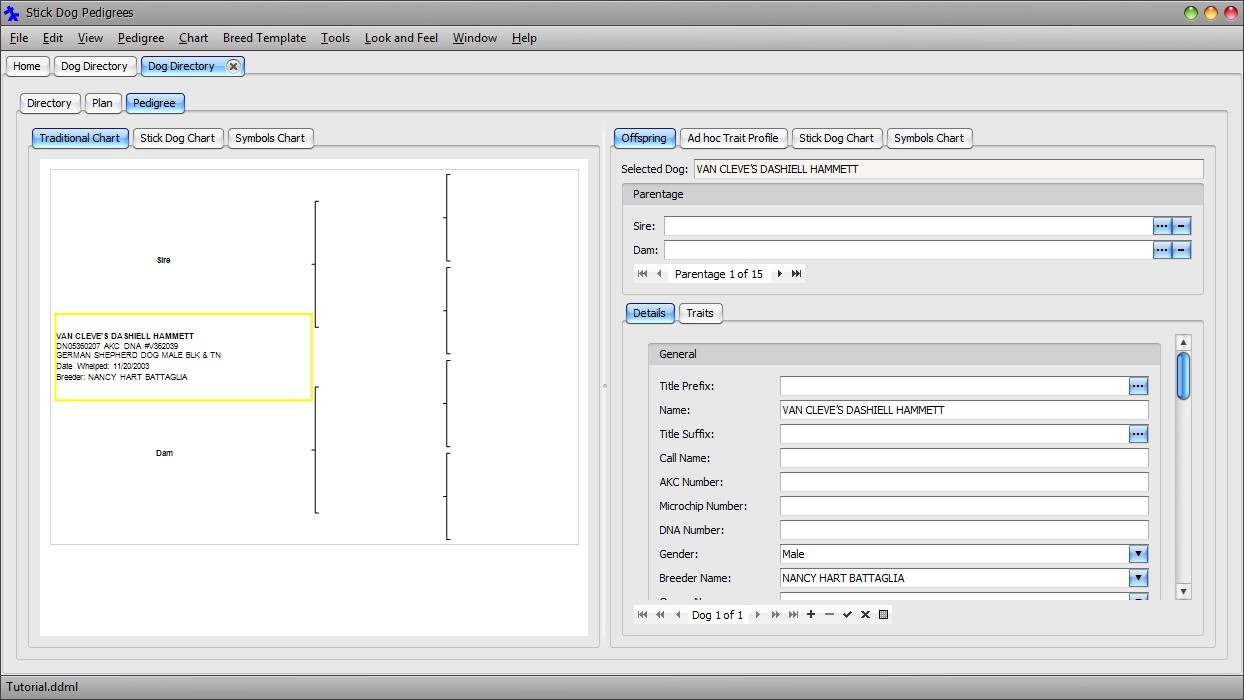
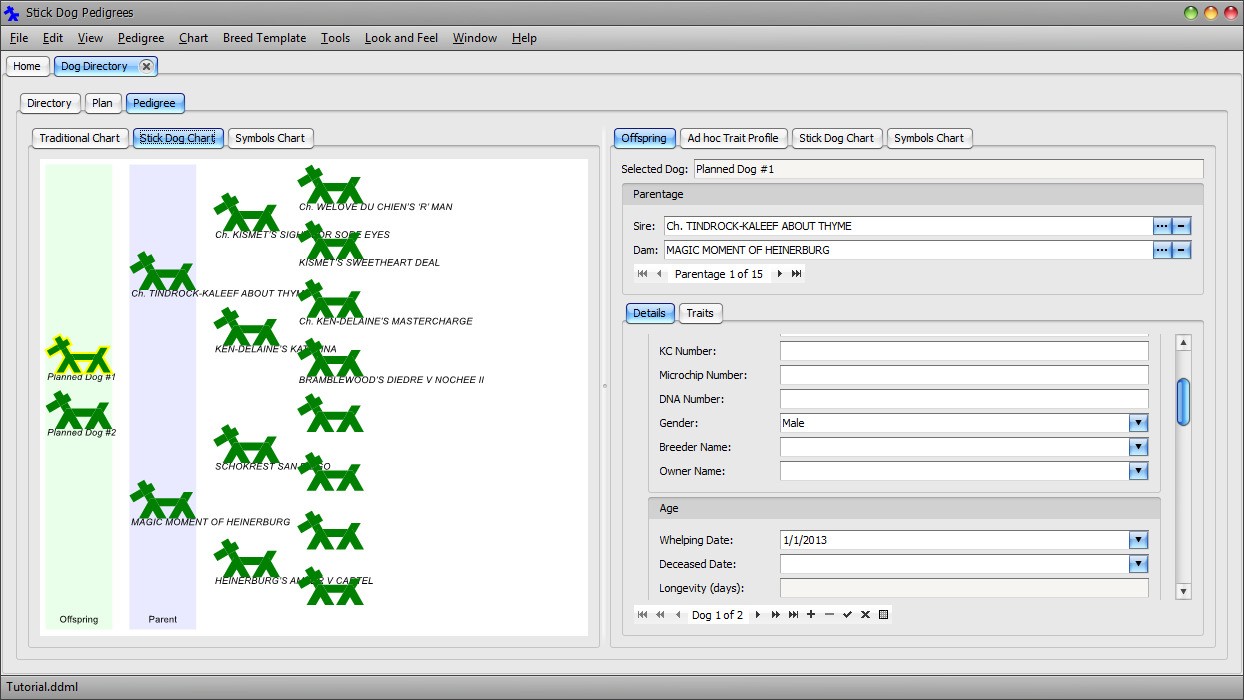
After selecting the record, click the Pedigree tab. The panel will display the pedigree for the selected dog, in this case VAN CLEVES CASSANDRA V KALEEF. The application builds the pedigree by tracing the sire and dam relationships between the dog records in the directory.

The following figure shows the Pedigree panel with the Traditional chart selected. The pedigree will be incomplete (i.e. limited to three dogs) because only the sire and dam for VAN CLEVES CASSANDRA V KALEEF have been entered so far.
At any time, you may click the Directory tab or Pedigree tab to switch between the panels. Changes made to dog records in the Pedigree panel are automatically applied to the Dog Details List panel (Directory tab) and vice versa.
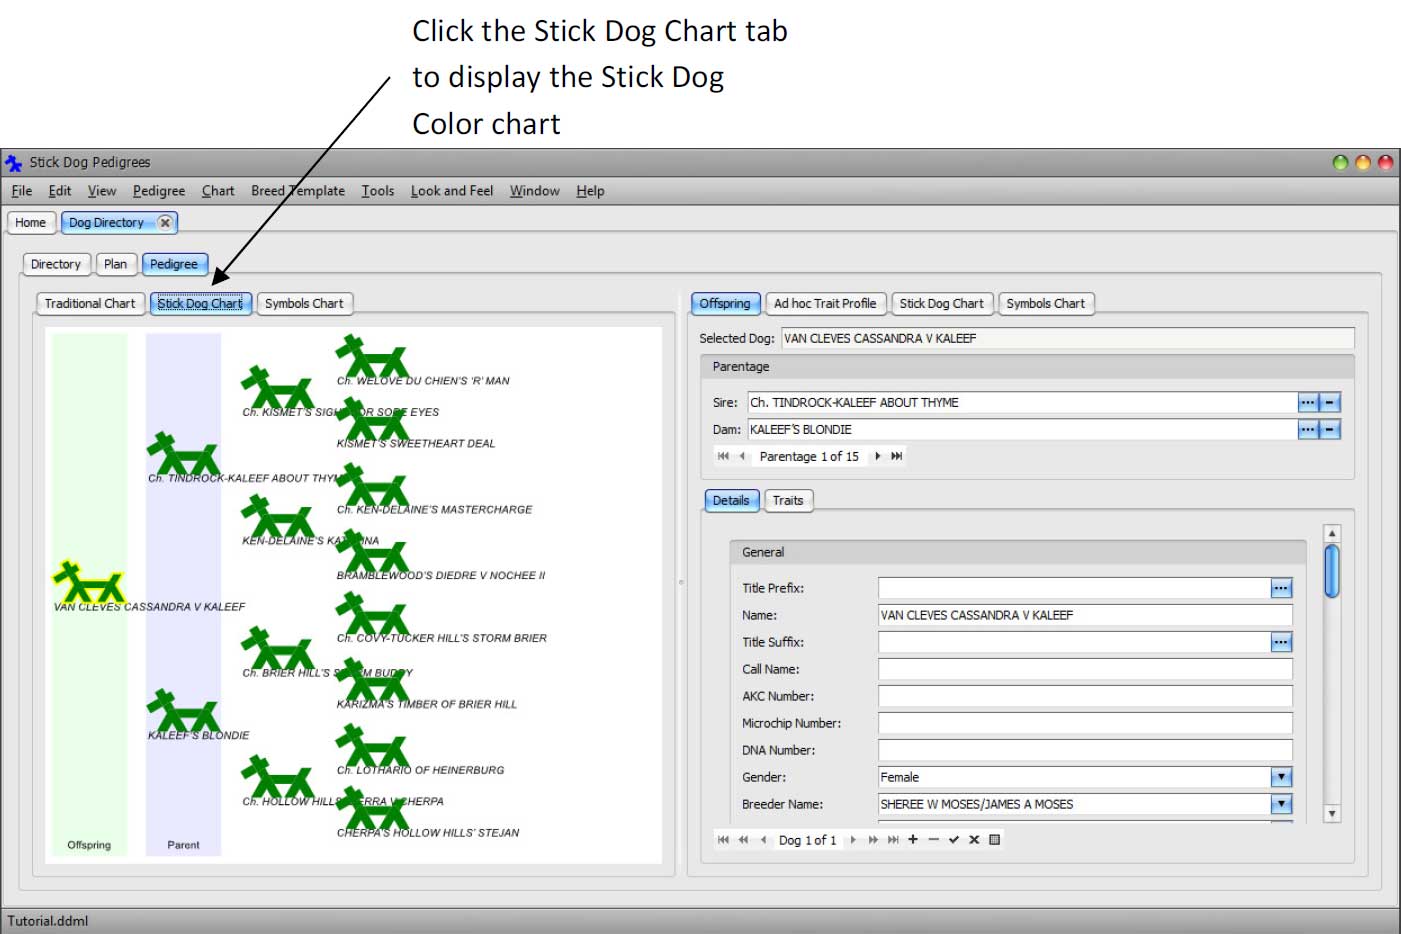
The default graphical representation is the Traditional chart. To view the Stick Dog Color chart, click the Stick Dog Chart tab located on the left hand side of the form.
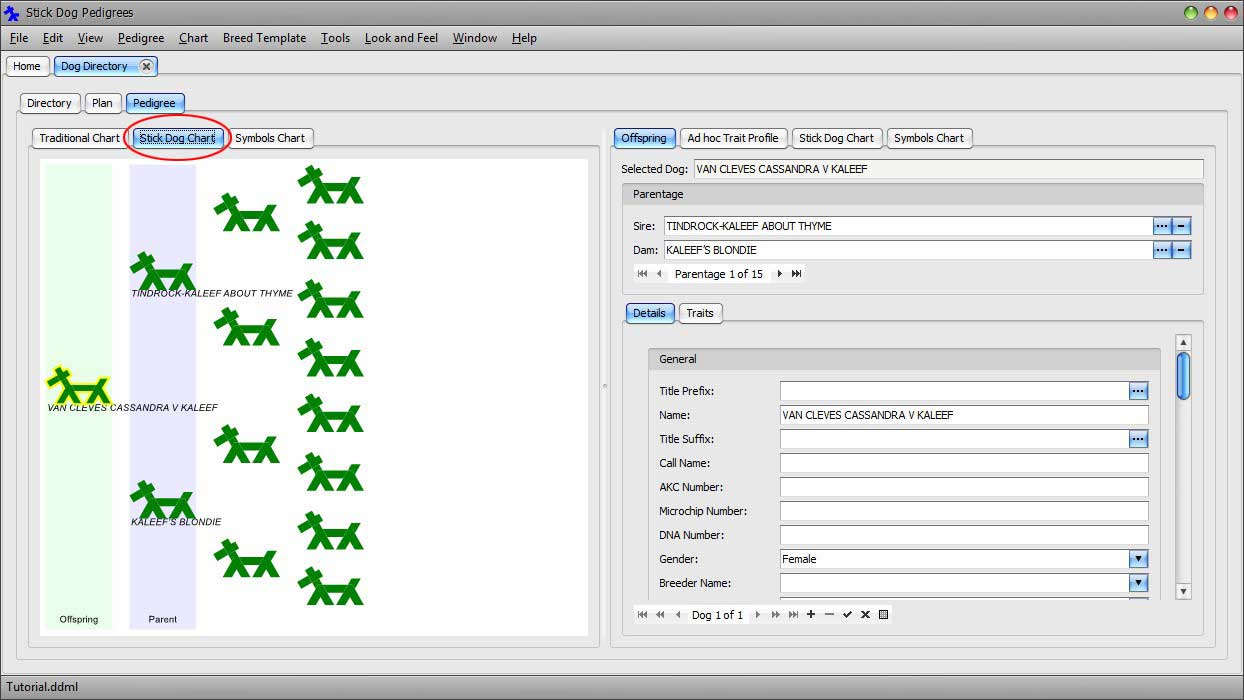
To view the Symbols chart, click the Symbols Chart tab located on the left hand side of the form.
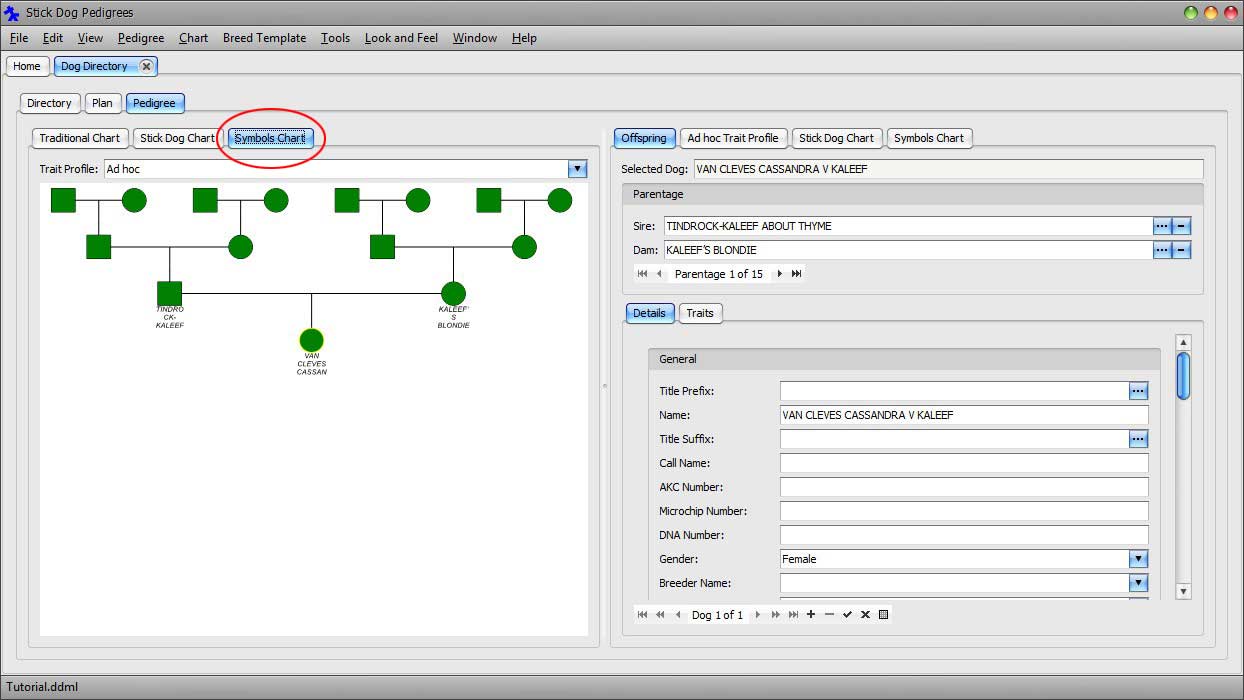
In all three charts, the selected dog is drawn with a yellow border around it. A dog may be selected by clicking on its symbol within the chart. The record corresponding to the selected dog in the chart is displayed in the panel on the right hand side (see Figure 26). Records displayed in this panel are the same records appearing in the Dog Details List panel (Directory tab).
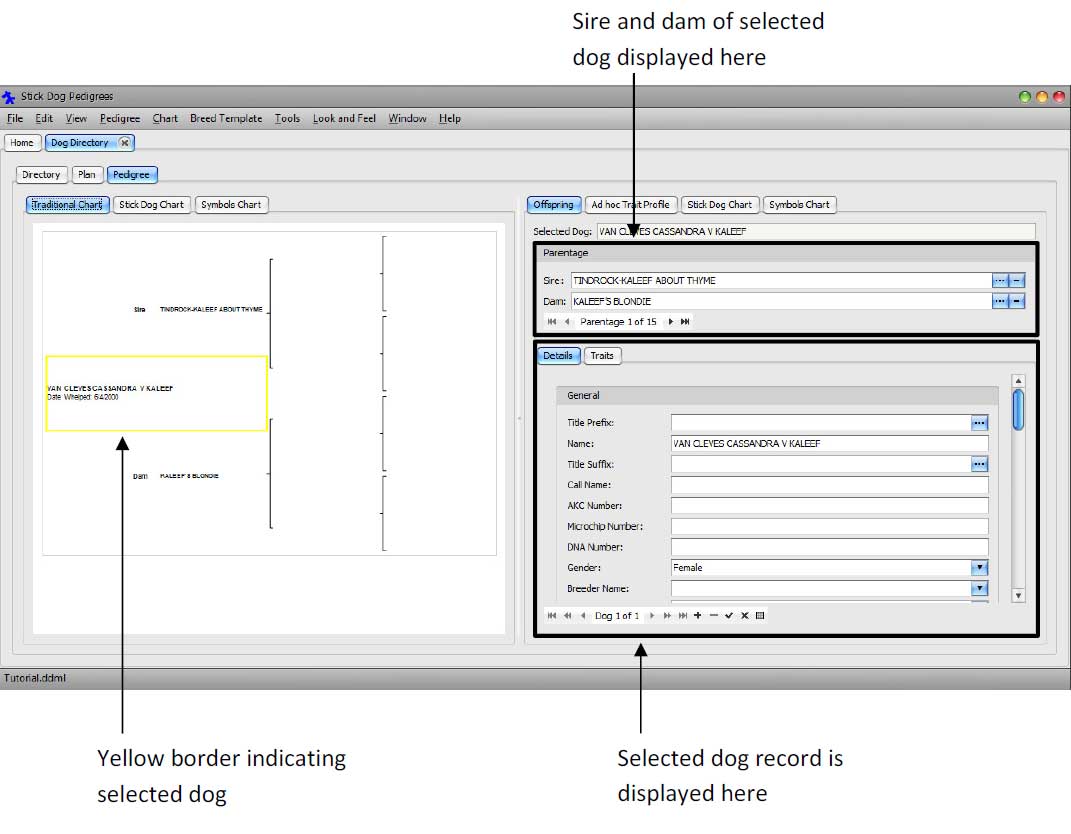
Figure 26: Layout of Pedigree form
Select the Traditional pedigree chart by clicking "Traditional Chart" tab.
Select the sire of TINDROCK-KALEEF ABOUT THYME by clicking the blank area indicated in the figure below.
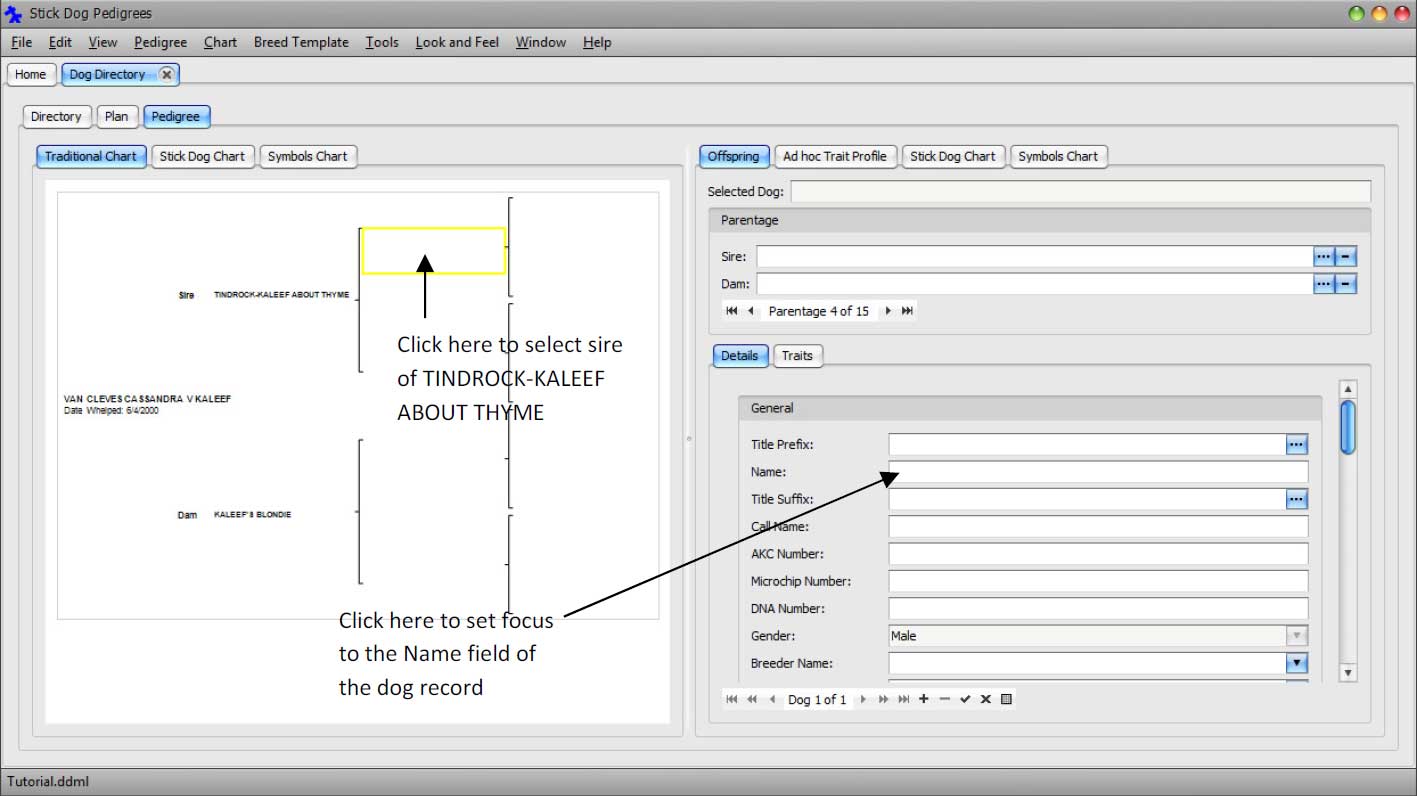
Focus is shifted to the blank dog as indicated by the yellow square.
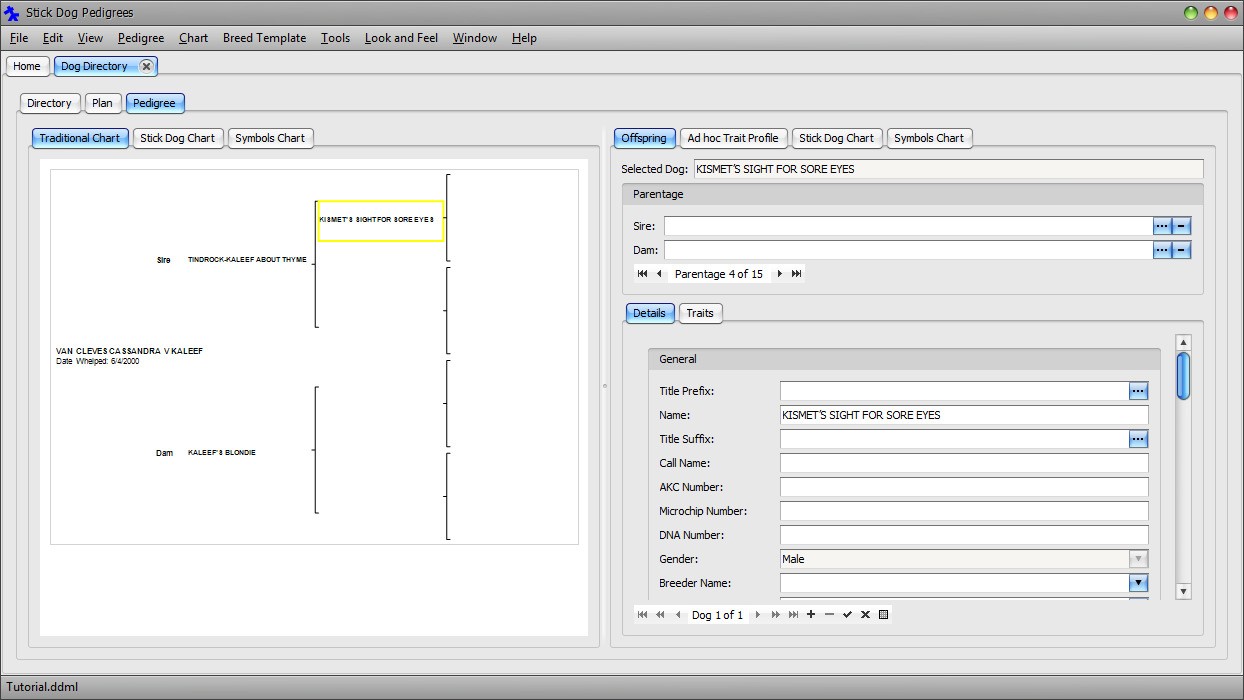
Set focus to the Name field of the selected dog record by clicking the Name field in the panel on the right as shown in the above figure. Type or paste "KISMET'S SIGHT FOR SORE EYES" into the Name field. Press Tab key to see the name appear in the chart.
Select the dam of TINDROCK-KALEEF ABOUT THYME by clicking the blank dog indicated in the figure below.
Focus is shifted to the blank dog as indicated by the yellow square.
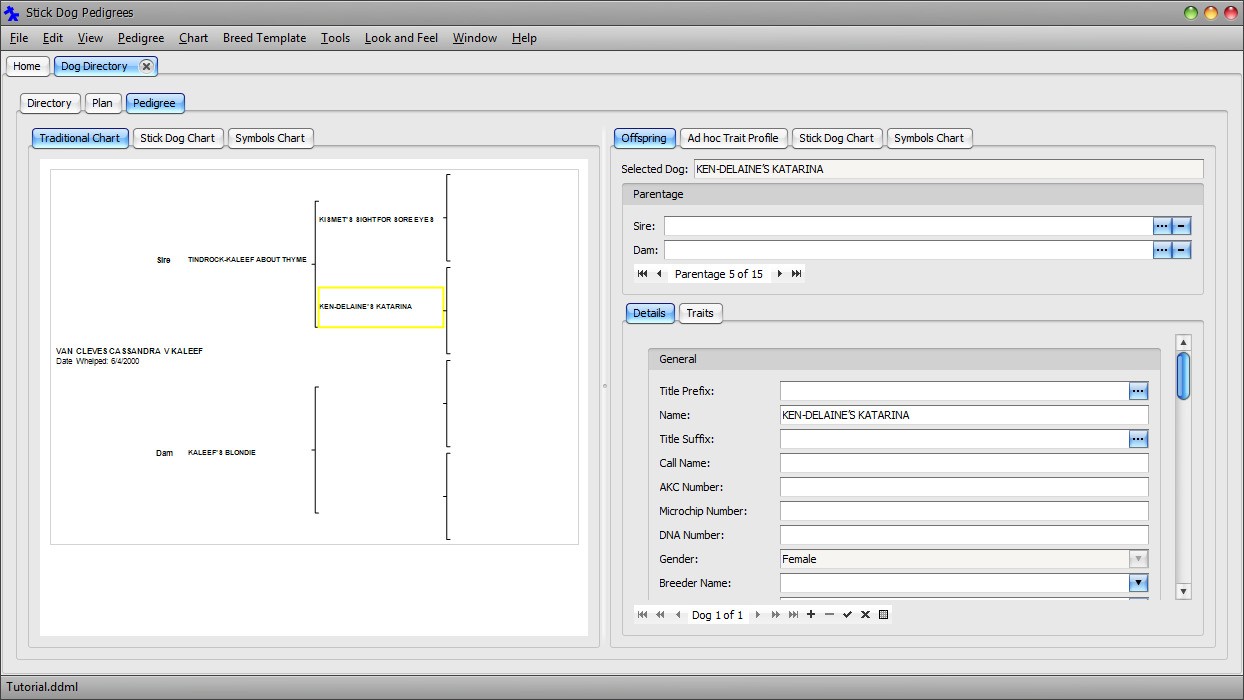
Set focus to the Name field of the selected dog record by clicking the Name field in the panel on the right as shown in the above figure. Type or paste "KEN-DELAINE'S KATARINA" into the Name field. Press Tab key to see the name appear in the chart.
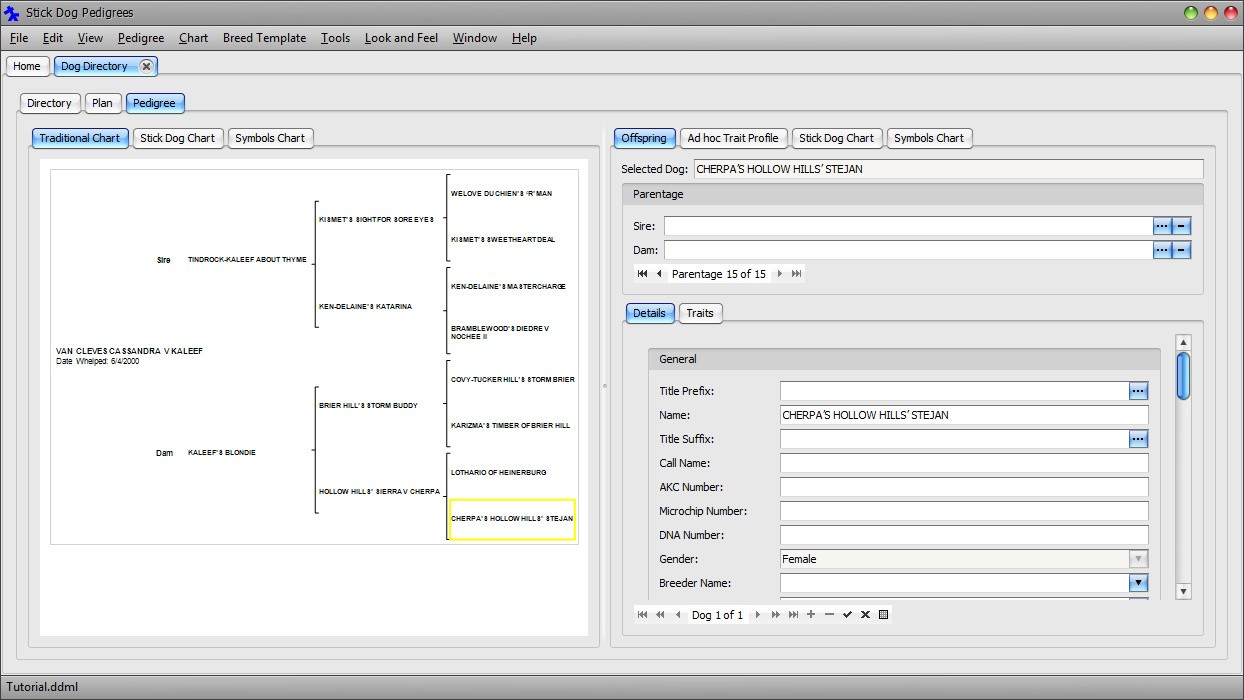
Follow the same procedure to enter the remaining dogs in the pedigree. The complete pedigree is given below. The fastest way to do this is to copy and paste the names into the application.
WELOVE DU CHIEN'S 'R' MAN
KISMET'S SIGHT FOR SORE EYES
KISMET'S SWEETHEART DEAL
TINDROCK-KALEEF ABOUT THYME
KEN-DELAINE'S MASTERCHARGE
KEN-DELAINE'S KATARINA
BRAMBLEWOOD'S DIEDRE V NOCHEE II
VAN CLEVES CASSANDRA V KALEEF
COVY-TUCKER HILL'S STORM BRIER BRIER HILL'S STORM BUDDY
KARIZMA'S TIMBER OF BRIER HILL
KALEEF'S BLONDIE
LOTHARIO OF HEINERBURG HOLLOW HILLS' SIERRA V CHERPA
CHERPA'S HOLLOW HILLS' STEJAN
The screen will look like the following figure after all the dog names have been entered into each position.
Click the Directory tab to see the newly entered dogs in the directory.
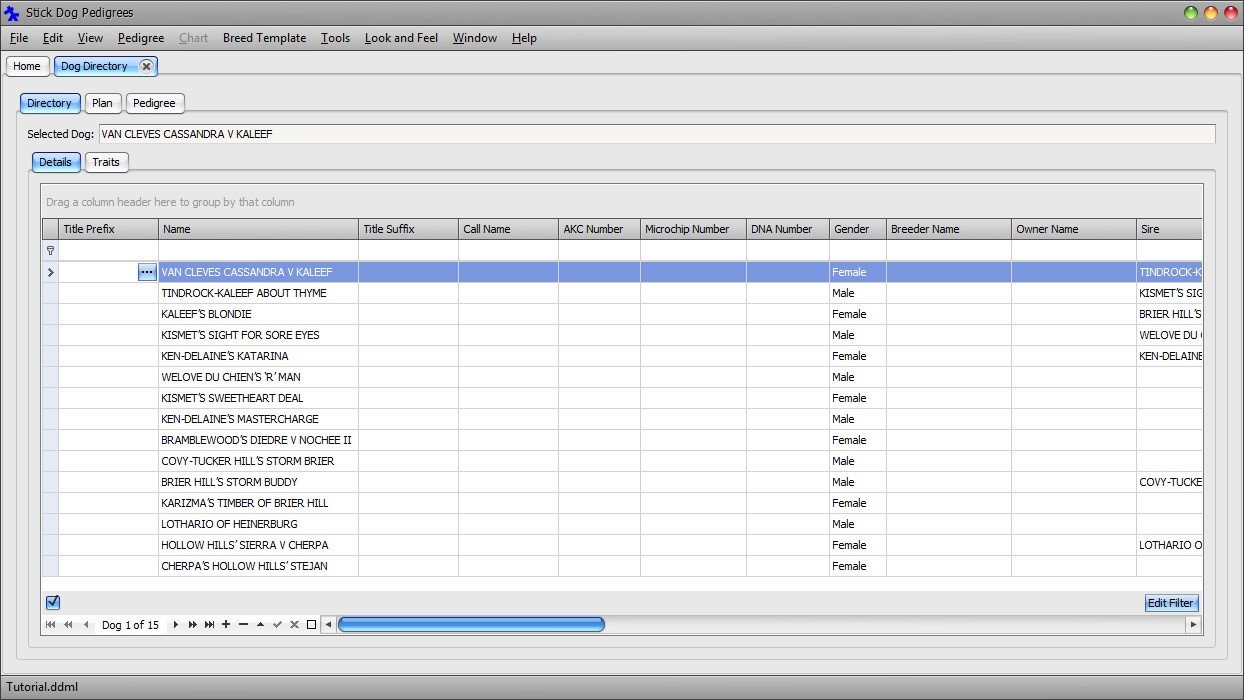
Each dog added via the Pedigree panel has been appended to the directory Dog Details List panel. Gender, Sire, and Dam information has been set automatically based on the position of each dog in the graphical layout.
Automatic data synchronization between the Dog Details List and Pedigree panels allows you to work with both "views" at the same time. The next tasks will demonstrate this further.
In the directory, select TINDROCK-KALEEF ABOUT THYME by clicking the record selector button to the left of the record.
Set focus to the Title Prefix field and click on the lookup button on the left hand side of the field.
The Title Prefix Selector dialog appears.
Select the Champion row and click Add.
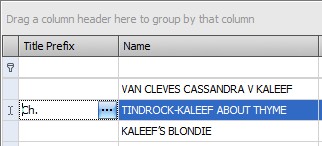
The Title Prefix field is set to the title selected in the dialog.
Repeat the procedure for the remaining champions in the VAN CLEVES CASSANDRA V KALEEF pedigree. They are listed below.
- KISMET'S SIGHT FOR SORE EYES
- BRIER HILL'S STORM BUDDY
- HOLLOW HILLS' SIERRA V CHERPA
- WELOVE DU CHIEN'S 'R' MAN
- KEN-DELAINE'S MASTERCHARGE
- COVY-TUCKER HILL'S STORM BRIER
- LOTHARIO OF HEINERBURG
View the pedigree for VAN CLEVES CASSANDRA V KALEEF. There are two ways of going about this. This first is the same method that was used previously, which was to select VAN CLEVES CASSANDRA V KALEEF in the list and click the Pedigree tab. Pedigree tab always displays the pedigree for the dog (or plan) currently selected at the moment the Pedigree tab is clicked.
Another way is to use the most recent list in the Pedigree menu. It records the last twenty dogs and plans viewed with the Pedigree panel. Click Main Menu → Pedigree.
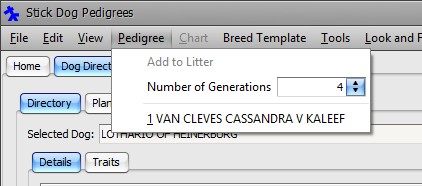
Select VAN CLEVES CASSANDRA V KALEEF.
The pedigree for VAN CLEVES CASSANDRA V KALEEF is displayed in the Pedigree tab. By using this method, there is no need to locate VAN CLEVES CASSANDRA V KALEEF in the list and select it prior to clicking the Pedigree tab. Both operations are accomplished in a single step.
Notice that the champion prefix appears in the chart for each champion dog. Changes made in the Dog Details List panel are reflected in the Pedigree panel because both views work with the same set of dog records.
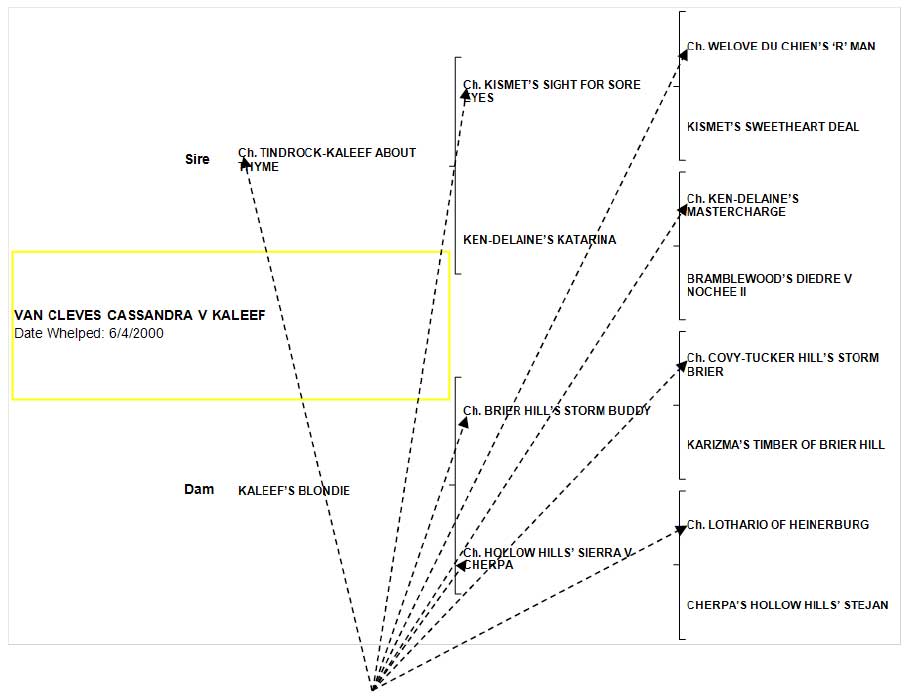
Chart updated with "Ch." champion prefix
The Traditional Pedigree chart can display additional details for each dog. For the starting dog (VAN CLEVES CASSANDRA V KALEEF in this case), it can display the following information.
Name
Conformation Notes
Date Whelped
Breeder
For the ancestors, it can display the following information.
Name
Conformation Notes
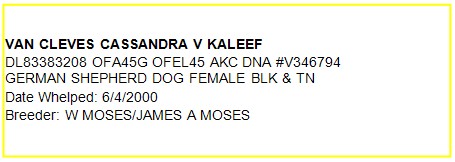
Next, we will update the VAN CLEVES CASSANDRA V KALEEF to show the description and breeder.
Click VAN CLEVES CASSANDRA V KALEEF in the Pedigree chart to select VAN CLEVES CASSANDRA V KALEEF record.
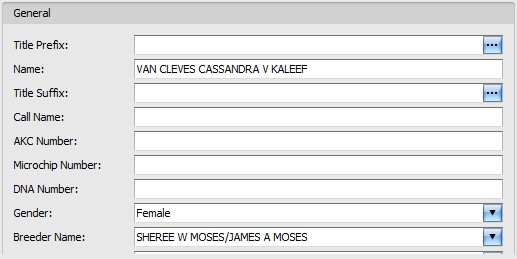
In the panel on the right hand side, scroll down until the Breeder Name field comes into view.
Enter "SHEREE W MOSES/JAMES A MOSES" into the Breeder Name field. Press the Tab key to see the change reflected in the chart.
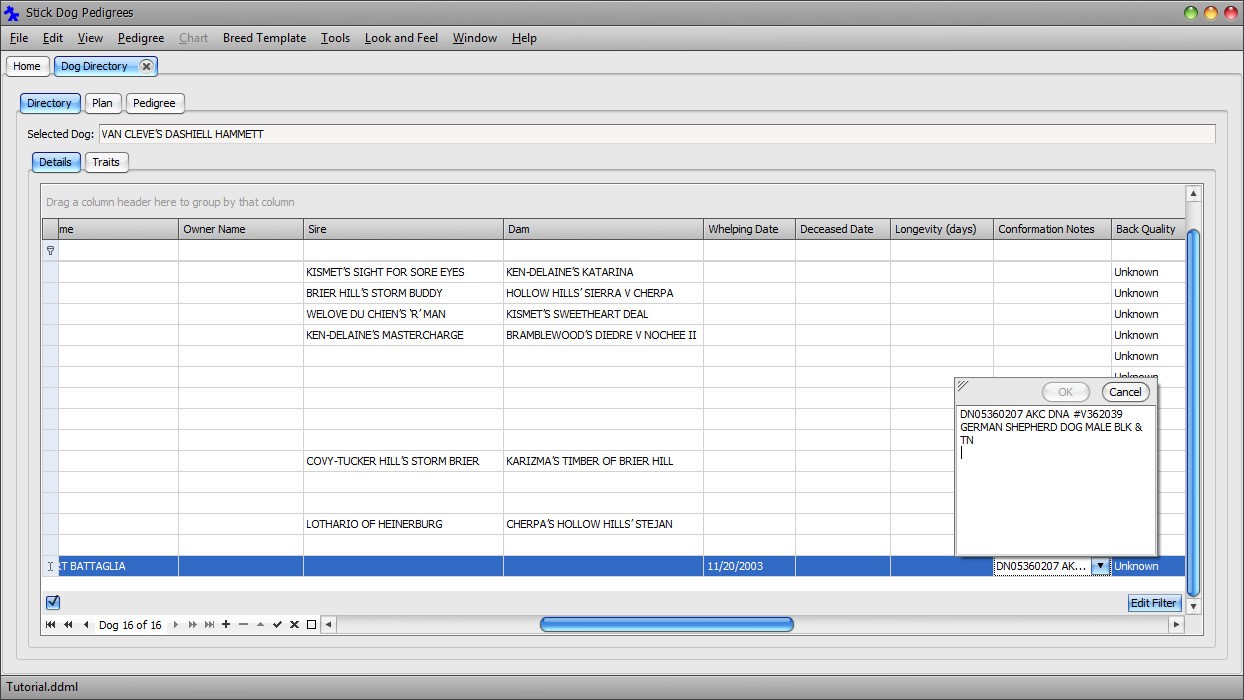
Scroll further down until the Conformation Notes field comes into view. Enter the following text into the Conformation Notes field.
DL83383208 OFA45G OFEL45 AKC DNA #V346794
GERMAN SHEPHERD DOG FEMALE BLK & TN
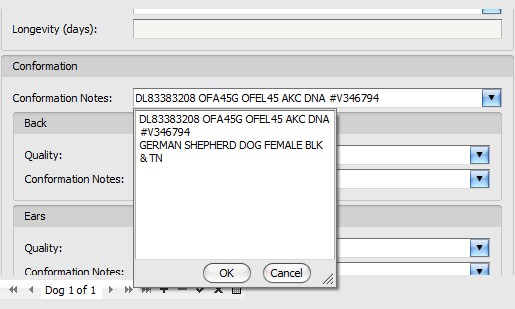
Click OK to close the dropdown editor. Press the Tab key to see the change reflected in the chart.
The description of the remaining dogs may be updated using a similar procedure. First, select the dog to update by clicking its name in the chart. The panel on the right will switch to the selected dog record automatically. Scroll to the Conformation Notes field and enter the description. Click OK to dismiss the dropdown editor and then press the Tab key to see the update reflected in the chart.
Click the Directory tab. Notice that the Breeder Name and Conformation Notes entered for VAN CLEVES CASSANDRA V KALEEF appear in the Dog Details List panel as well.
Save the changes to file by clicking Main Menu → File → Save.
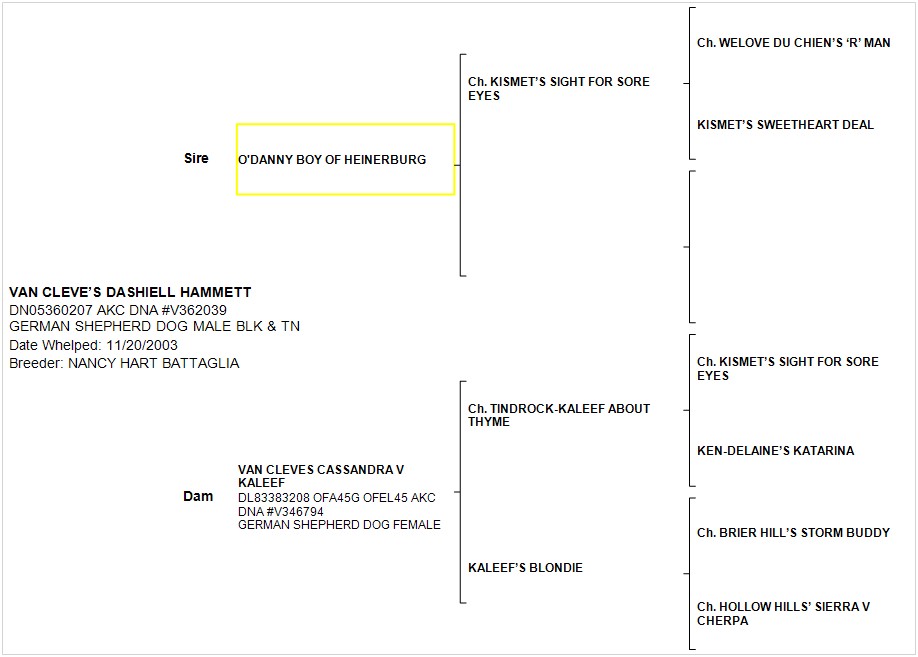
In part 3 of this tutorial, we will add the pedigree for VAN CLEVE'S DASHIELL HAMMETT shown below to the directory. This pedigree is comprised of a number of dogs that have already been entered in to the directory as part of the first pedigree. You will learn how to leverage the existing information in the directory to help enter the second pedigree more quickly while avoiding creating duplicating dog records.
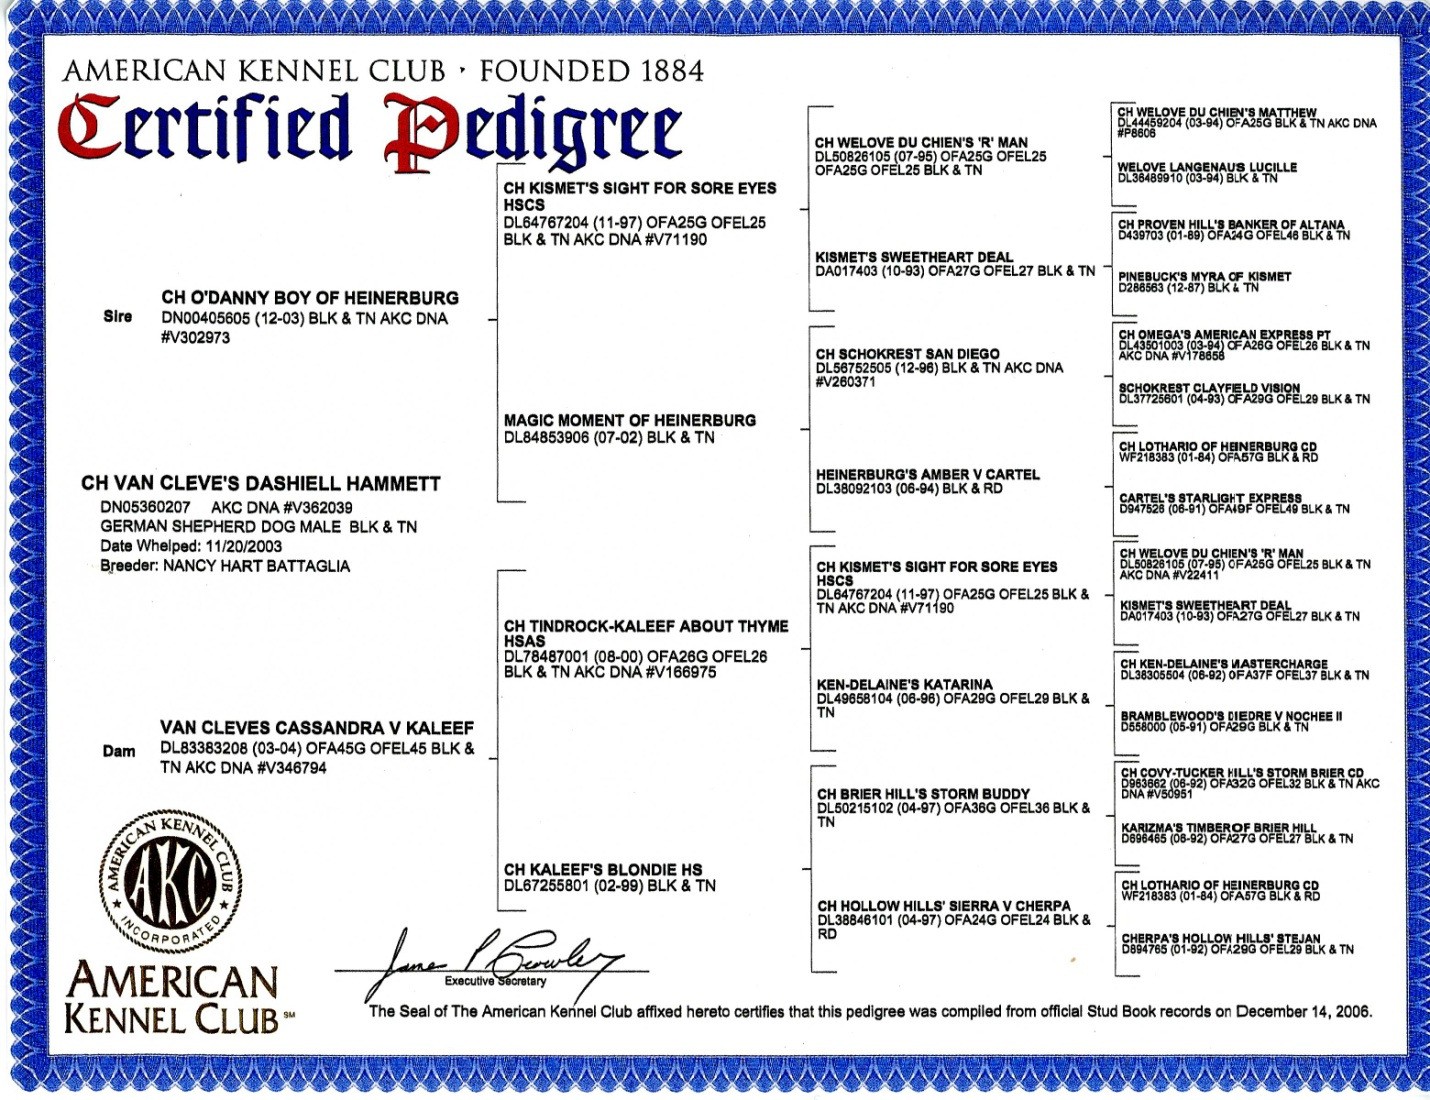
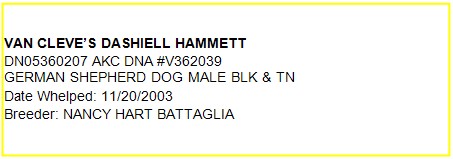
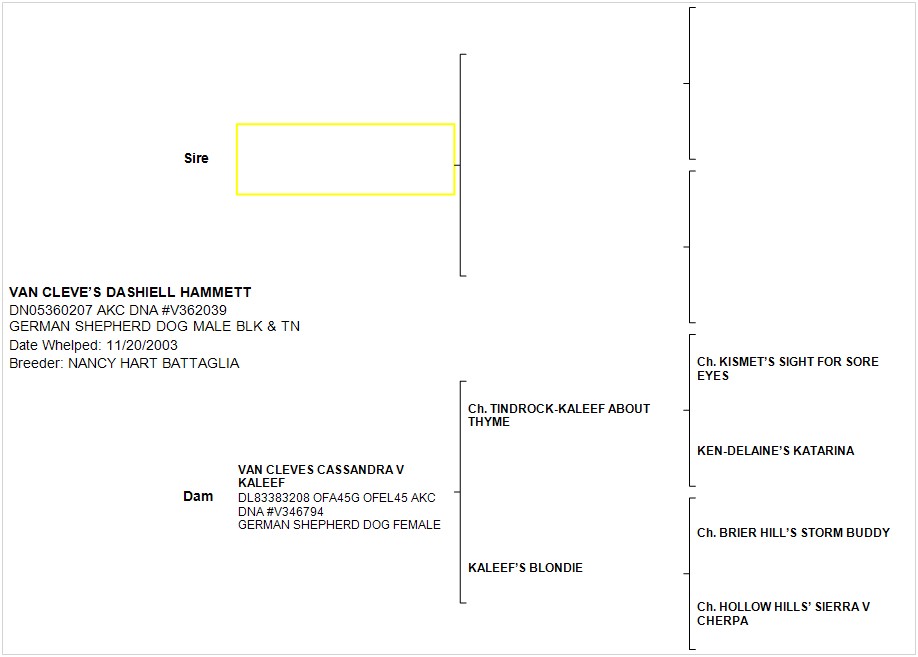
Figure 27: Pedigree for VAN CLEVE'S DASHIELL HAMMETT
Before proceeding to part 3, click the close button on the right hand side of the Dog Directory tab.

Click the close button to close the document
The document tab is removed from the main application window.
Part 3: Adding a Second Pedigree to the Directory
In part 3 of this tutorial, we will add the pedigree for VAN CLEVE'S DASHIELL HAMMETT shown in Figure 27 to the directory. The pedigree is reproduced below. Bold font indicates dog is new and has not yet been entered into the directory in parts 1 and 2. Underline font indicates dog appears more than once in the pedigree (linebreeding).
WELOVE DU CHIEN'S 'R' MAN
KISMET'S SIGHT FOR SORE EYES
KISMET'S SWEETHEART DEAL
O'DANNY BOY OF HEINERBURG
SCHOKREST SAN DIEGO
MAGIC MOMENT OF HEINERBURG
HEINERBURG'S AMBER V CARTEL
VAN CLEVE'S DASHIELL HAMMETT
KISMET'S SIGHT FOR SORE EYES
TINDROCK-KALEEF ABOUT THYME
KEN-DELAINE'S KATARINA
VAN CLEVES CASSANDRA V KALEEF
BRIER HILL'S STORM BUDDY
KALEEF'S BLONDIE
HOLLOW HILLS' SIERRA V CHERPA
We will see how to enter this pedigree without duplicating any dog records. The resulting directory will contain a set of distinct dog records that may be used to view the pedigree for both VAN CLEVE'S DASHIELL HAMMETT and VAN CLEVES CASSANDRA V KALEEF, as well as any sub-pedigree implied by the dataset.
We will start by opening the previously saved dog directory document created in parts 1 and 2 of this tutorial.
Click Main Menu → Viewstrong> → Dog Directory.
If "Tutorial" is the only dog directory document in the library, the application and opens it automatically, otherwise it presents the Dog Directory Selector dialog so that you can select the document to open.

If the Dog Directory Selector dialog appears, select Tutorial and click Open.
We will use the Pedigree panel to enter the pedigree for VAN CLEVE'S DASHIELL HAMMETT into the directory because it automatically sets the gender, sire, and dam properties of each dog. Before switching to the Pedigree panel, VAN CLEVE'S DASHIELL HAMMETT will need to be entered into the directory so that the (blank) pedigree for that dog can be viewed.
Click the Append button in the Dog Data Navigator to append a new blank dog record to the directory.
Update the record with the following information:
Name: VAN CLEVE'S DASHIELL HAMMETT Gender: Male
Breeder Name: NANCY HART BATTAGLIA
Whelping Date: 11/20/2003
Conformation Notes: DN05360207 AKC DNA #V362039
GERMAN SHEPHERD DOG MALE BLK & TN
With the VAN CLEVE'S DASHIELL HAMMETT record selected in the grid, click the Pedigree tab.

The default graphical representation is the Traditional Chart.
Note It is possible to enter and update dogs using any of three charts. Each differs in the information displayed and graphical representation of the pedigree. The Stick Dog Color chart is optimal for entering conformation quality data whereas the Symbols chart is optimal for entering trait data. Both the Stick Dog Color chart and Symbols chart are capable of displaying the litter and predicted litter for the current generation. The Symbols chart is unique in that it can display the litter for all generations.
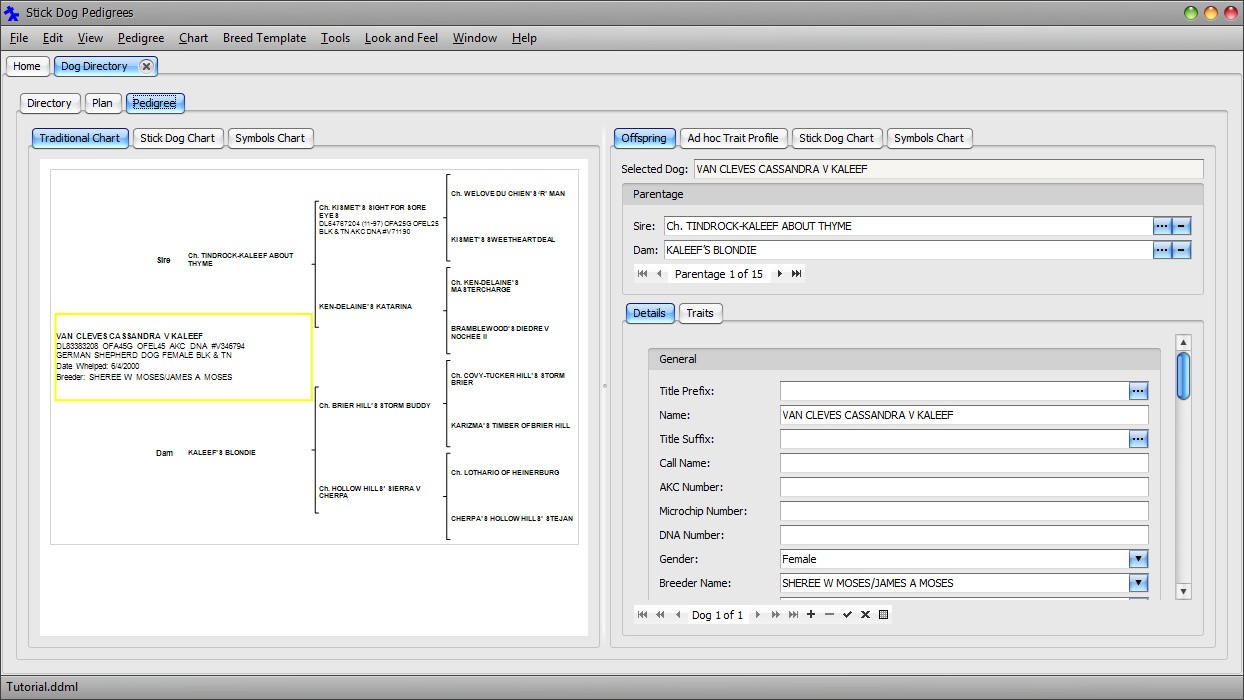
The dam of VAN CLEVE'S DASHIELL HAMMETT is VAN CLEVES CASSANDRA V KALEEF. VAN CLEVES CASSANDRA V KALEEF and her pedigree have already been entered into the directory. It will not be necessary to enter that information again. Instead, all that needs to be done is to set the Sire field of VAN CLEVE'S DASHIELL HAMMETT to the existing VAN CLEVES CASSANDRA V KALEEF record.
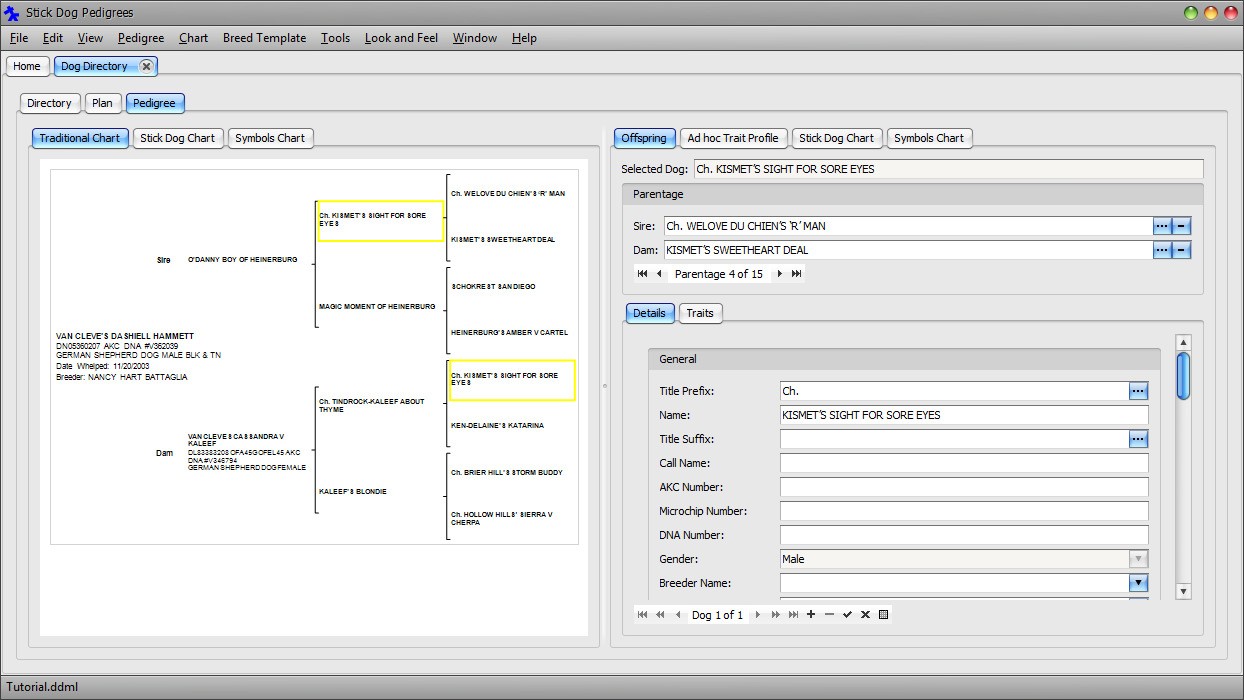
In the chart select VAN CLEVE'S DASHIELL HAMMETT by clicking the name of the dog.
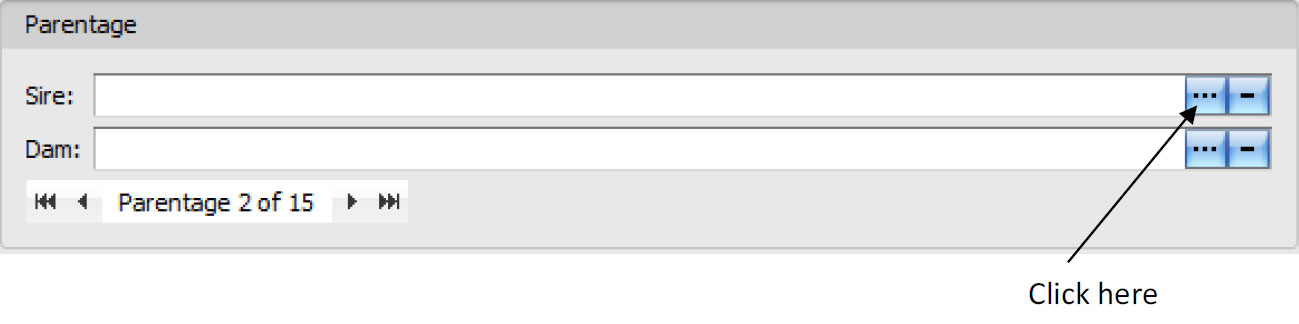
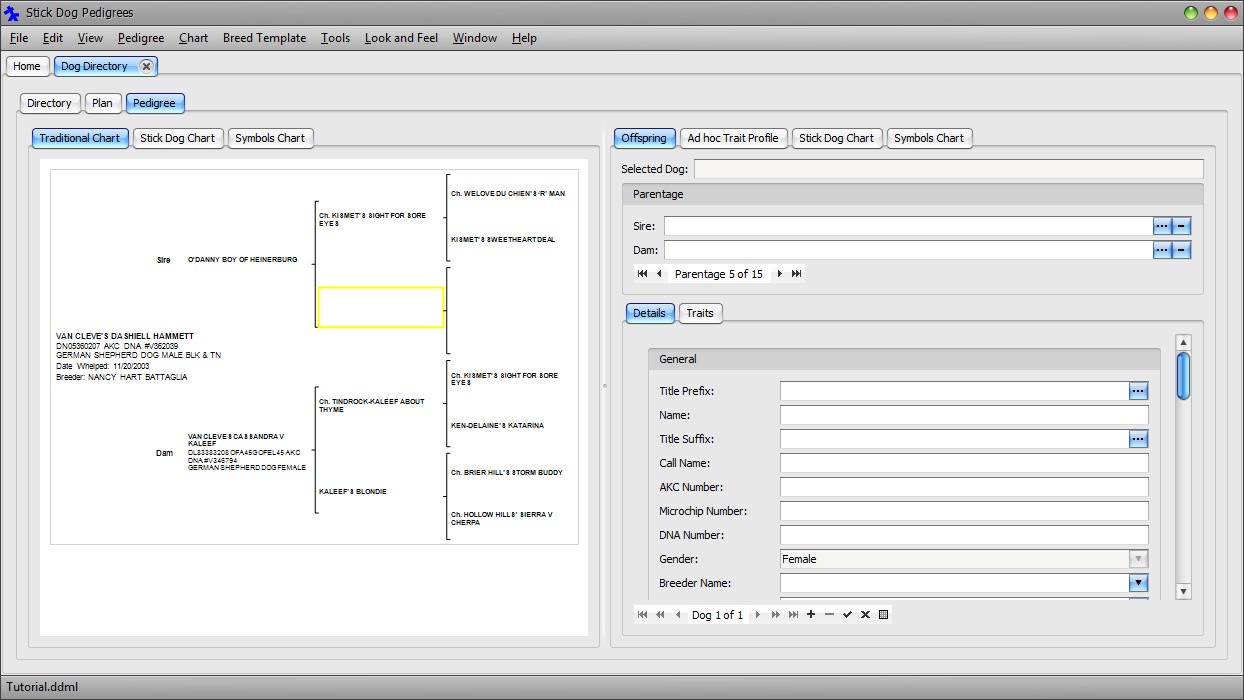
Click the "Replace with Existing" button (the one with the ellipses) of the Dam field located in the Parentage section in the top right hand section of the form. See figure below for the location of the button.
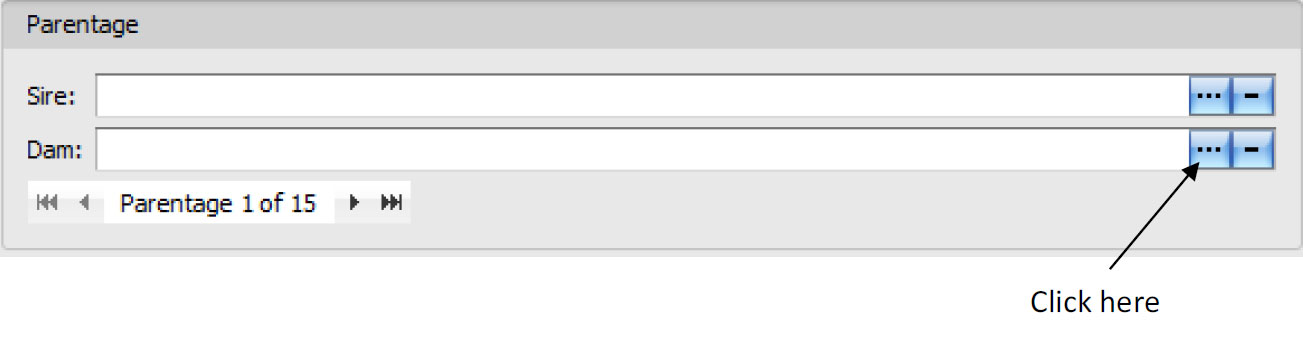
The Dam Lookup dialog appears.
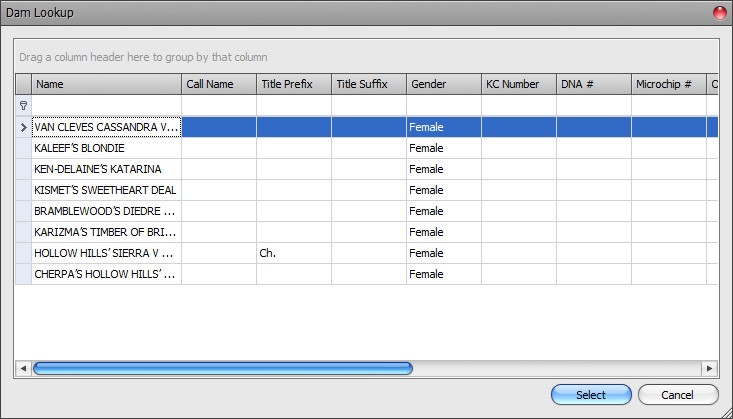
Select row VAN CLEVES CASSANDRA V KALEEF and then click Select.
The pedigree is updated based on the information previously entered into the directory. The application examines the sire and dam attributes of each dog to locate all ancestors automatically.

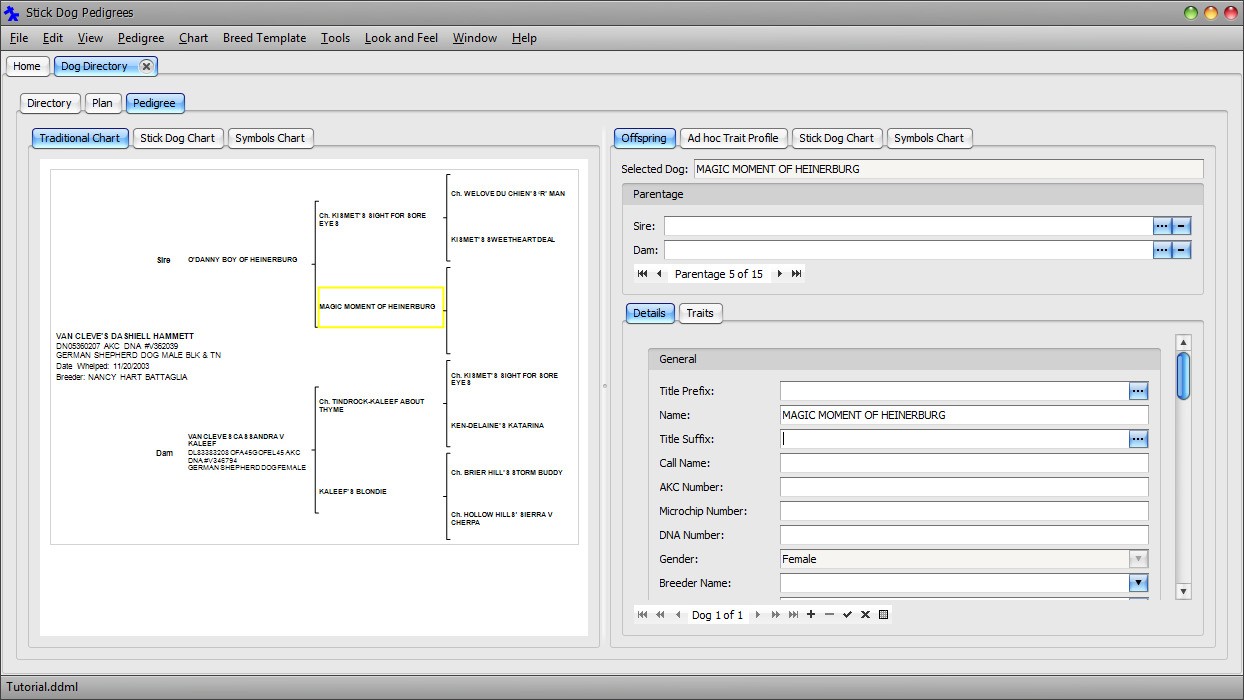
The sire of VAN CLEVE'S DASHIELL HAMMETT, O'DANNY BOY OF HEINERBURG, is a new dog not yet in the directory. A new record will need to be created.
In the Pedigree chart select the sire of VAN CLEVE'S DASHIELL HAMMETT by clicking in the area to the right of the word Sire.
Enter O'DANNY BOY OF HEINERBURG into the Name field located in the Offspring - Details panel on the right. Press Tab to update the chart.
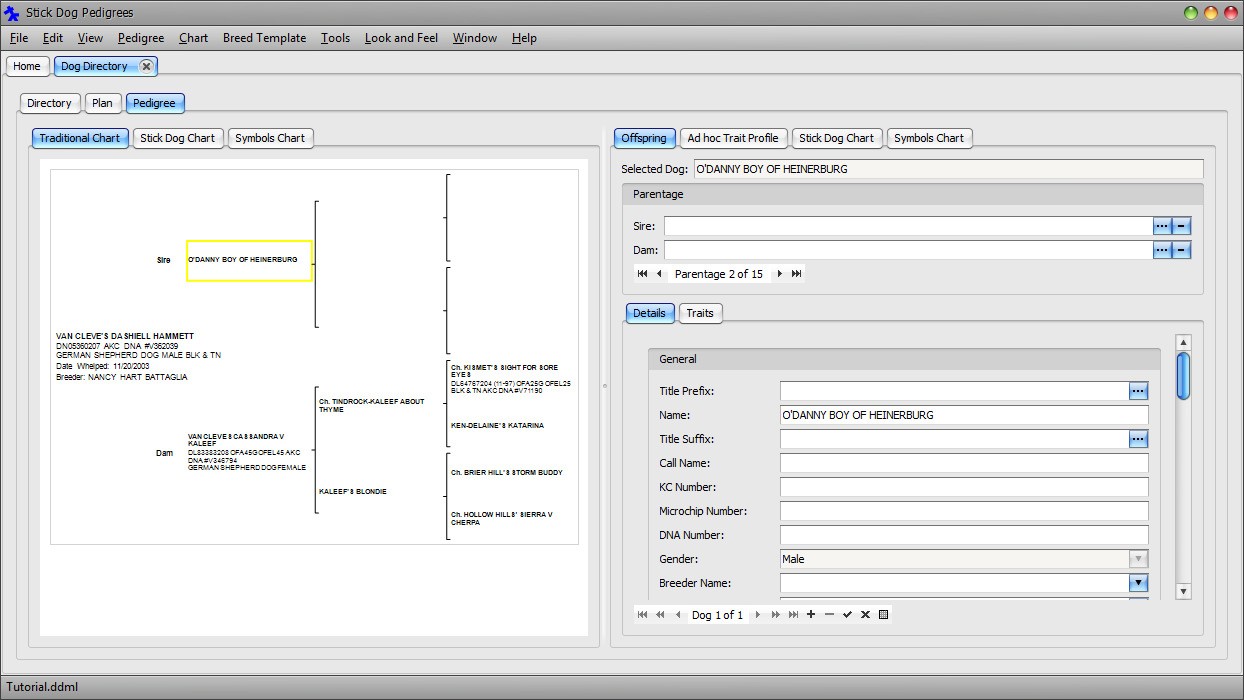
The sire of O'DANNY BOY OF HEINERBURG, KISMET'S SIGHT FOR SORE EYES, has already been entered into the directory. To associate O'DANNY BOY OF HEINERBURG with KISMET'S SIGHT FOR SORE EYES, set the Sire attribute of O'DANNY BOY OF HEINERBURG to KISMET'S SIGHT FOR SORE EYES.
Click the "Replace with Existing" button of the Sire field located in the Parentage section in the top right hand section of the form.
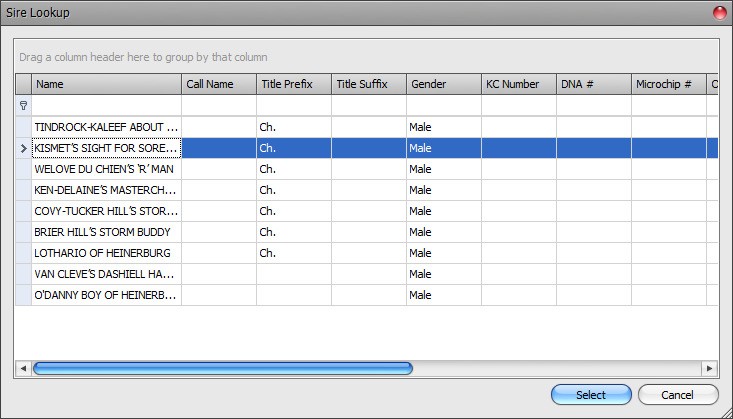
Select row KISMET'S SIGHT FOR SORE EYES and then click Select.
The pedigree is updated based on the information previously entered into the directory.
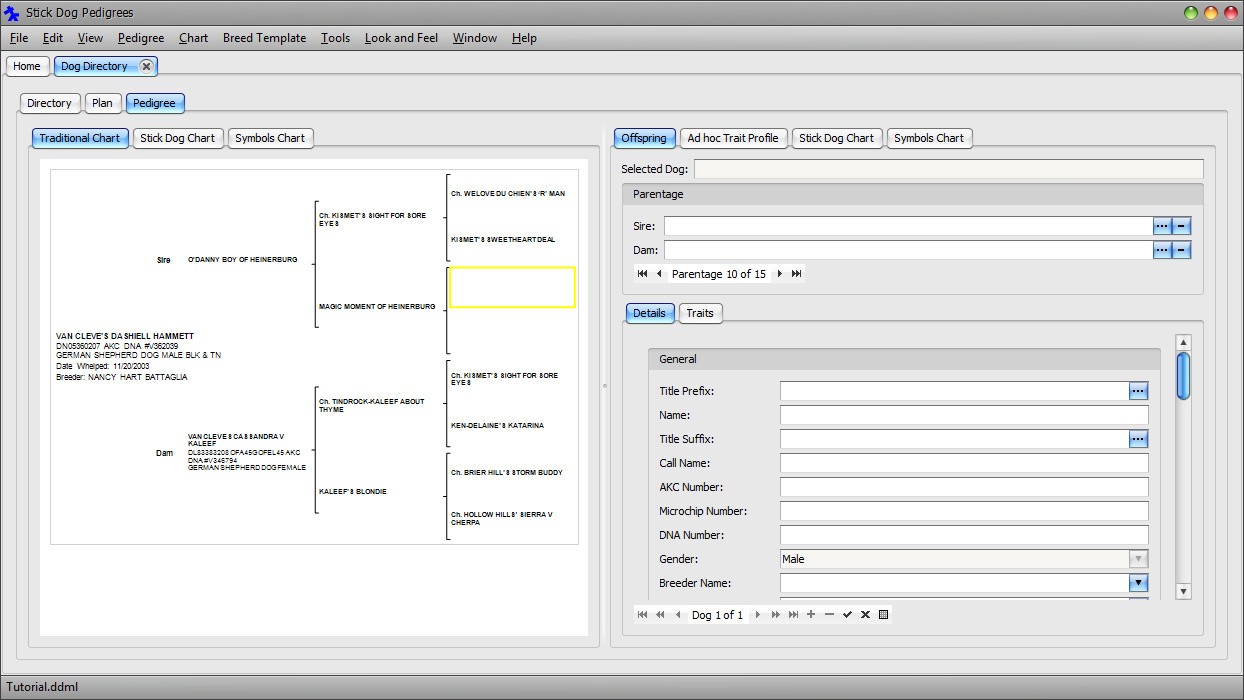
The dam of O'DANNY BOY OF HEINERBURG is MAGIC MOMENT OF HEINERBURG. MAGIC MOMENT OF HEINERBURG has not been previously entered into the directory. A new record needs to be created.
In the Pedigree chart select the dam of O'DANNY BOY OF HEINERBURG by clicking the blank area highlighted in the figure below.
Enter MAGIC MOMENT OF HEINERBURG into the Name field located in the Offspring - Details panel on the right. Press Tab to update the chart.
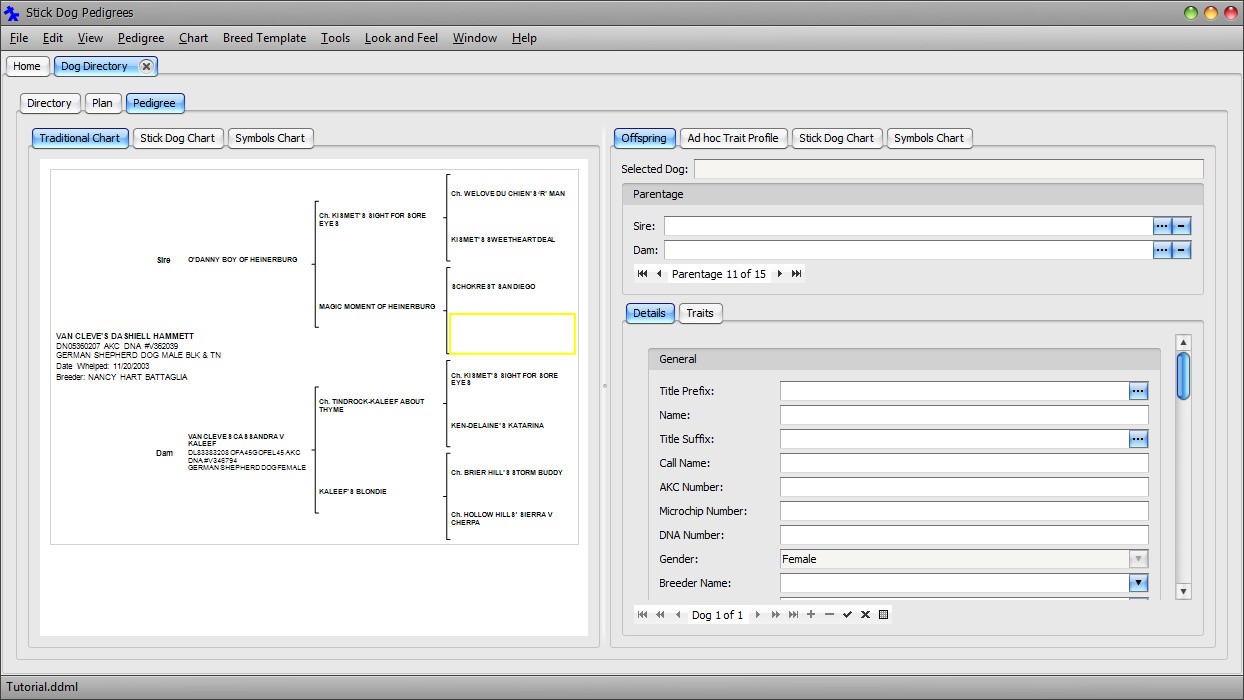
The sire of MAGIC MOMENT OF HEINERBURG is SCHOKREST SAN DIEGO. SCHOKREST SAN DIEGO has not been previously entered into the directory. A new record needs to be created.
In the Pedigree chart click the sire of MAGIC MOMENT OF HEINERBURG by clicking the blank area highlighted in the figure below.
Enter SCHOKREST SAN DIEGO into the Name field located in the Offspring - Details panel on the right. Press Tab to update the chart.

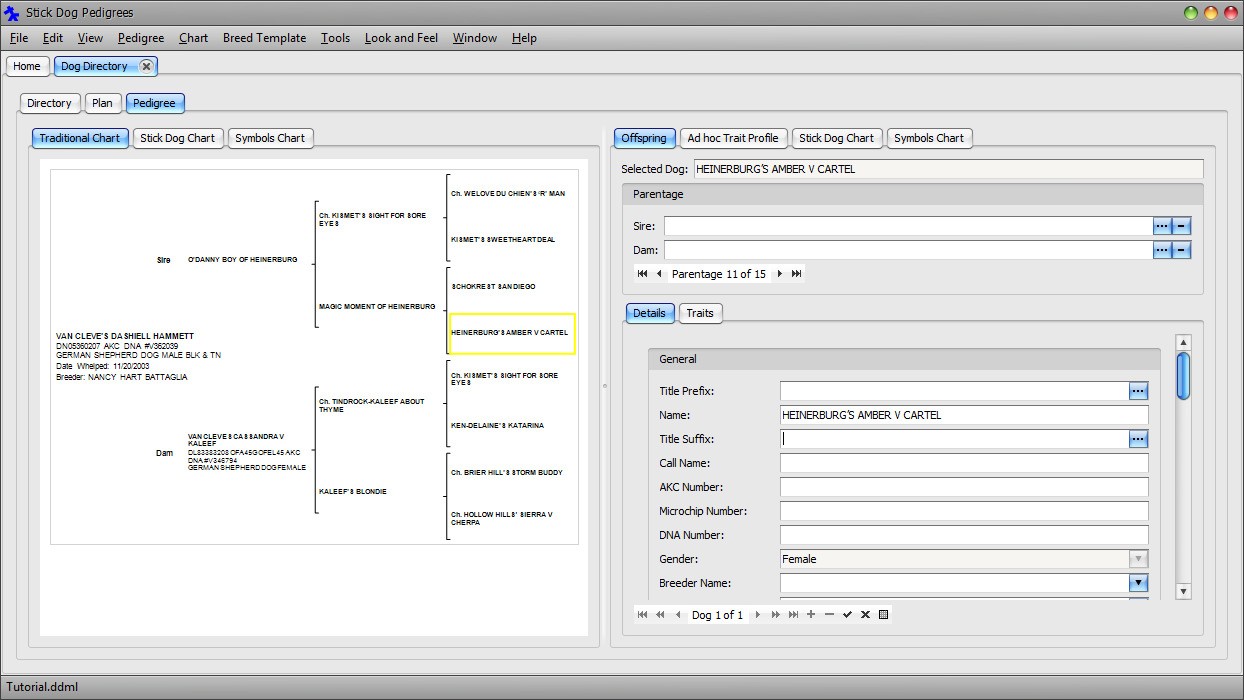
The dam of MAGIC MOMENT OF HEINERBURG is HEINERBURG'S AMBER V CARTEL. HEINERBURG'S AMBER V CARTEL has not been previously entered into the directory. A new record needs to be created.
In the Pedigree chart click the dam of MAGIC MOMENT OF HEINERBURG by clicking the blank area highlighted in the figure below.
Enter HEINERBURG'S AMBER V CARTEL into the Name field located in the Offspring - Details panel on the right. Press Tab to update the chart.
Click Main Menu → File → Save to save changes to file.
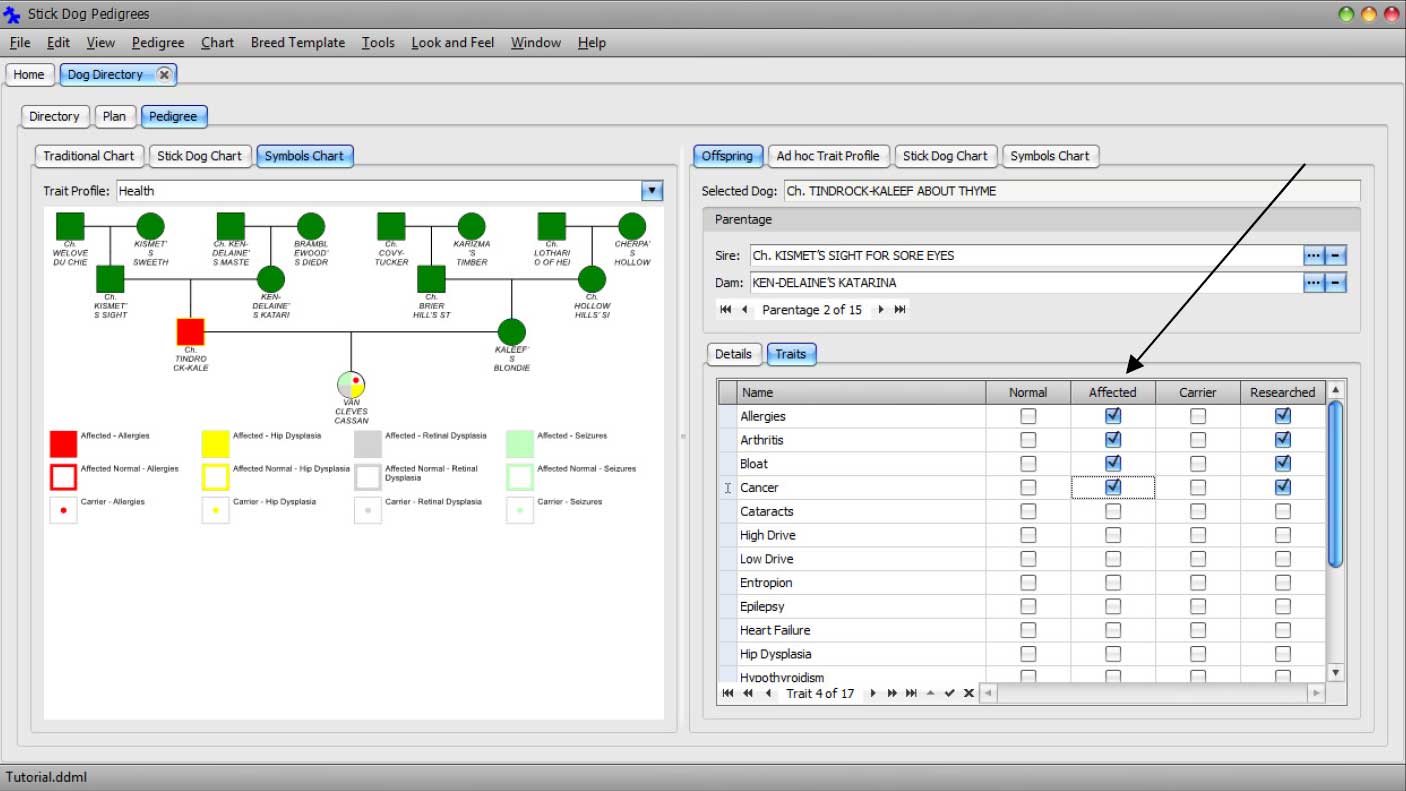
Notice that the pedigree now contains an example of line breeding. KISMET'S SIGHT FOR SORE EYES has been bred to MAGIC MOMENT OF HEINERBURG and KEN-DELAINE'S KATARINA. By using existing information in the directory to build the pedigree instead of creating new records for each dog, both instances of KISMET'S SIGHT FOR SORE EYES appearing in the chart represent the same dog record in the directory.
To demonstrate this, we will select one of the instances of KISMET'S SIGHT FOR SORE EYES in the chart and update its description. The update will automatically appear in the in the other instance.
In the Pedigree chart click the instance of KISMET'S SIGHT FOR SORE EYES situated at the top of the third column to select it. You may also select the other instance appearing in the fourth column. It does not matter which one is selected. Notice both are highlighted.
Enter the following text into the Conformation Notes field located in the Offspring - Details panel on the right. You may need to scroll down to see it. Press Tab to update the chart.
DL64767204 (11-97) OFA25G OFEL25
BLK & TN AKC DNA #V71190
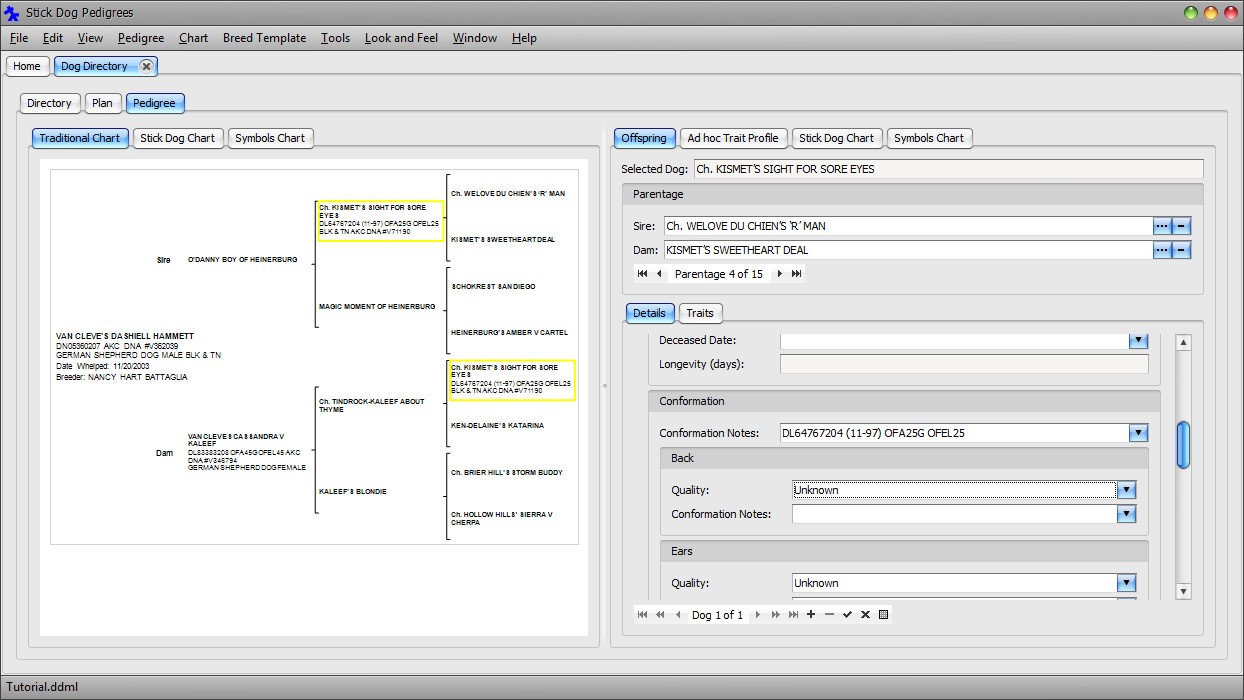
Notice that both instances of KISMET'S SIGHT FOR SORE EYES show the same update. Any changes made to one instance are automatically reflected all other instances that may exist in the pedigree.

Click the Directory tab to switch to the Dog Details List panel.
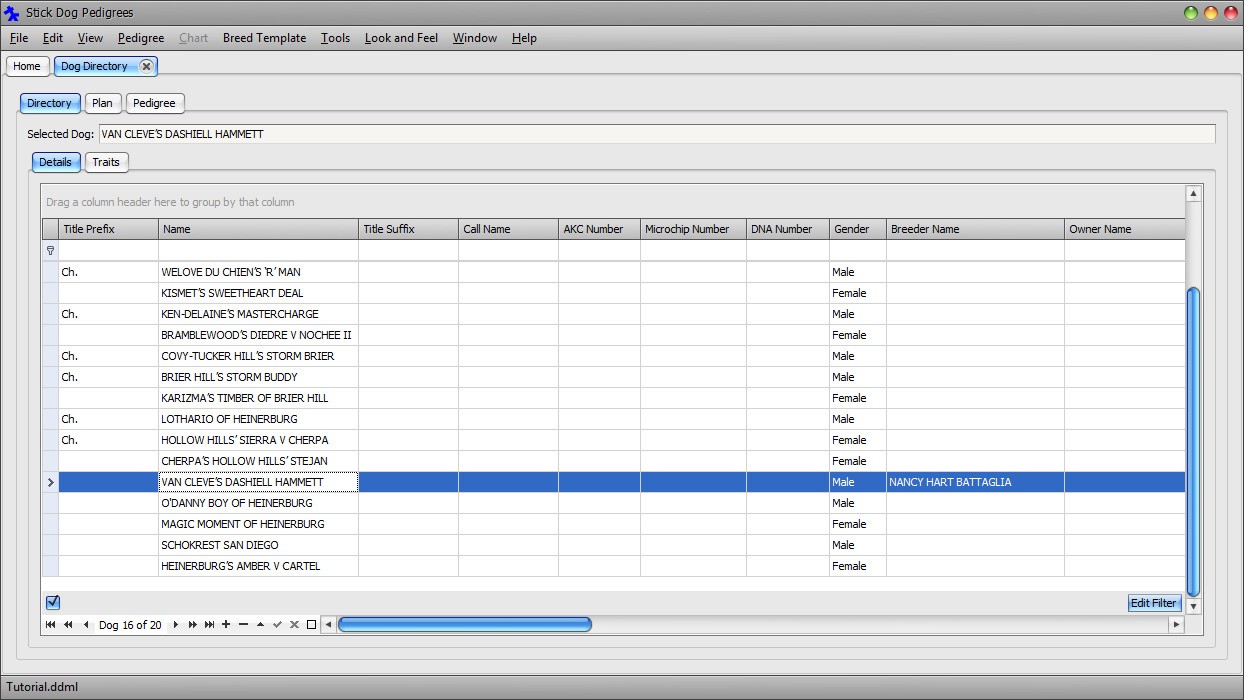
Notice that the only dog records added to the directory are those unique to the VAN CLEVE'S DASHIELL HAMMETT pedigree. By using the Sire and Dam lookup function to associate existing dogs with the new pedigree, duplication of dog records has been avoided.
To demonstrate this point, we will check for the number of copies of KISMET'S SIGHT FOR SORE EYES.
Enter "KISMET'S SIGHT" into the filter row Name field.
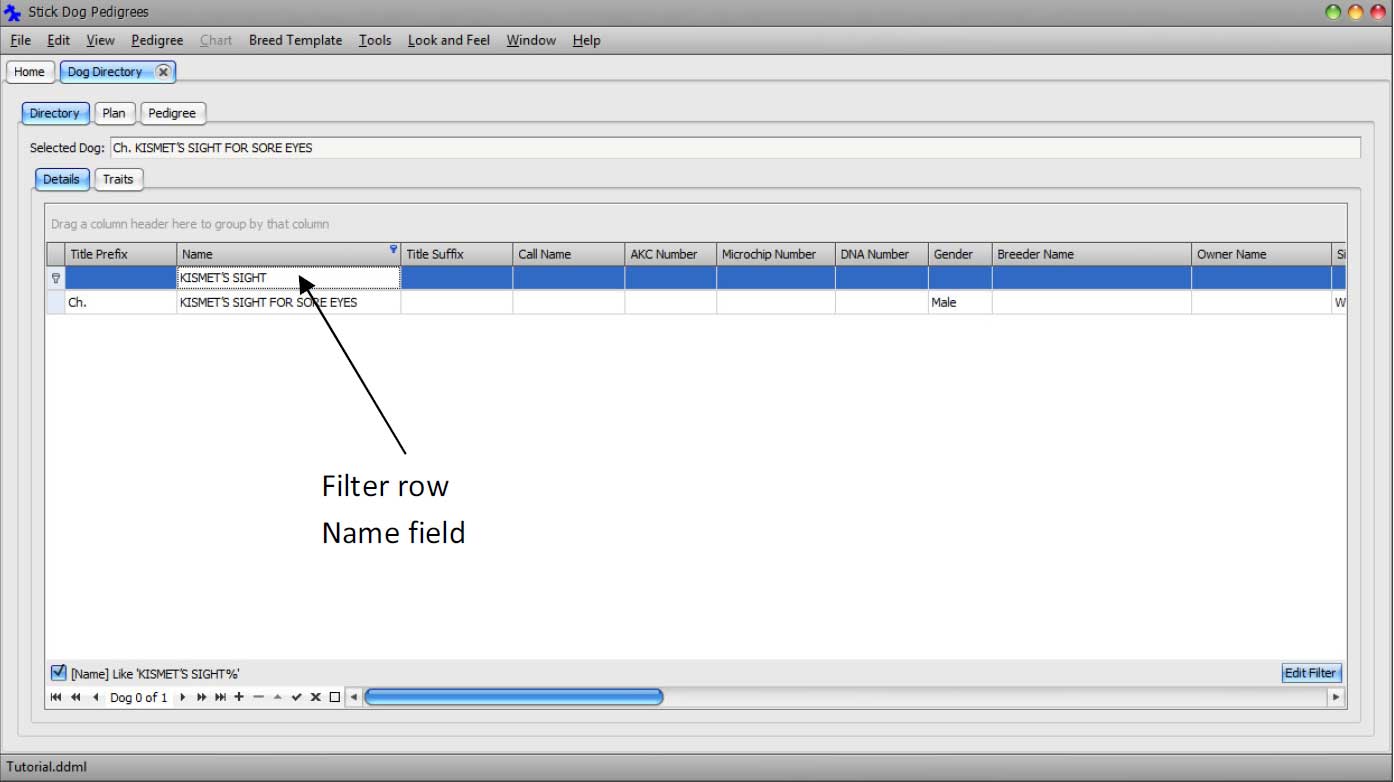
Only one record meets the filter criteria instead of two, proving there are no duplicates.
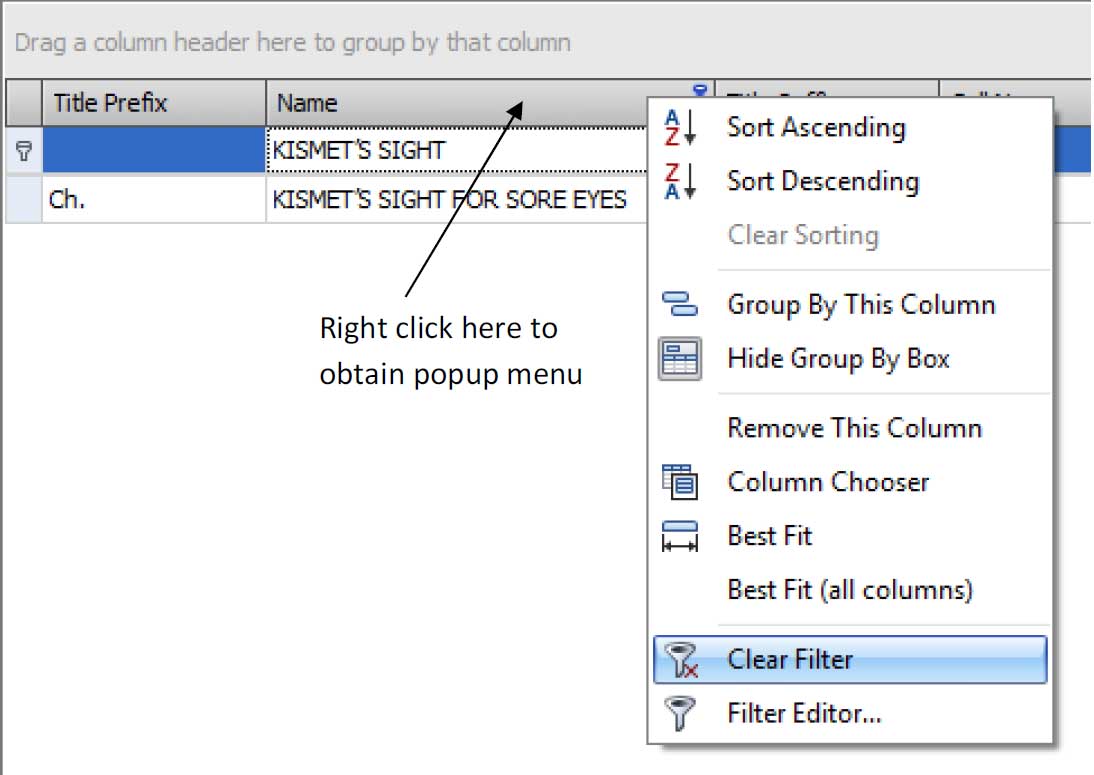
Clear the filter by right clicking in the Name header and choosing "Clear Filter".
All the records are displayed again.
Next, we will demonstrate sorting the list. It is possible to sort by most columns. To sort by Name, click the Name header.
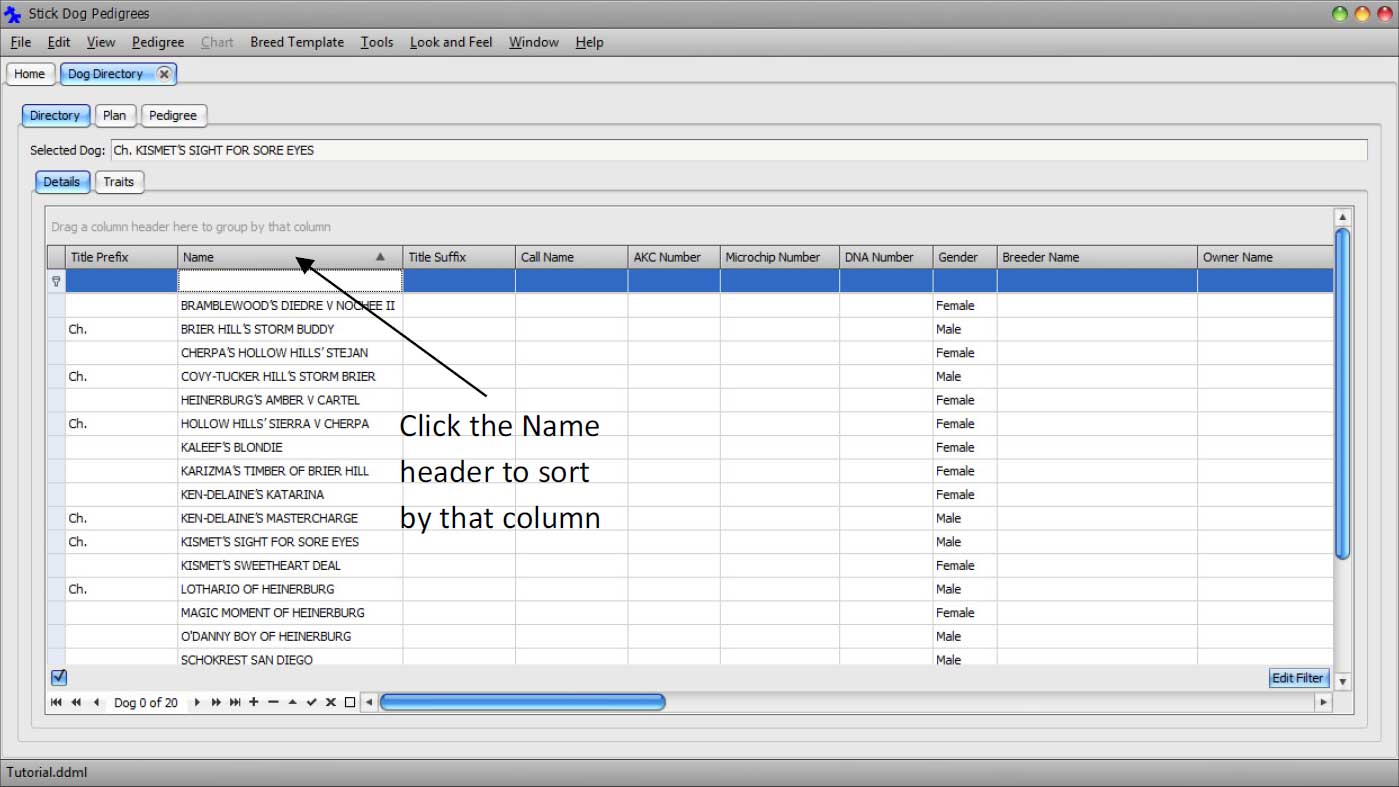
Inspection of the sorted list confirms there are no duplicates.
Save the changes to file by clicking Main Menu → File → Save.
In part 4 of this tutorial, we will enter conformation quality data and trait data with the aid of the Stick Dog Color and Symbols charts.
Before proceeding to part 4, click the close button on the right hand side of the Dog Directory tab.
The document tab is removed from the main application window.
Part 4: Coding the Color & Symbols Chart
In part 4 of this tutorial, we will enter conformation quality data and trait data with the aid of the Stick Dog Color and Symbols charts.
We will start by opening the previously saved dog directory document created in parts 1 to 3 of this tutorial.
Click Main Menu → View → Dog Directory.
If "Tutorial" is the only dog directory document in the library, the application and opens it automatically, otherwise it presents the Dog Directory Selector dialog so that you can select the document to open.
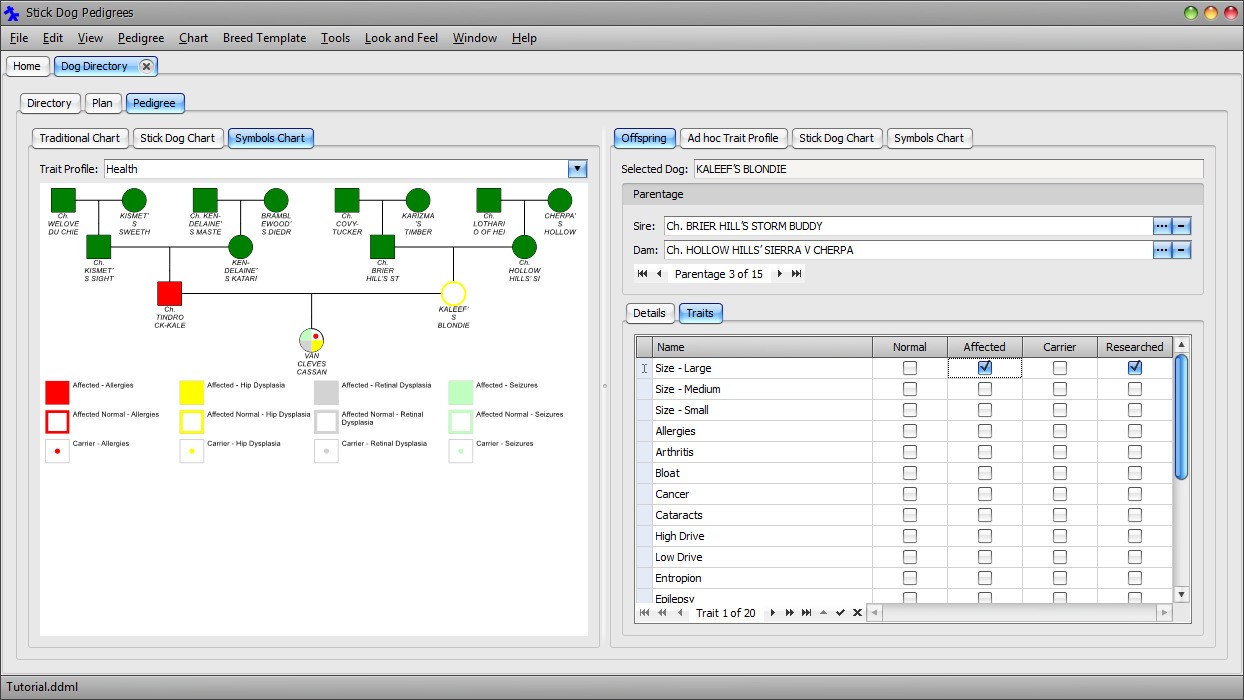
Display the pedigree for VAN CLEVES CASSANDRA V KALEEF. Recall that this can be done by selecting the record in the Dog Details List panel (Directory tab) and clicking the Pedigree tab, or by using the most recent list of the Pedigree menu.
Click the Stick Dog Chart tab to display the Stick Dog Color chart instead of the Traditional chart that is shown by default.
Color-coding each dog is as simple as setting the Conformation Quality fields located in the Offspring - Details panel located on the right hand side of the screen.
Scroll the Offspring - Details panel down until the Conformation section appears.
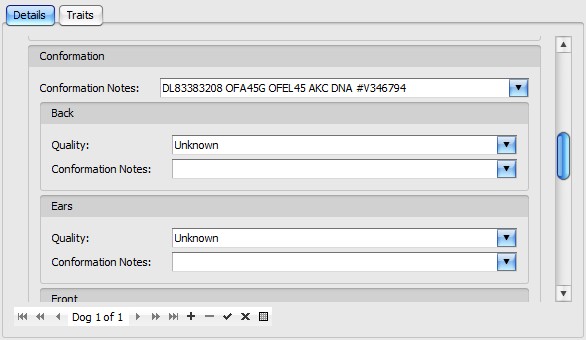
Click the button on the right hand side of the Back - Quality field (see below).
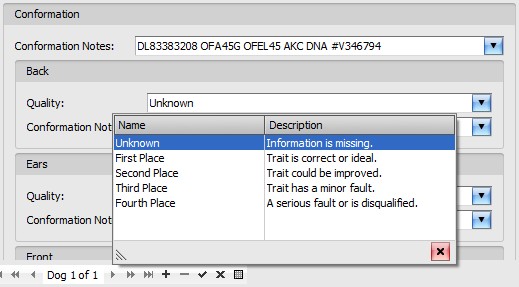
Choose "First Place" from the dropdown list.
Notice the selected dog back segment is now colored blue.
Set the remaining Conformation - Quality fields as follows:
Ears: Second Place
Front: Third Place
Head: Fourth Place
Neck: First Place
Rear: Fourth Place
Tail: Second Place
The following figure shows the chart representation of the dog after the above settings are applied.

All dogs can be color-coded using the same method. To color-code a dog, select it by clicking its image in the chart, then update the Conformation - Quality fields in the Offspring - Details panel. Note that it is not necessary to use the Stick Dog Color chart to apply quality settings. Settings can be made using any chart or via the Dog List panel (Directory tab).
Next, we will color code traits using the Symbols chart.
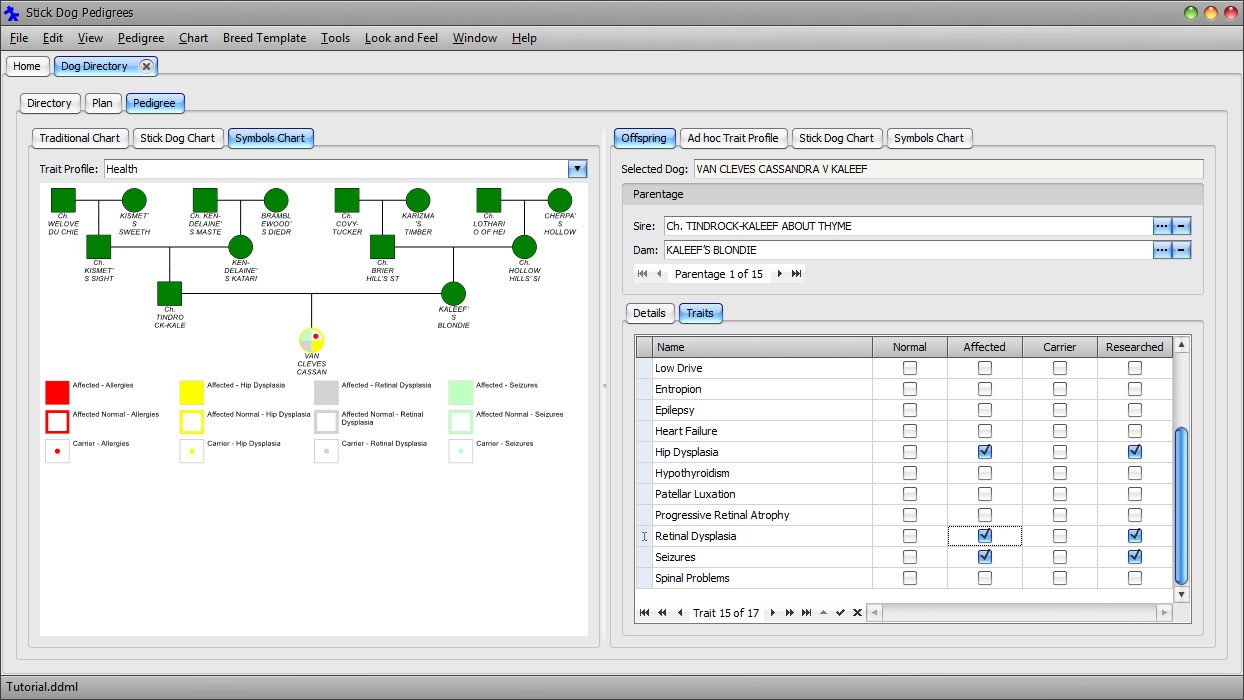
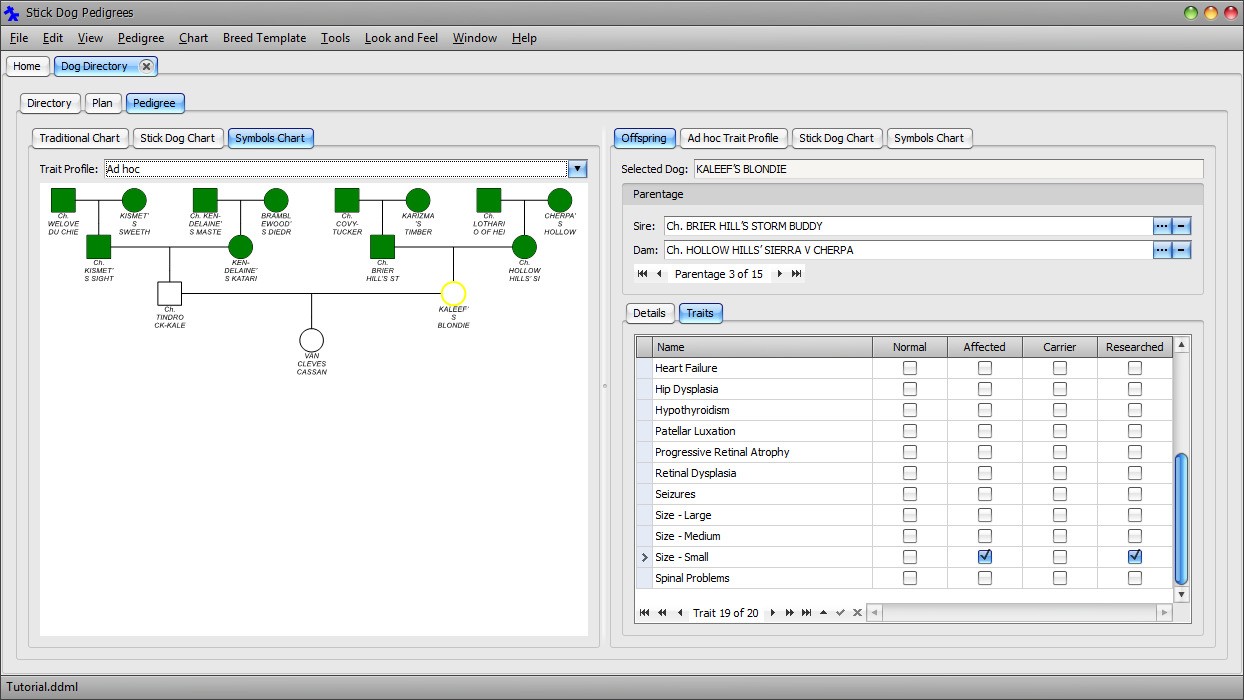
Click the Symbols Chart tab to display the Symbols chart.
Square symbols represent male dogs, circles females. Small squares indicate gender unknown.
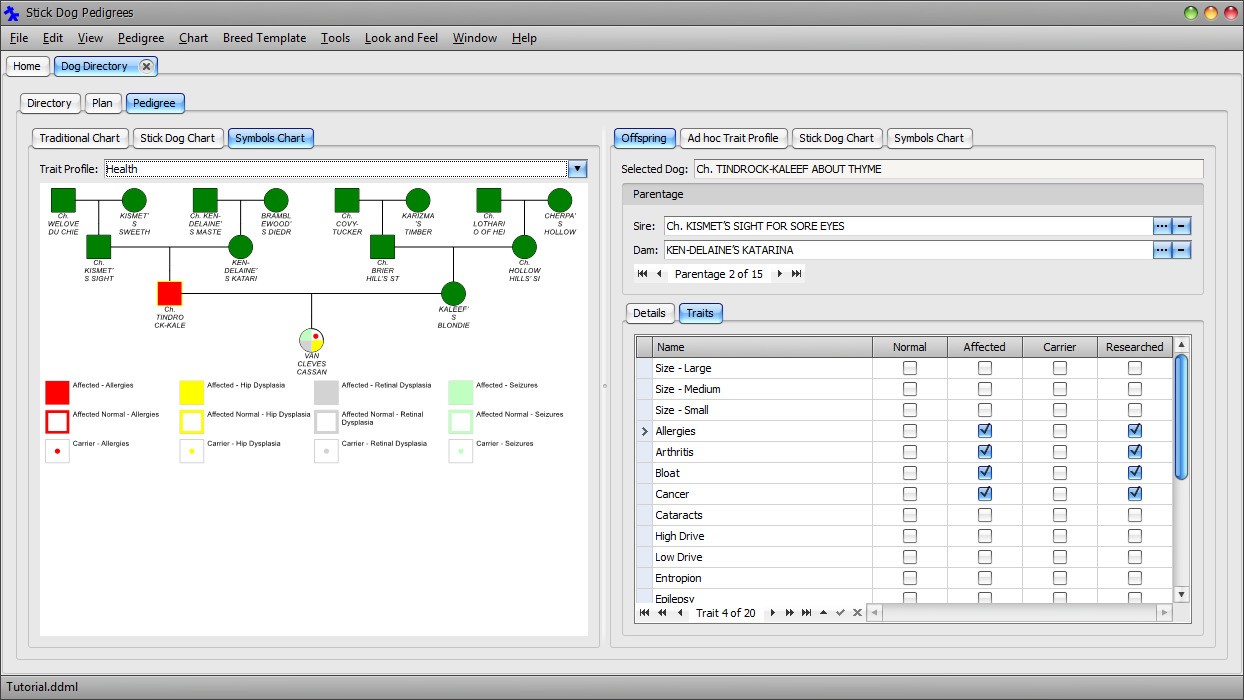
Click the Traits tab located in the Offspring panel to view the trait information for the currently selected dog.
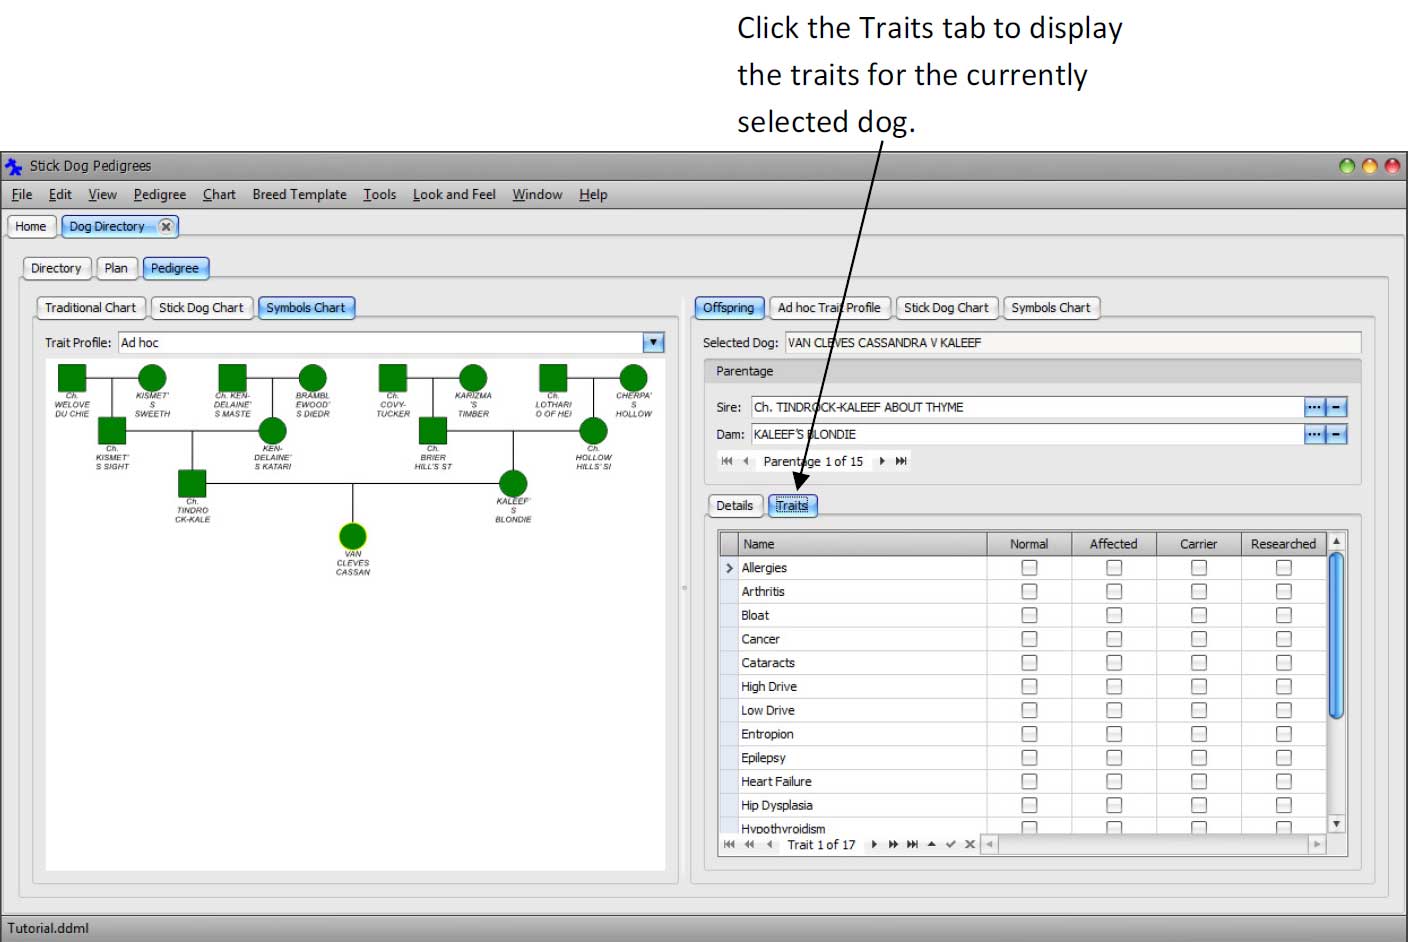
The set of possible traits for each dog are defined by the "DEFAULT" breed template that was selected when the Dog Directory was created. The Affected, Carrier, and Researched columns are editable. The remaining columns - Name and Normal - are populated according to the breed template. The Normal column is checked whenever a trait is considered normal for the breed. Since the "DEFAULT" template is not breed specific, there are no traits marked normal.
To specify a trait, click the corresponding checkbox in the Affected, Carrier, or Researched columns. The settings have the following meanings:
Affected - Dog exhibits trait.
Carrier - Dog does not exhibit trait, however is a known carrier of the trait.
Researched - Research shows neither Affected nor Carrier applies. This setting helps to distinguish between not knowing if Affected or Carrier applies and knowing that neither applies.
Note The Researched checkbox is automatically checked when either Affected or Carrier are checked because either setting implies the trait was researched.
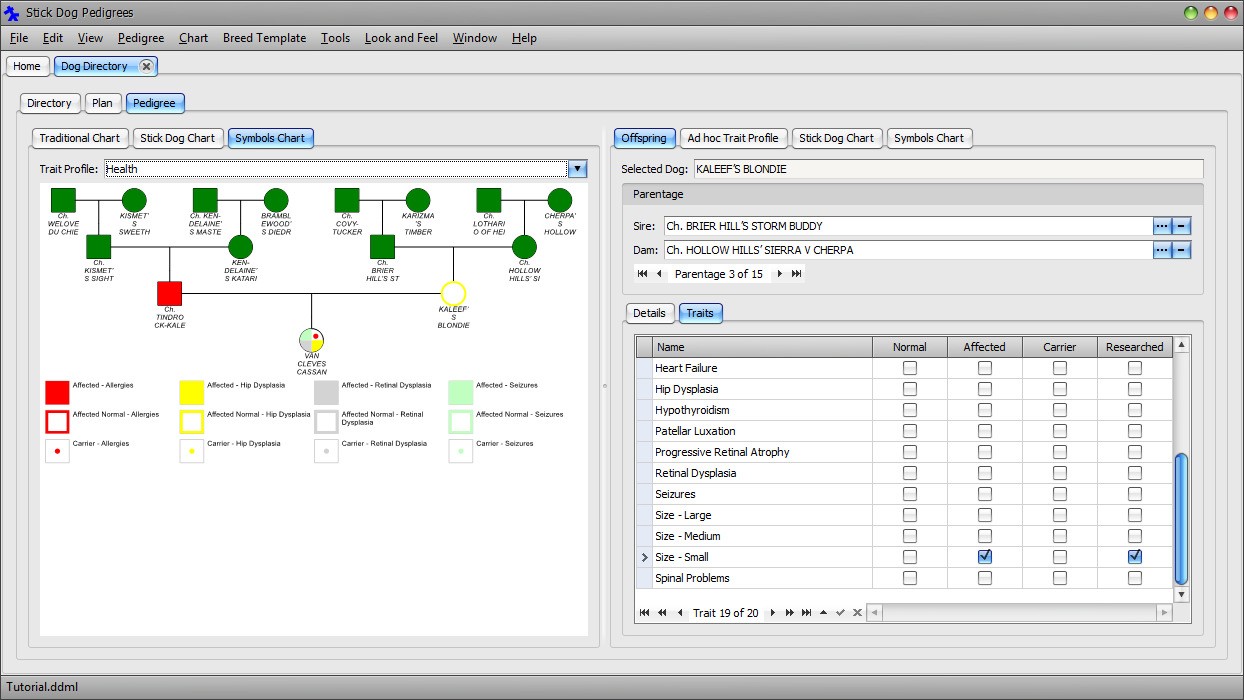
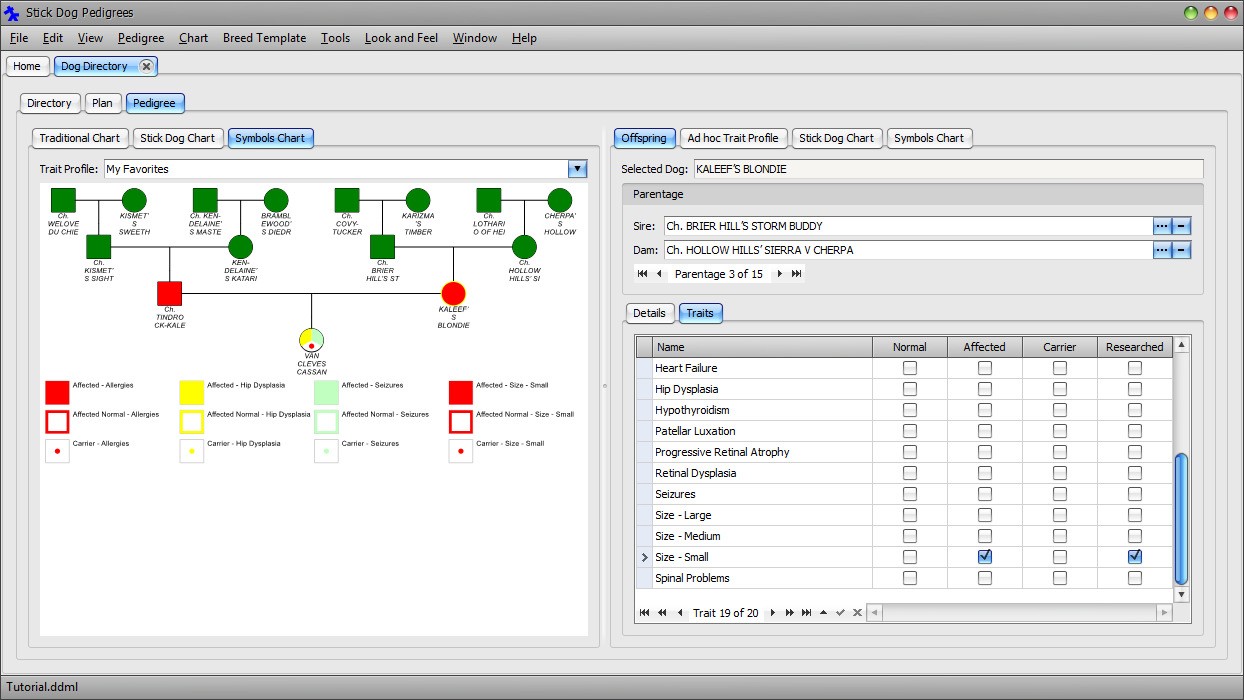
Click the Affected checkbox for trait Allergies. Notice that the symbol for the dog in the chart changes from solid green to white. This indicates that the dog has at least one trait selected. However, the chart provides no indication of which trait is selected.
The reason why is because the chart is limited to showing a maximum of four different traits, and it is possible for more than four traits to be selected (Affected or Carrier) for any given dog. Therefore, it is necessary to specify which traits the chart should display.
To specify which set of traits the chart is to display, a trait profile must be selected.
Select the Health trait profile by choosing it from the dropdown list above the Symbols chart.
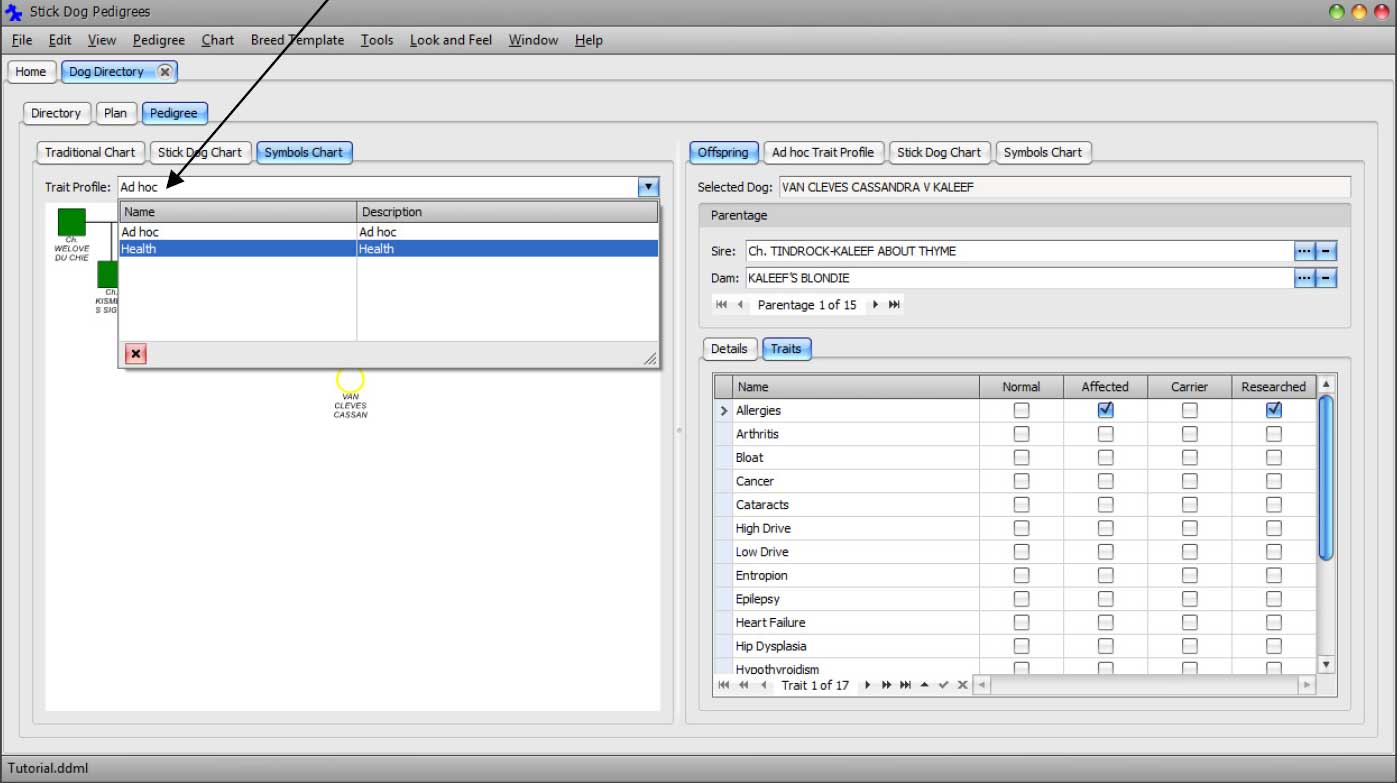
Notice the result. "Allergies", "Hip Dysplasia", "Retinal Dysplasia", and "Seizures" traits have been selected for display and appear in the legend at the bottom of the chart.
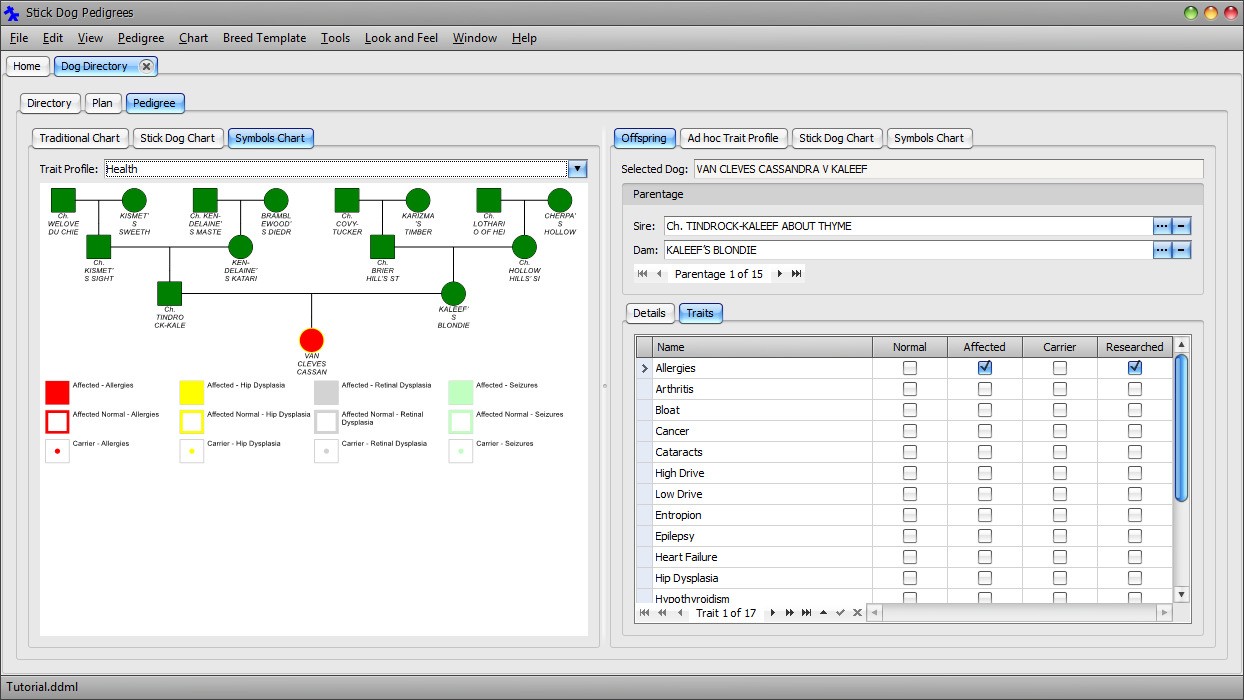
Recall that the currently selected dog was marked Allergies - Affected. Since Allergies appears in the Health trait profile, the Symbols chart colors the current dog red. Red is the color defined by the Health profile to represent Allergies.
Note: If the Allergies trait had been defined as normal, the symbol would have been drawn with a red outline instead of sold red.
Return to the Traits panel and set the Allergies trait to Carrier instead of Affected. Notice the symbol changes to show a red dot instead of solid red.
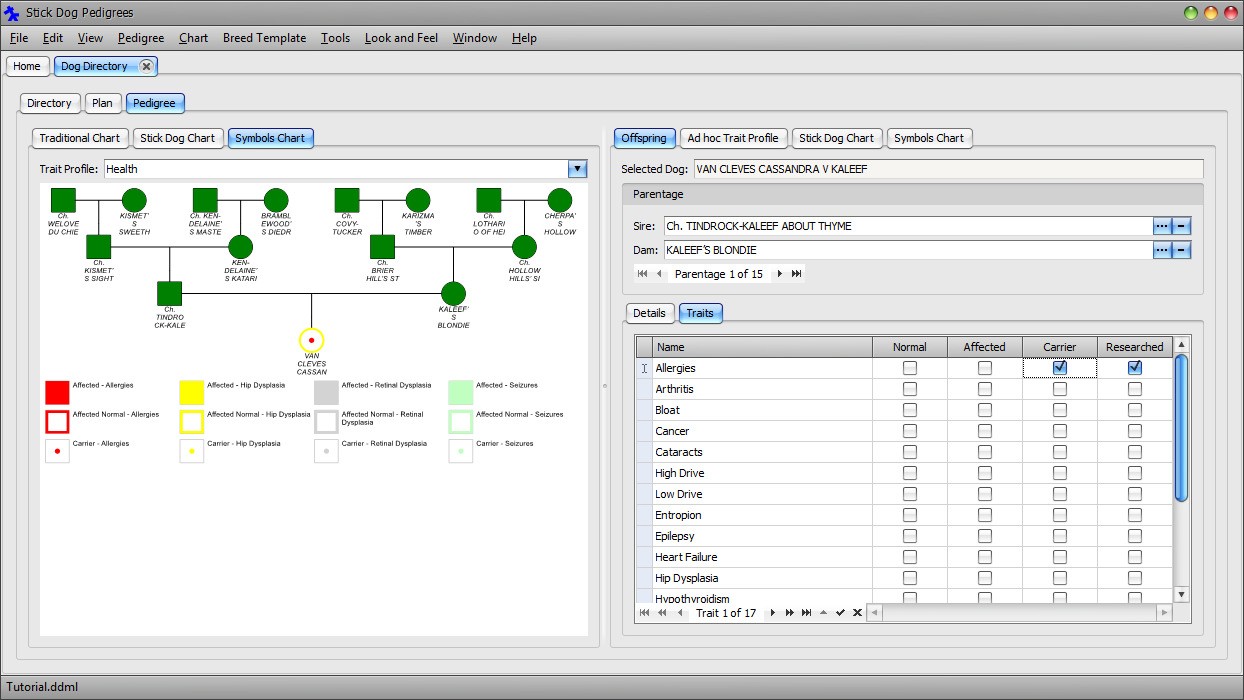
Each dog symbol can display up to four of the traits included in the legend.
Set "Hip Dysplasia" = "Affected", "Retinal Dysplasia" = Affected, and "Seizures" = Affected. Notice the changes to the symbol as this selections are made.
Note The trait selections for each dog are independent of the chart. The trait profile only serves to configure the chart. Changing the trait profile changes the traits displayed by the chart (i.e. the legend). The trait selections associated with each dog are not impacted in any way.
Click the symbol corresponding to dog TINDROCK-KALEEF ABOUT THYME. Notice the set of traits are the same.
Set the first four traits appearing in the list. Notice that the symbol is colored solid red. Of the four selected traits, the chart is configured to display only the first one.
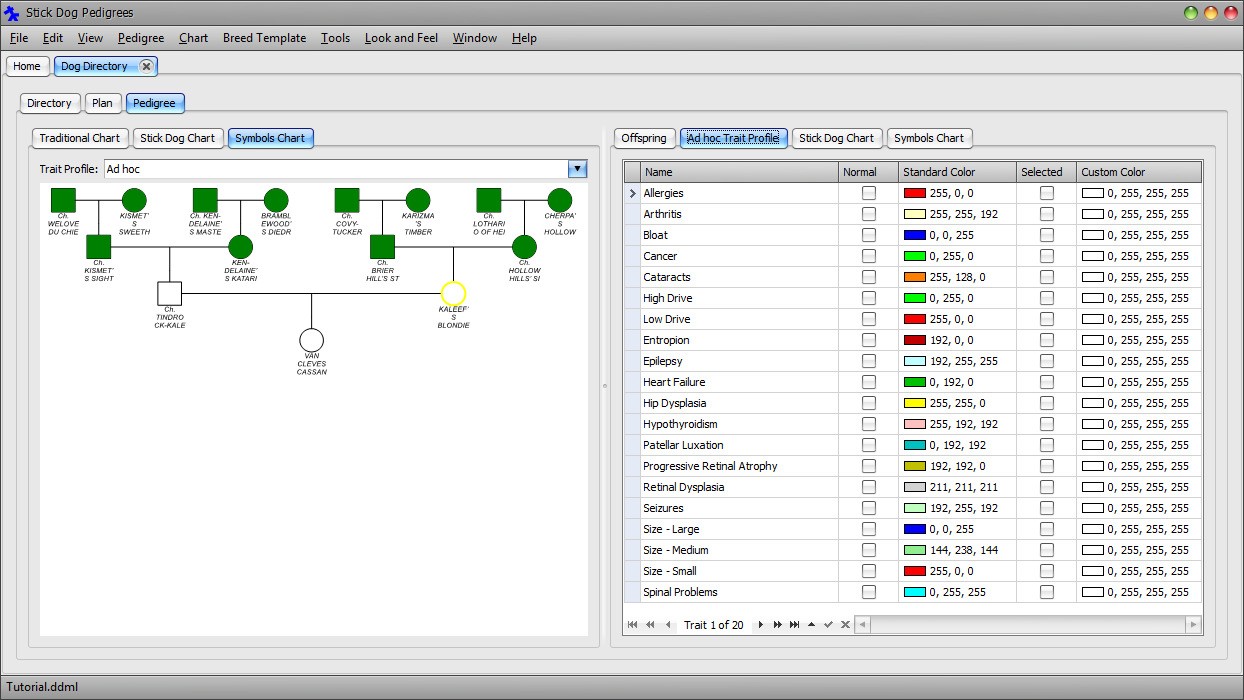
Trait profiles are part of the breed template definition. Updating them or adding new profiles requires updating the breed template. To edit the breed template embedded inside the directory document, click Main Menu → Breed Template → Edit.
The Dog Directory Breed Template Editor dialog appears.
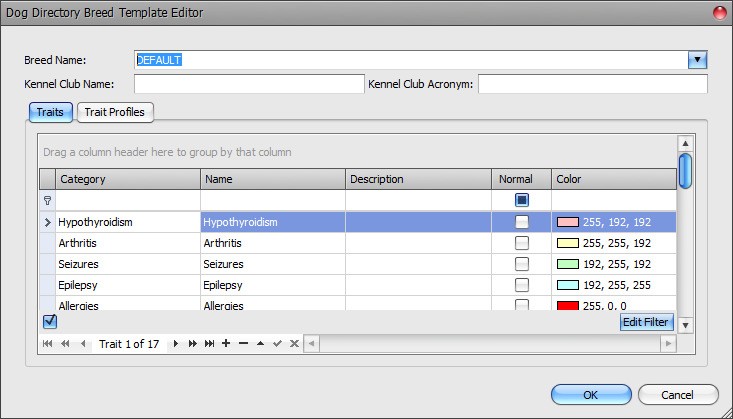
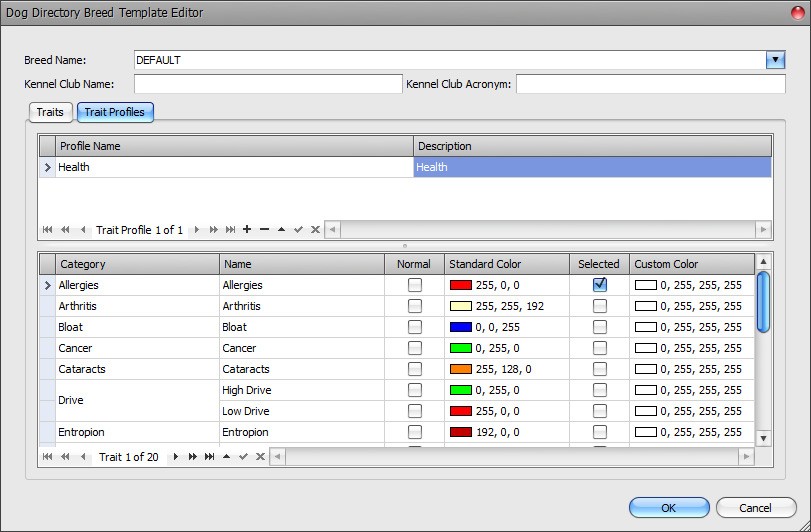
The Editor is divided into two panels - Traits and Trait Profiles. The Traits panel enables editing of the trait list. Traits can be changed, deleted, or added. The Trait Profiles panel enables editing of trait profiles.
Next, we will add a size trait.
Click the Append button in the Trait Data Navigator underneath the trait grid.
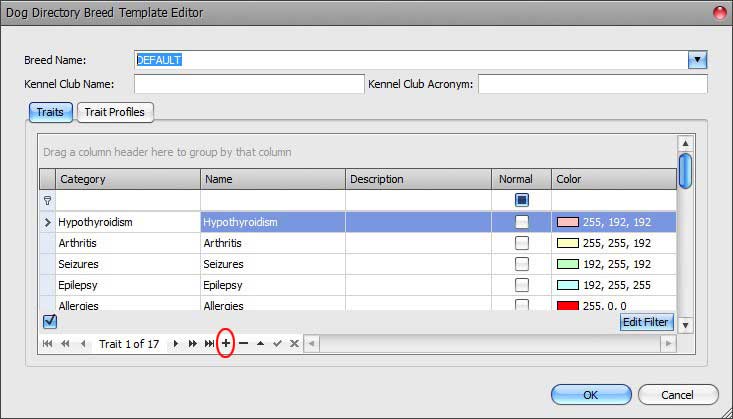
A new trait record is appended to the list.
Click the Name column and enter Size - Small. Set the color column to Red. Leave Category blank.
Repeat the previous two steps adding "Size - Medium" = Light Green and "Size - Large" = Blue. Remember to leave the Category blank. Click OK to accept changes and close the dialog.
Notice the new traits are added to the trait list.
Note: The reason why the three Size traits appear at the top of the list is that the list is actually sorted by Category followed by Name. The reason why the list is sorted by "Category, Name" instead of "Name" will become apparent later.
Note The Trait panel Category column is hidden by default.
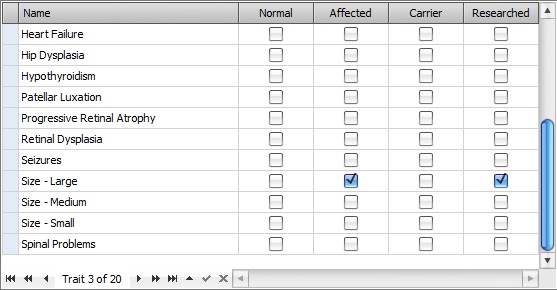
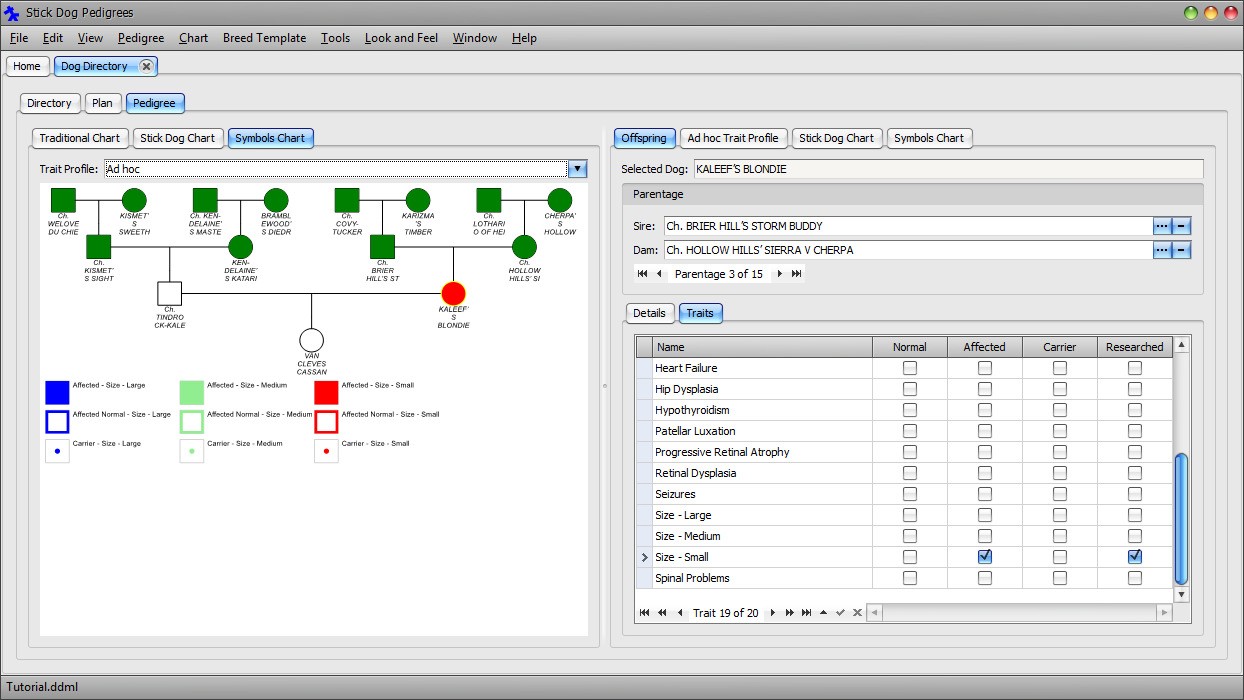
Click the symbol corresponding to KALEEF'S BLONDIE and set trait "Size - Large" = Affected.
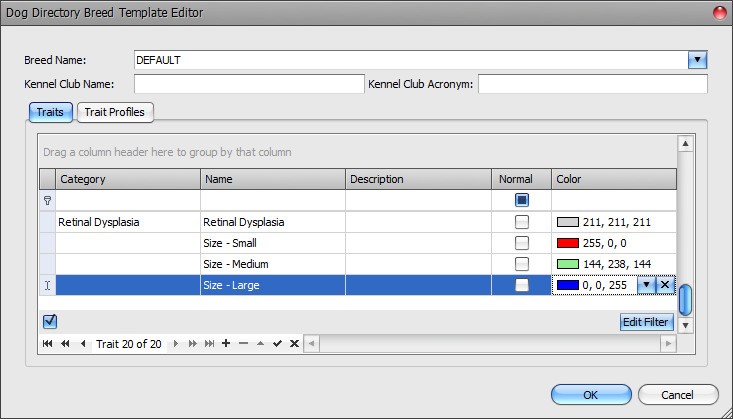
Set trait "Size - Small" = Affected. There is a problem; large and small are now both selected. They should be mutually exclusive. To make them mutually exclusive, it is necessary to update the breed template by assigning all three traits to the same non-blank category.

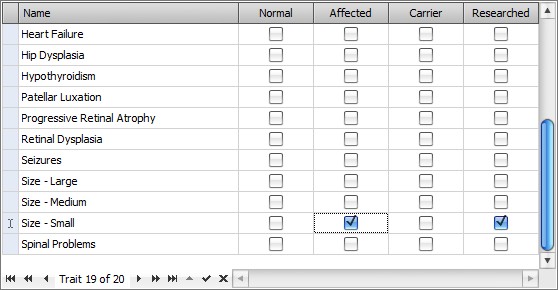
Deselect "Size - Small" Affected and Researched checkboxes so that only "Size - Large" Affected is checked.

Click Main Menu → Breed Template → Edit.
Set the Category of each of three size traits to "Size".
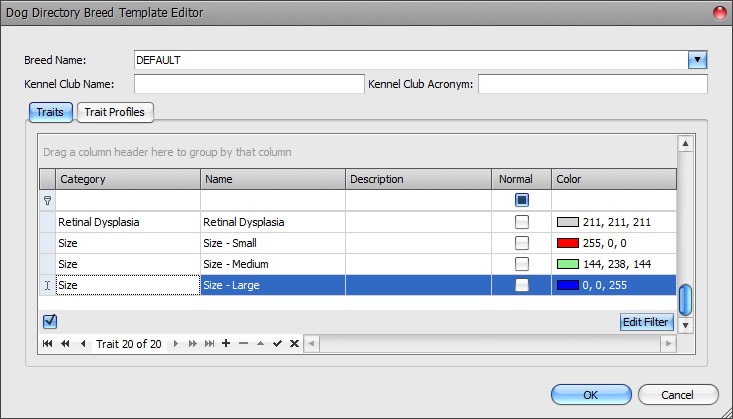
Click OK to accept the changes.
Note You could set the category name to anything you like as long as it is not being used by another group of traits.
Notice the sorting now appears correct. The set of traits that came with the DEFAULT breed template all have category assignments, even though most traits do not belong to any group. The only exception is the Drive trait. All traits except Drive could have been assigned to the blank category. If that had been the case, the Size traits with blank category would have appeared under Seizures. The Drive traits would have appeared at the bottom of the list.
Set trait "Size - Small" = Affected again. Notice "Size - Large" is deselected. The Size traits are now mutually exclusive.
The size selection is not displayed in the chart because none of the Size traits is included in the Health trait profile. There are two ways to include the Size traits in the Symbols chart. The first to make use of a special trait profile called the Ad hoc. The second is to add a new trait profile that includes one or more of the Size traits to the breed template.
The Ad hoc profile is not part of the breed template. Therefore, no matter which breed template is selected at the time of dog directory creation, the Ad hoc profile will always be present. As suggested by its name, the purpose of the Ad hoc profile is to enable quick selection of various combinations of traits for display in the Symbols chart. In contrast, trait profiles are created for combinations of traits that are viewed regularly.
Next, we will demonstrate how to use the Ad hoc profile to display the Size traits.
Select the Ad hoc trait profile from the Trait Profile dropdown list located above the Symbols chart.
Notice the legend has disappeared from the symbols chart and no symbol is color-coded. This is because the Ad hoc trait profile has no traits selected by default. Recall that the white color of the three dogs signifies they have trait selections.
Click the "Ad hoc Trait Profile" tab at the top right hand side of the screen. Unlike trait profiles defined in the breed template, the Ad hoc profile can be configured directly within the Dog Directory form without needing to open the Breed Template Editor dialog.
Click the Selected checkbox for each of the three Size traits.

Notice the three traits appear in the Symbols chart legend and trait selection ("Size - Small" = Affected) for KALEEF'S BLONDIE is now displayed by the chart.
Switching profiles is easy, as will be demonstrated next.
Select the Health trait profile from the Trait Profile dropdown list located above the Symbols chart.
Notice the chart now displays the Health related traits.
Select the Ad hoc trait profile from the Trait Profile dropdown list located above the Symbols chart.
The chart now renders the Size traits. Next, we will create a new trait profile to demonstrate how to group commonly viewed traits together for easy selection whenever the need arises.
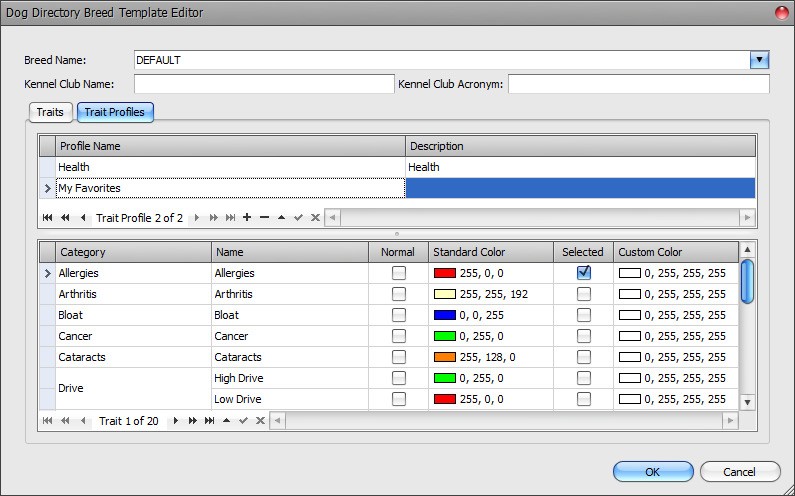
Click Main Menu → Breed Template → Edit. Click the Trait Profiles tab. Resize the dialog by dragging the bottom right corner to increase the size of the upper grid.
The upper grid displays the profiles defined in the breed template. The lower grid displays the trait selections for the selected profile in the upper grid.
Click the Append button in the Trait Profile Data Navigator (upper grid). Enter "My Favorites" in the Profile Name field.
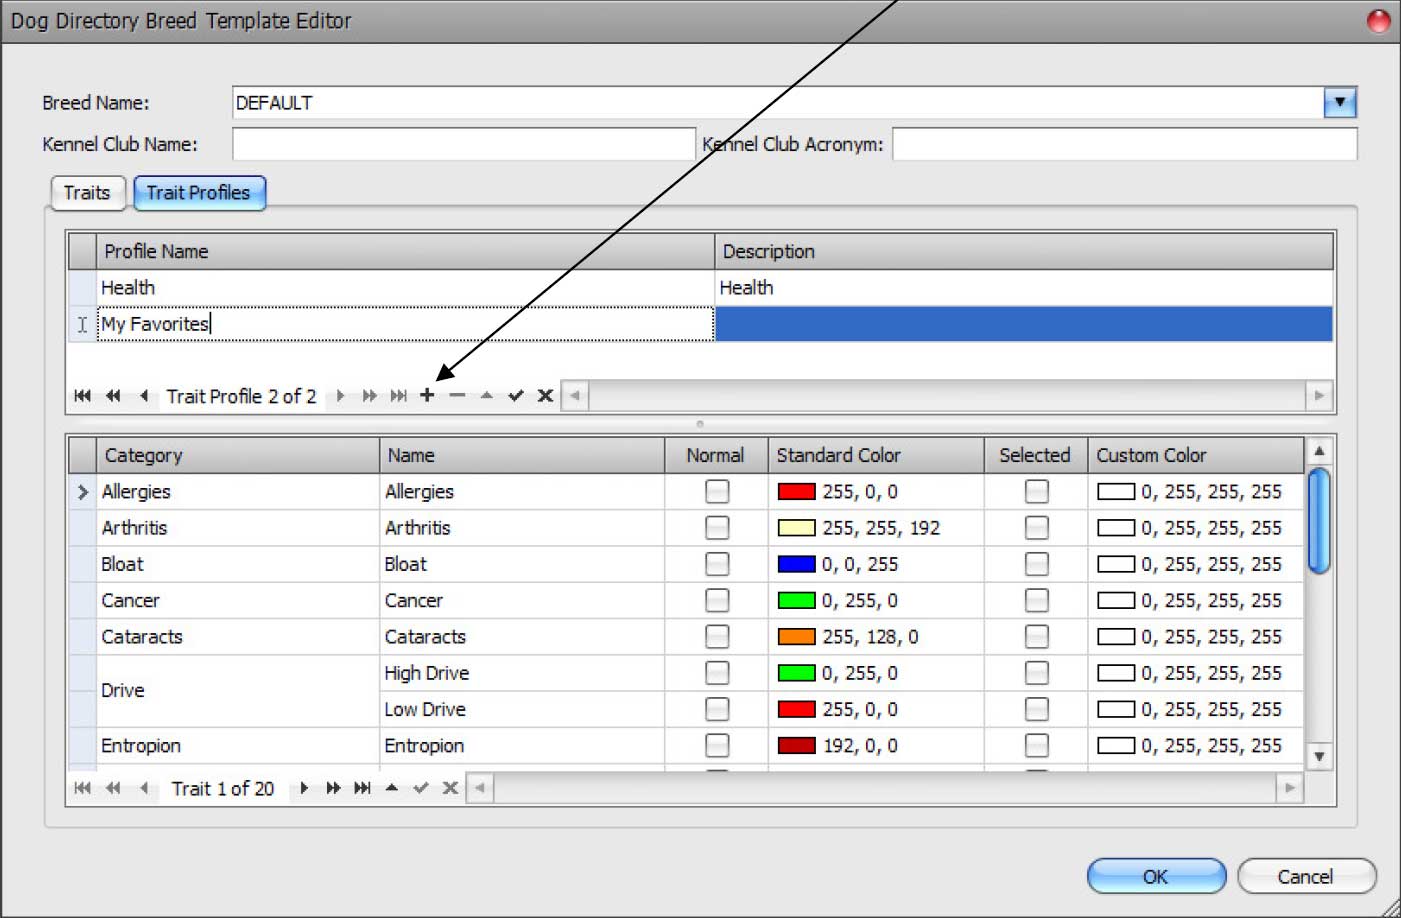
In the lower grid, click the Selected checkbox for the following traits:
- Allergies
- Hip Dysplasia
- Seizures
- Size - Small
Click OK.
Select the Ad hoc trait profile from the Trait Profile dropdown list located above the Symbols chart.
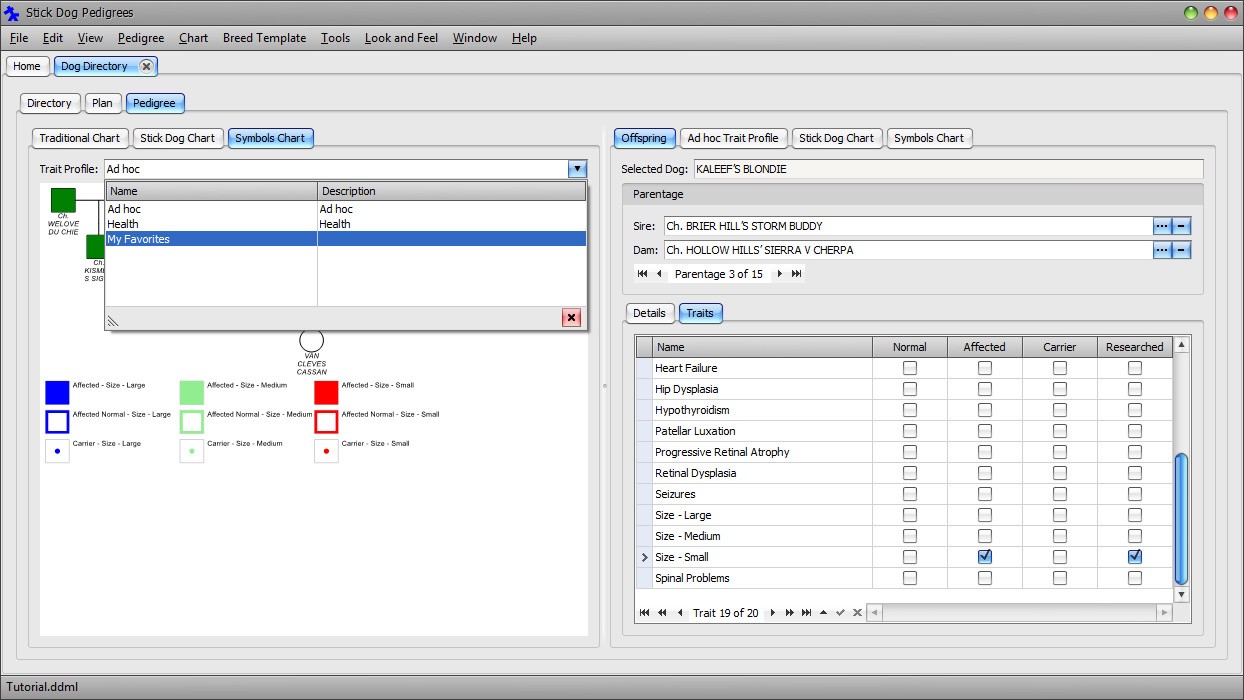
The Symbols chart now displays the Size - Small trait as well as some of the health traits. However, there is a problem. Both Allergies and Size - Small are rendered using the same color - Red. This is easily corrected.
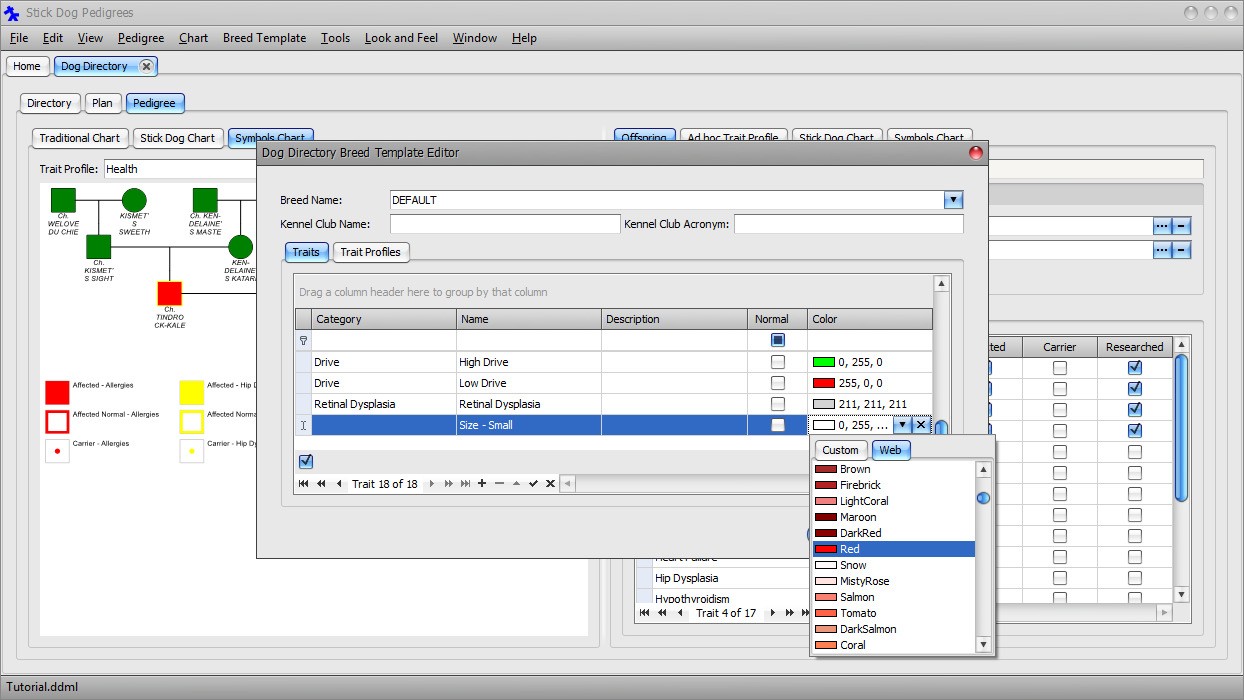
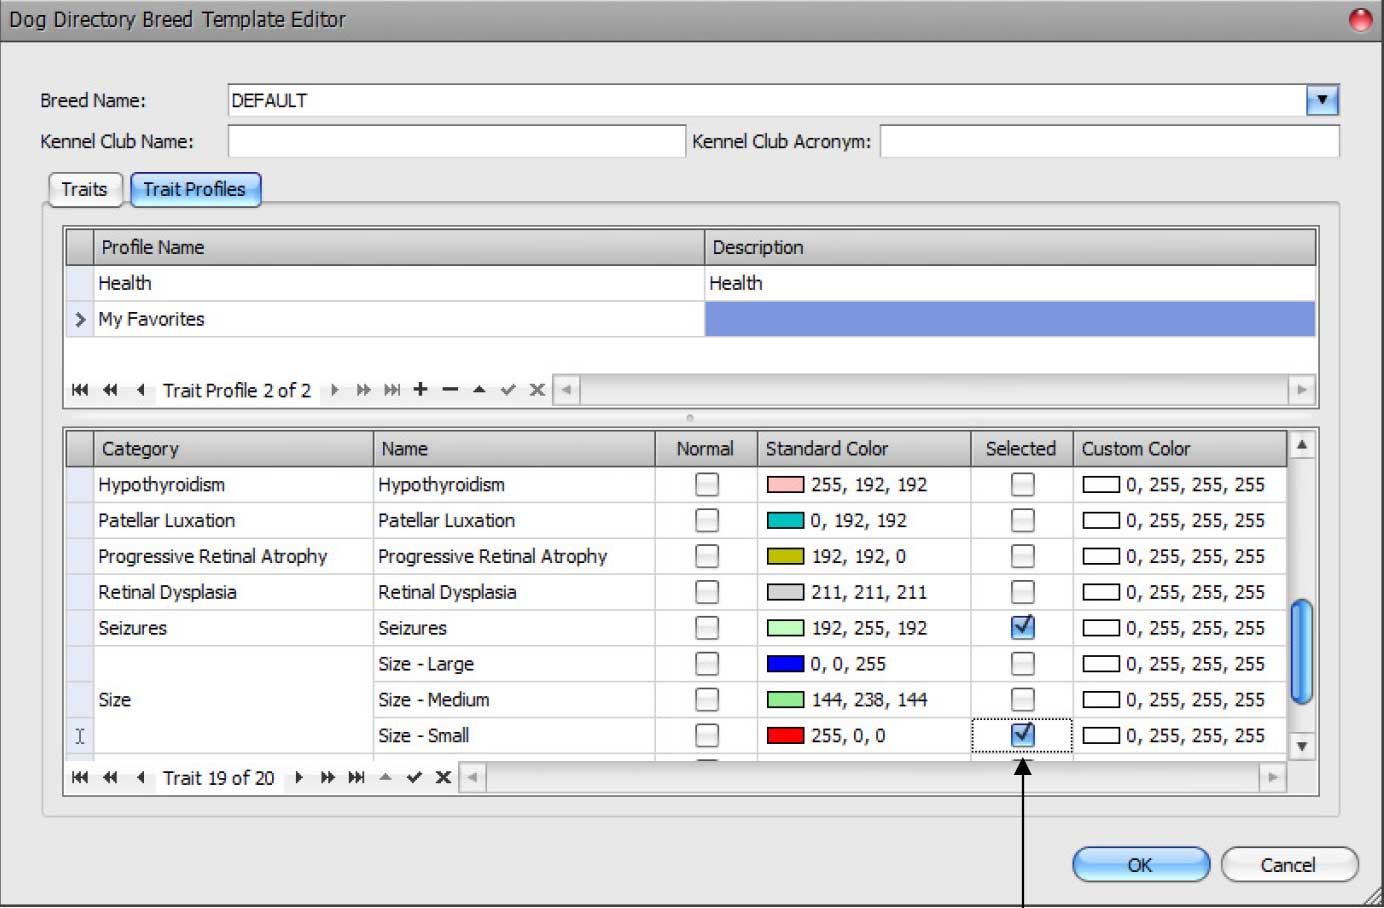
Click Main Menu → Breed Template → Edit. Click the Trait Profiles tab. Select the "My Favorites" row in the upper grid.
If necessary, scroll down to the "Size - Small" trait. Change the Custom Color to Turquoise. The custom color overrides the default color set in the Traits panel.
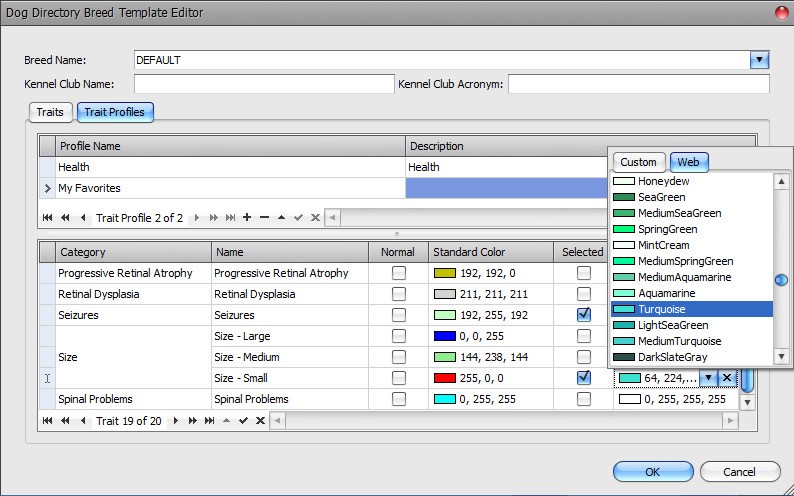
Click OK to dismiss the dialog.
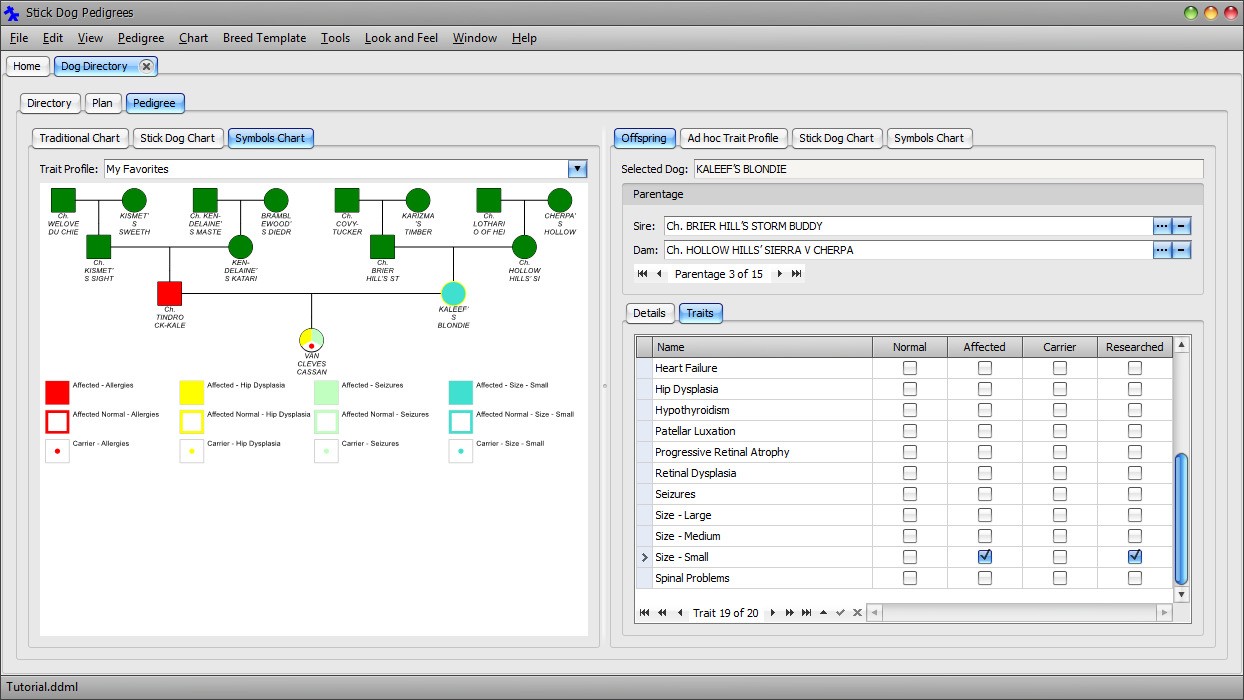
All four traits now have a unique color assignment thus avoiding potential confusion interpreting the chart.
Save the changes to file by clicking Main Menu ? File ? Save.
In part 5 of this tutorial, we will demonstrate how to manage breeding plans and predicted dogs.
Before proceeding to part 5, click the close button on the right hand side of the Dog Directory tab.
The document tab is removed from the main application window.
Part 5: Creating a Breeding Plan
In part 5 of this tutorial, we will demonstrate how to manage breeding plans and predicted dogs.
We will start by opening the previously saved dog directory document created in parts 1 to 4 of this tutorial.
Click Main Menu → View → Dog Directory.
If "Tutorial" is the only dog directory document in the library, the application and opens it automatically, otherwise it presents the Dog Directory Selector dialog so that you can select the document to open.
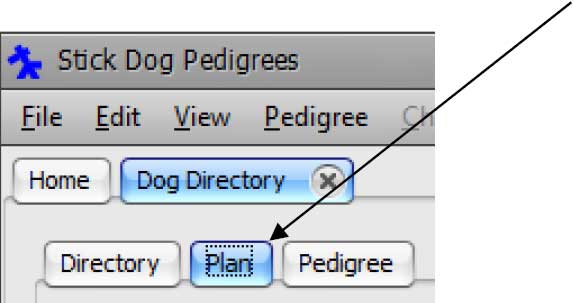
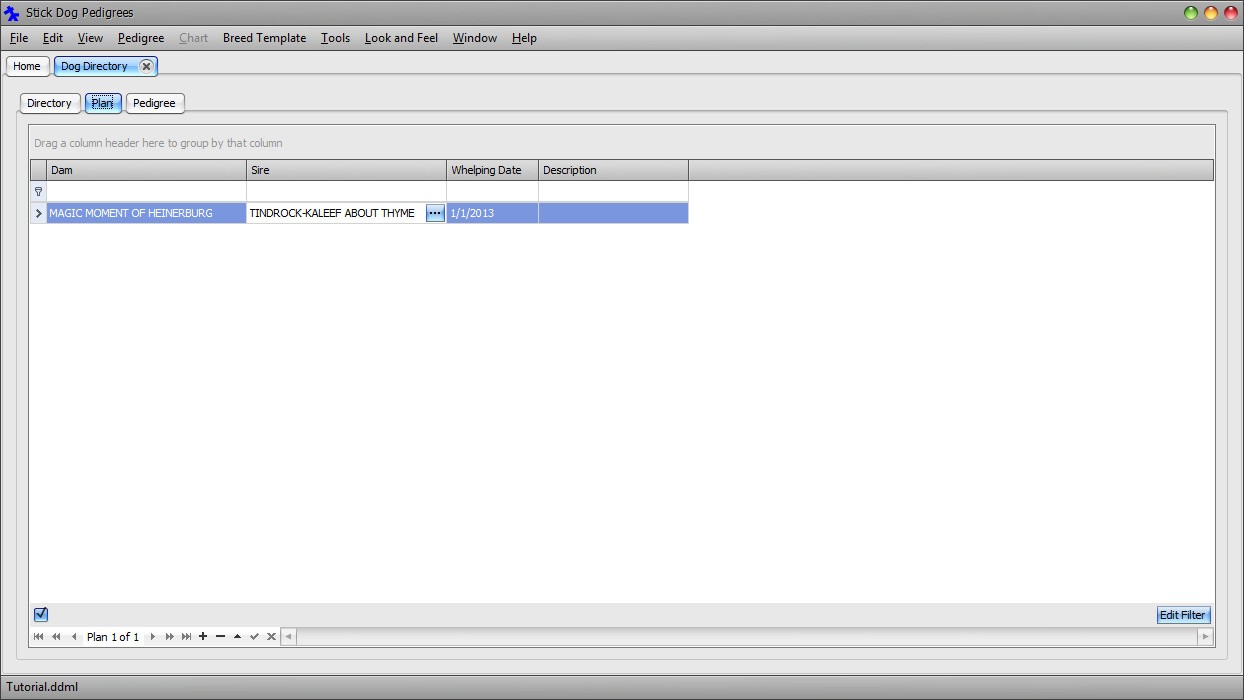
Click the Plan tab at the top of the form.
Click the Append button in the Plan Data Navigator.

Next, we will specify a Dam and Sire for the breeding plan.
Click the selector button appearing on the right hand side of the Dam field.

The Dam Lookup dialog appears allowing you to choose an existing female dog from the directory.
Select MAGIC MOMENT OF HEINERBURG and click Select.

Click the selector button appearing on the right hand side of the Sire field.

The Sire Lookup dialog appears allowing you to choose an existing male dog from the directory.
Select TINDROCK-KALEEF ABOUT THYME and click Select.

You may also set a Whelping Date, which is optional. If you do, the Pedigree panel will display any "actual" dogs that exist in the directory with the same Sire, Dam, and Whelping Date in the "Actual" column of the Stick Dog Color chart, next to the predicted dogs associated with the plan. If no Whelping Date is selected, the Pedigree panel will display any "actual" dogs that exist in the directory with the same Sire and Dam and no Whelping Date.
Click the Pedigree tab to display the pedigree for the plan. The pedigree is made up of the sire and dam along with their ancestors. Offspring of the sire and dam, if any, are included as well.
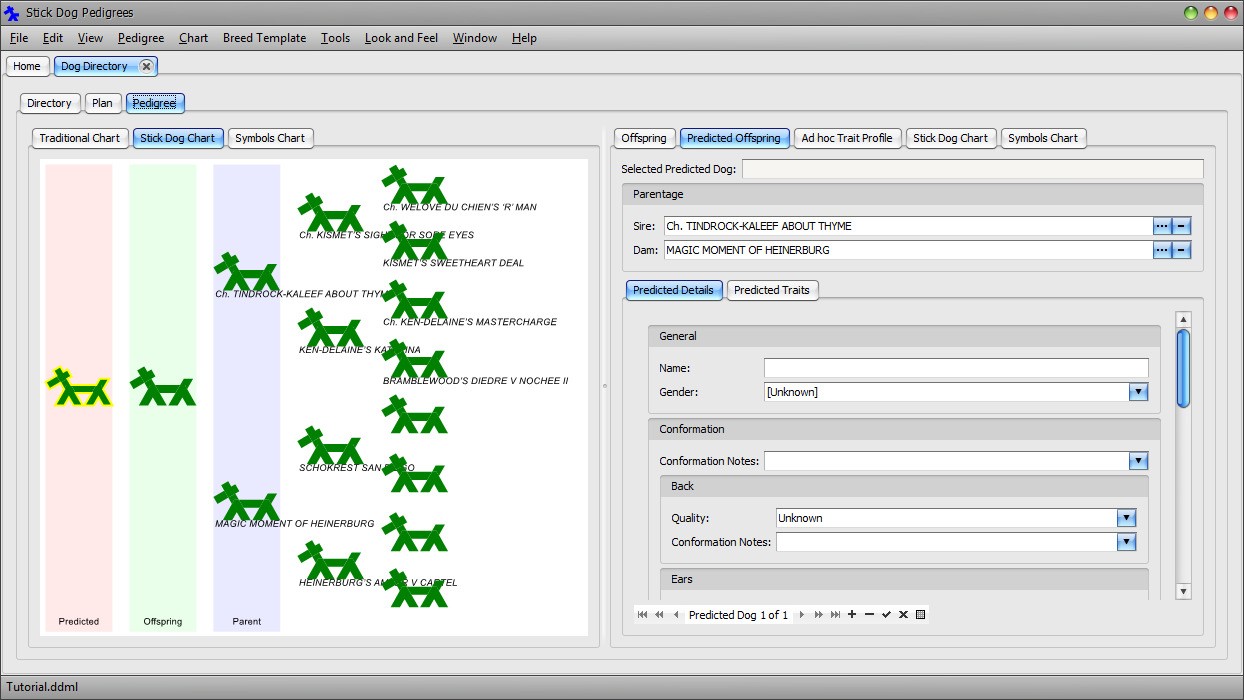
There are no offspring of MAGIC MOMENT OF HEINERBURG and TINDROCK-KALEEF ABOUT THYME in the directory. The Stick Dog Color chart displays a placeholder dog in the offspring column in case you decide to enter details about a dog resulting from the actual breeding of MAGIC MOMENT OF HEINERBURG and TINDROCK-KALEEF ABOUT THYME. The chart also displays a placeholder predicted dog for getting started with entering the predicted litter.
When a plan is displayed in the Pedigree panel, the "Predicted Offspring" panel on the right hand side of the form is enabled. In addition, the Stick Dog Color chart and Symbols chart display the predicted litter.
The "Predicted Offspring" panel is similar to the Offspring panel except that it only allows a restricted set of information to be entered for each predicted dog. This is because predicted dogs do not have AKC numbers or owners and so forth. Conformation quality data and trait selections are supported for predicted dogs.
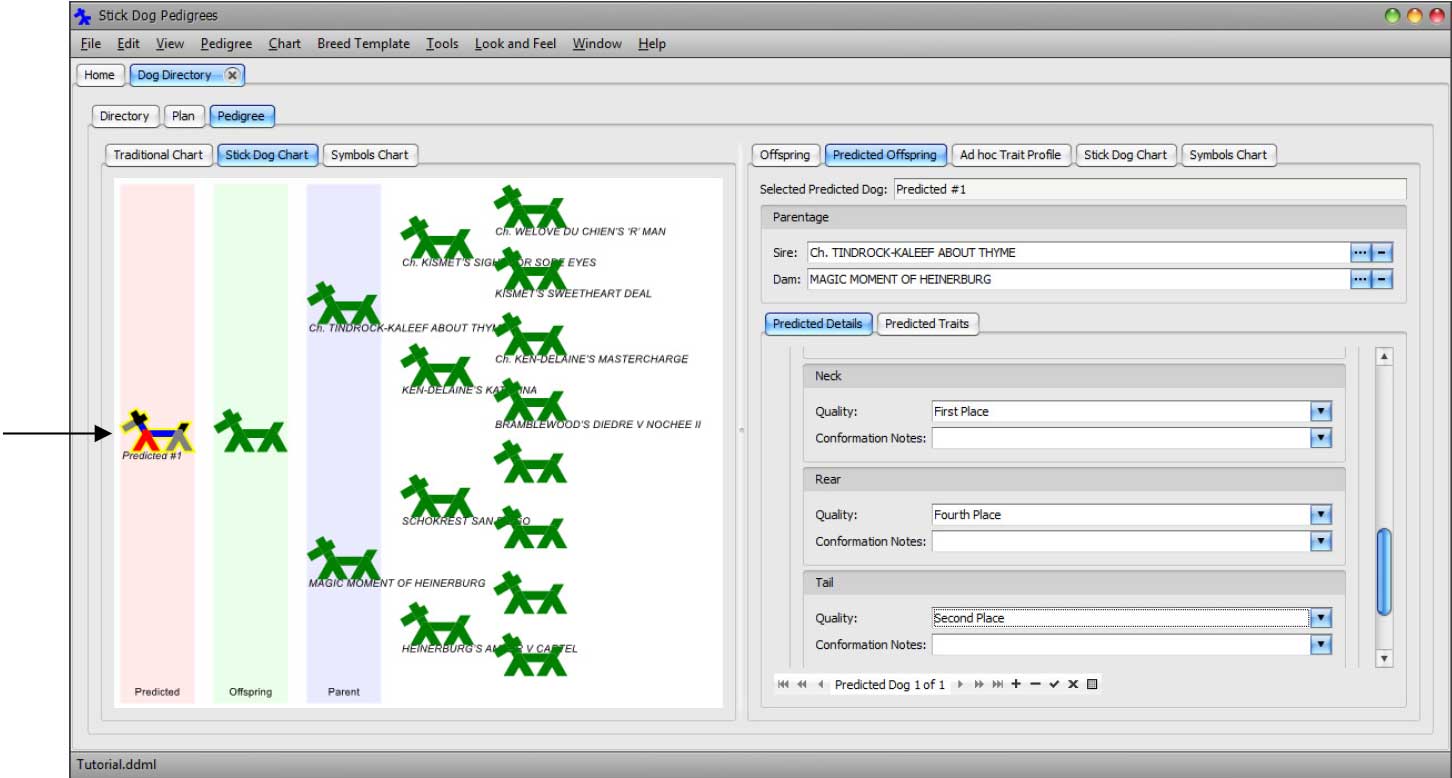
Select the placeholder predicted dog in the chart. In the Predicted Offspring - Predicted Details panel, set the Name field to "Predicted #1". Set the Conformation Quality settings as follows:
- Back: First Place
- Ears: Second Place
- Front: Third Place
- Head: Fourth Place
- Neck: First Place
- Rear: Fourth Place
- Tail: Second Place
Add a second dog to the predicted litter by clicking the Append button of the Predicted Dog Data Navigator.
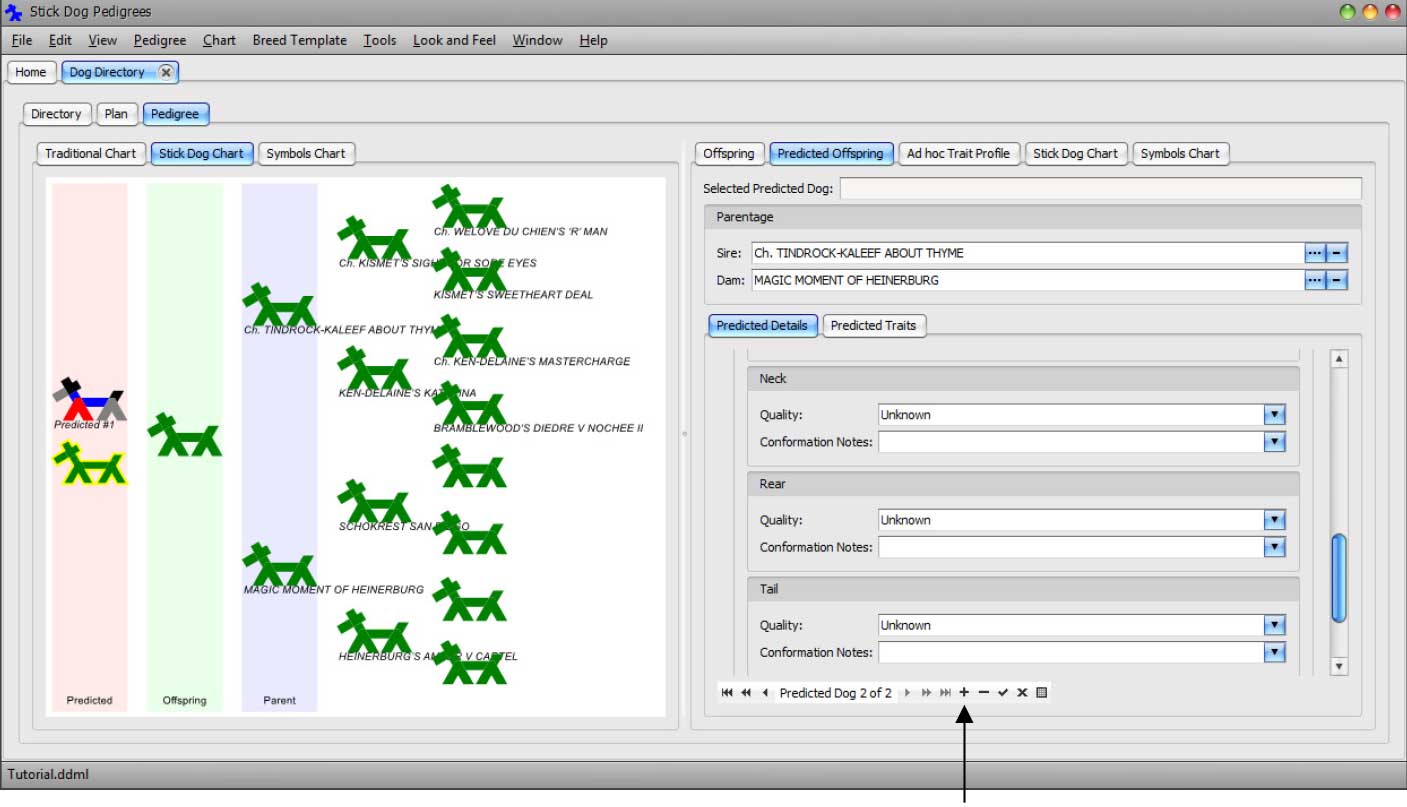
In the Predicted Offspring - Predicted Details panel, set the Name field to "Predicted #2". Set the Conformation Quality settings as follows:
- Back: Second Place
- Ears: Third Place
- Front: Fourth Place
- Head: First Place
- Neck: Second Place
- Rear: Third Place
- Tail: Fourth Place
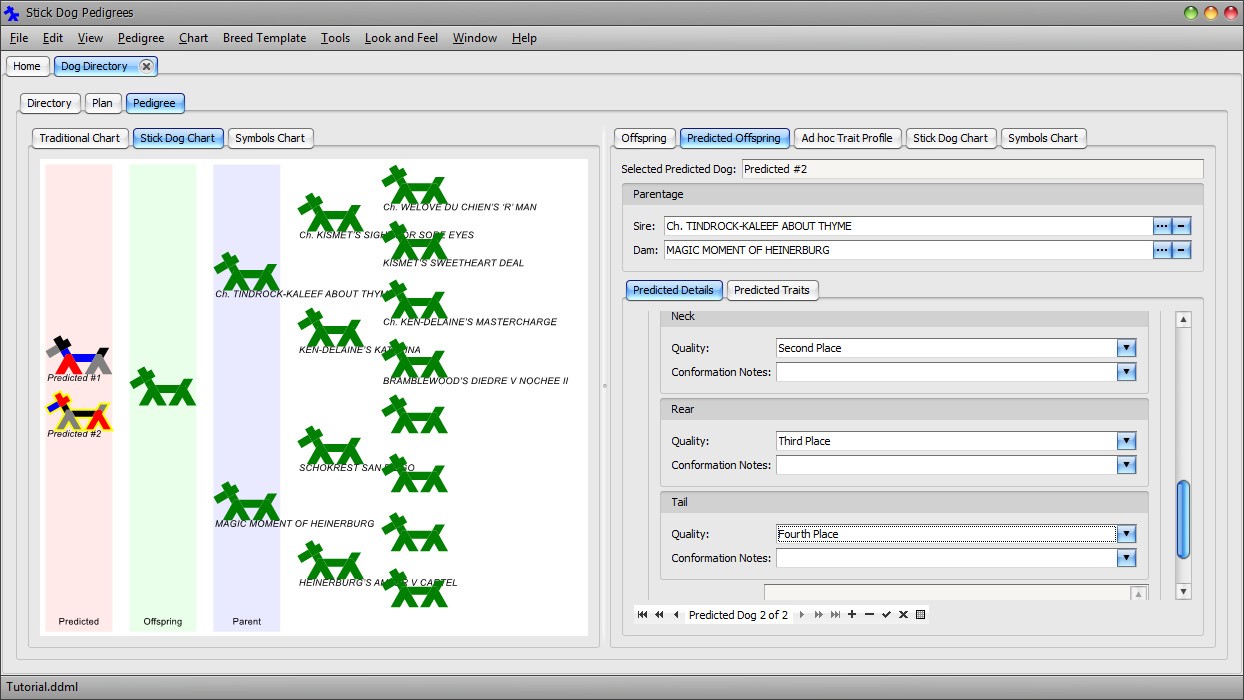
The predicted litter is now comprised of two dogs. The same procedure can be followed to add additional predicted dogs to the plan.
Suppose the breeding plan is executed and a litter born. The actual (real) dogs resulting from the breeding may be added to the directory using the Offspring panel in manner similar to how the predicted dogs were entered.
Click the placeholder dog appearing in the Offspring column of the Stick Dog Color chart.
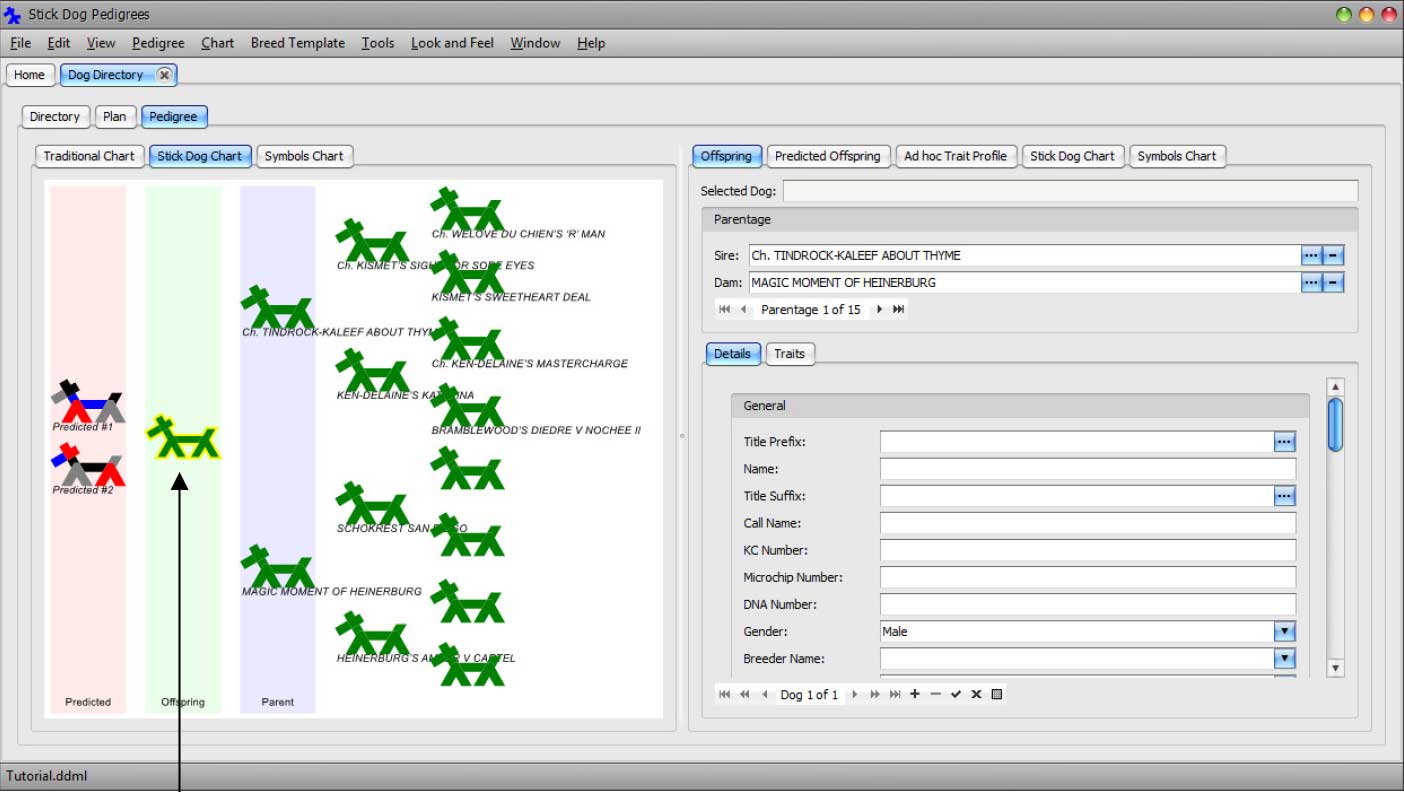
The Offspring tab is automatically selected.
Enter "Planned Dog #1" into the Name field.
Add a second dog to the actual litter by clicking the Append button of the Dog Data Navigator.
Enter "Planned Dog #2" into the Name field. Set the gender to female.
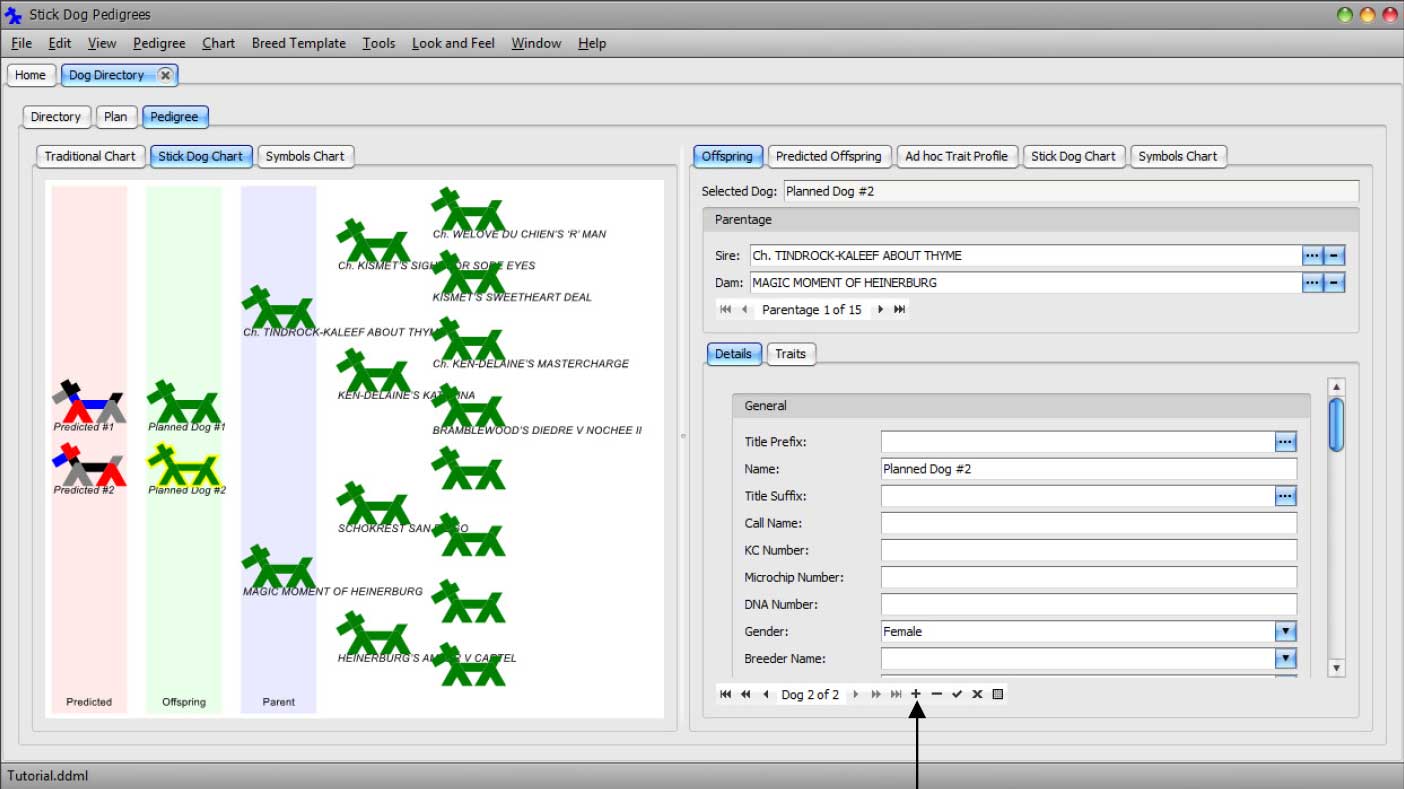
Select the first planned dog and enter a "1/1/2013" into the Whelping Date field.
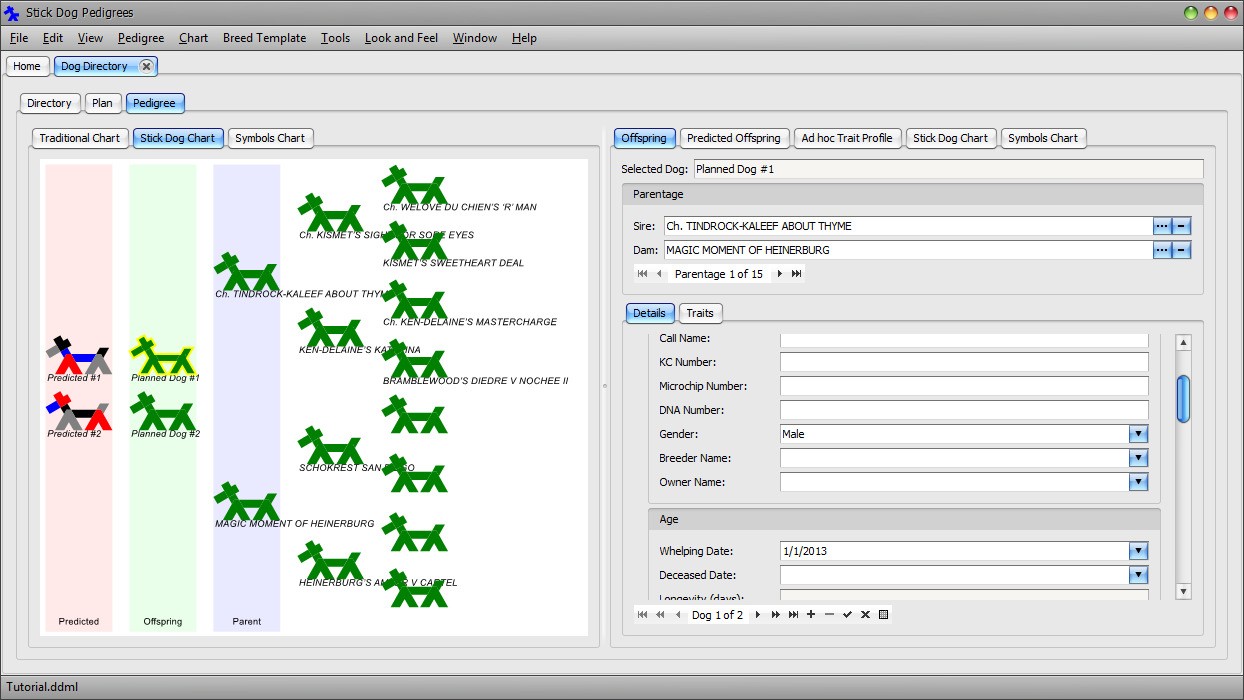
Click the second planned dog. Notice the Whelping Date field has been automatically set to the same date. That is because both dogs belong to the same litter.
Click the Directory tab to return to the Dog Details List panel. Scroll to the bottom of the list. Notice the addition of the two planned dogs.
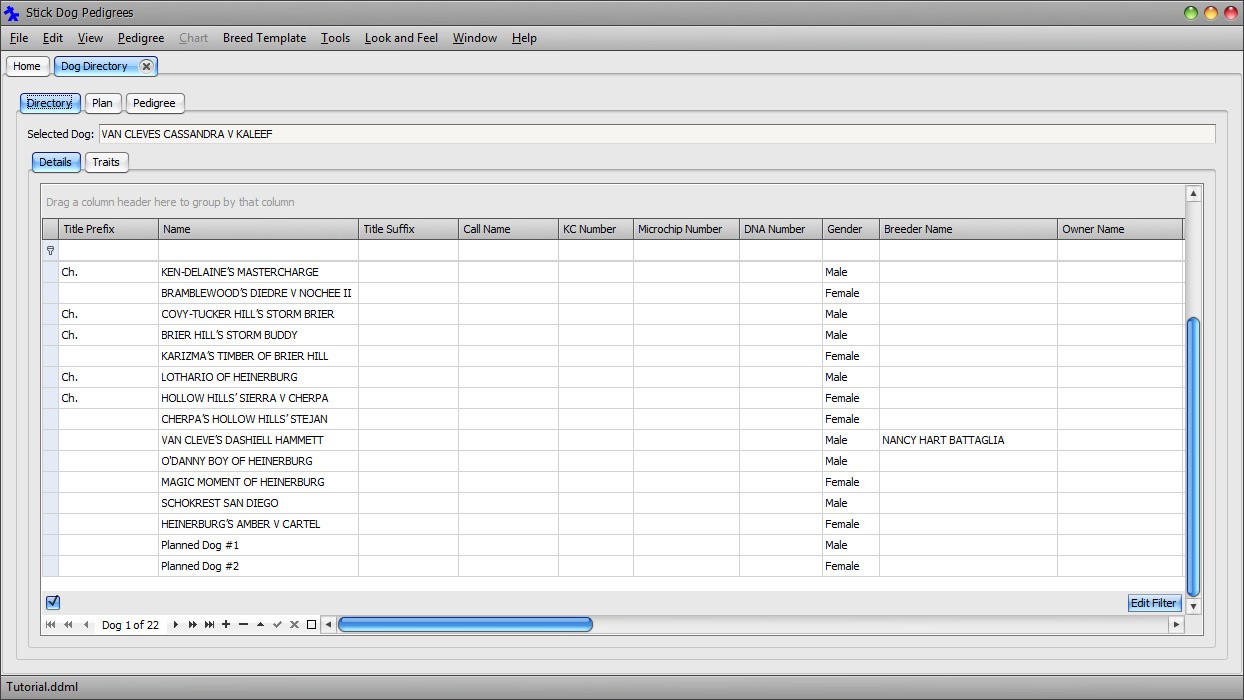
Scroll to the right and notice the Sire and Dam have been set to the plan parents.
Select Planned Dog #1 in the directory list.
Click the Pedigree tab followed by the Stick Dog Chart tab.
Notice the two planned dogs are now displayed as legitimate offspring of MAGIC MOMENT OF HEINERBURG and TINDROCK-KALEEF ABOUT THYME. They have an existence outside of the plan.
Add a third dog to the actual litter by clicking the Append button of the Dog Data Navigator.
Enter "Planned Dog #3" into the Name field. Set the gender to male. Notice the Whelping Date of the new dog is inherited from the litter.

Click the Plan tab.
Notice the Whelping Date field is now set to the date the actual litter was born.
Click the Pedigree tab.
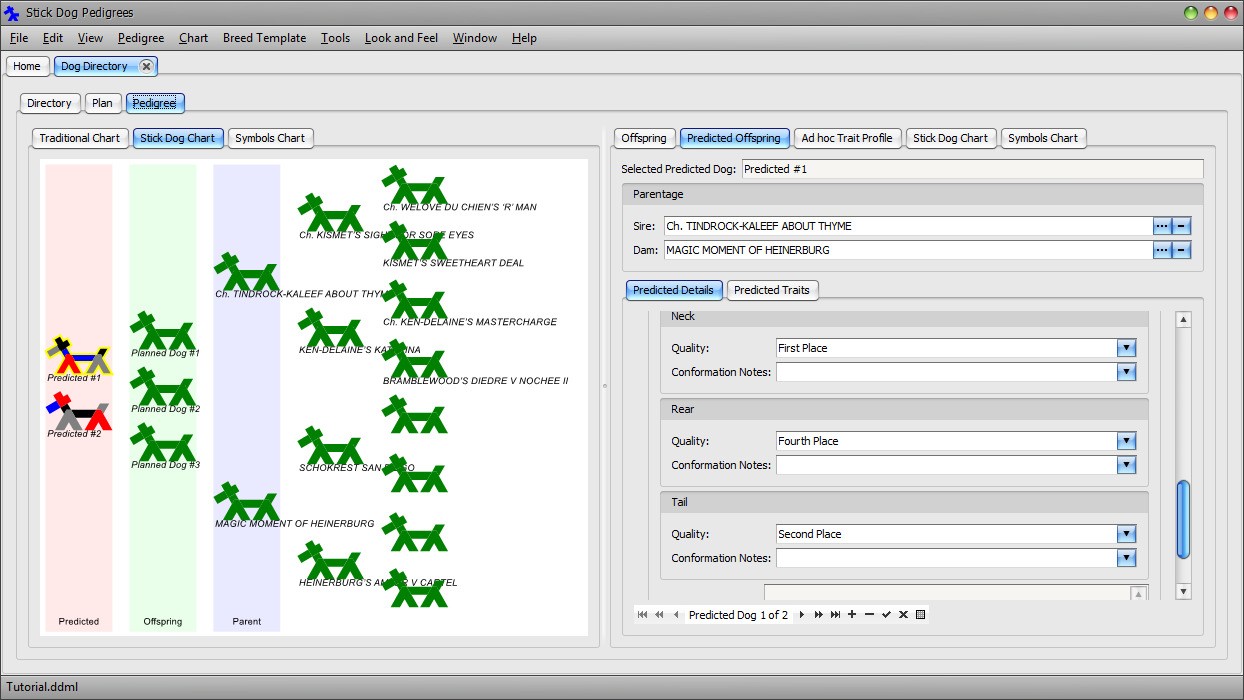
Notice the predicted dogs are again visible. Predicted dogs are only displayed for plans. Furthermore, each plan has its own set of predicted dogs. Predicted dogs do not appear in the main directory listing because it is reserved for "real" dogs.
Notice also that predicted dog #3 now appears. Actual dogs appearing in the pedigree are determined based on the current state of the directory.
Save the changes to file by clicking Main Menu → File → Save.
How to Share a Pedigree
If you wish to share a pedigree with another user that also has the Stickdog Pedigrees software follow the instructions provided here.
- Start StickDog program, open your Dog Directory.

- Choose a pedigree to export by selecting a dog in the directory list. In this example we’ll export the pedigree for "Van Cleves MOJO v Cedar Knoll."
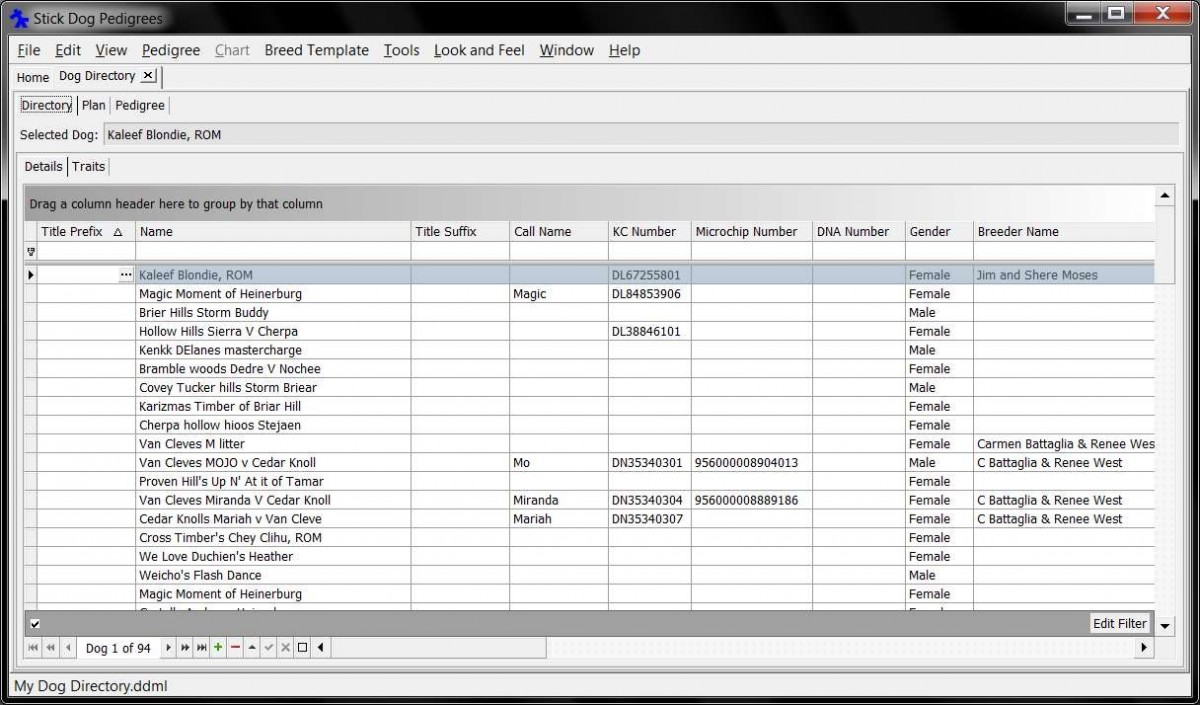
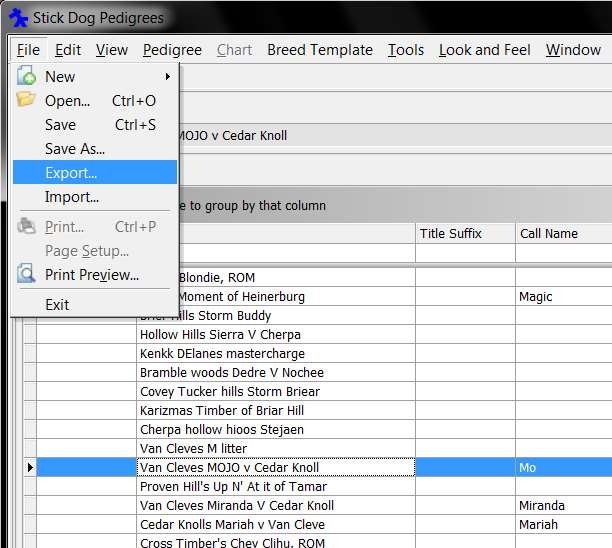
- With the correct dog selected in the directory, click File | Export.
- The Export dialog appears.
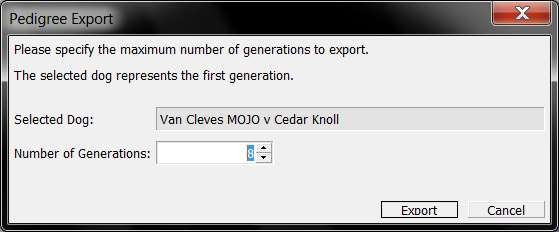
- If necessary, restrict the number of generations to include in the export by adjusting the "Number of Generations" setting. In this example, we’ll export three generations.

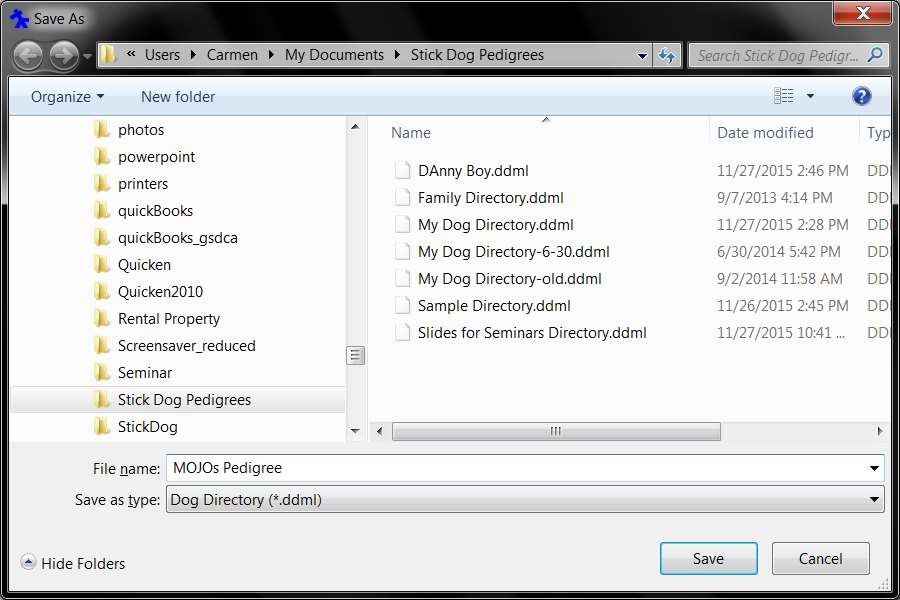
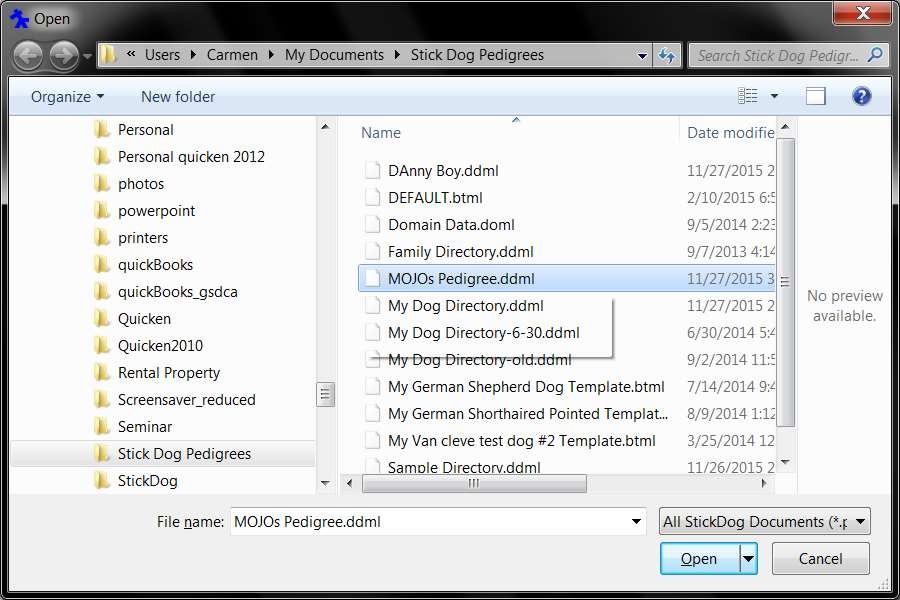
- Click Export. The “Save As” dialog appears. Enter the name of the file to export. In this example, we’ll name the file "MOJOs Pedigree."
- Click Save. A new StickDog database file is written to disk containing only the dogs that are members of MOJO’s pedigree, back three generations. Analog: Your StickDog database is like a Word document with many pages, where each page is all the details about one dog. When you export, you export only those pages of corresponding to dog members of the selected pedigree, to create a smaller document with select pages.
- To confirm the new pedigree specific database file was created, click File|Open and you should see the file in the Open diaglog (assuming the exported file was saved to you default StickDog directory).
- You can now attach this file in an email and share it.
Transfering Dog Directories to a new Computer
These instructions are for Microsoft Windows 10. Other versions will be similar
- Install a new copy of stickdog Pedigree Software on the new laptop. You can use the "Quick Installation Guide" if you need to.
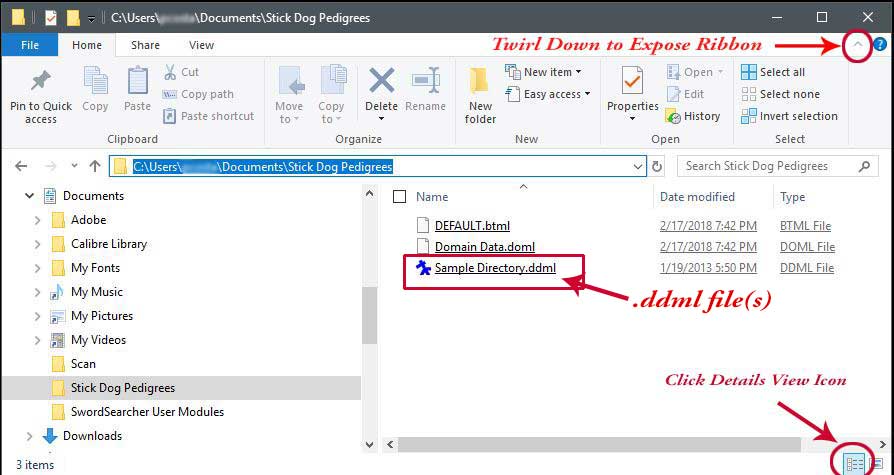
If the Stickdog Pedigree Program Runs after you install it, Please close it. - On your old computer, copy all the files that have the .ddml file extension to a flash drive.
Highlight all .ddml files, then right mouse click and choose the copy option (ctrl + c on the keyboard)
Note: By default, there will be a "Sample Directory.ddml" file created upon install.
On windows 10 those files will be located in C:\Users\userName\Documents\Stick Dog Pedigree
- Copy all the .ddml files from your flas drive to C:\Users\userName\Documents\Stick Dog Pedigree on your new computer.
- Run the program
Note: If you can't see the file extensions in File Explorer
- Open File Explorer and click on the View tab. If the ribbon is closed open it by clicking on the arrow (or pin) in the top right.
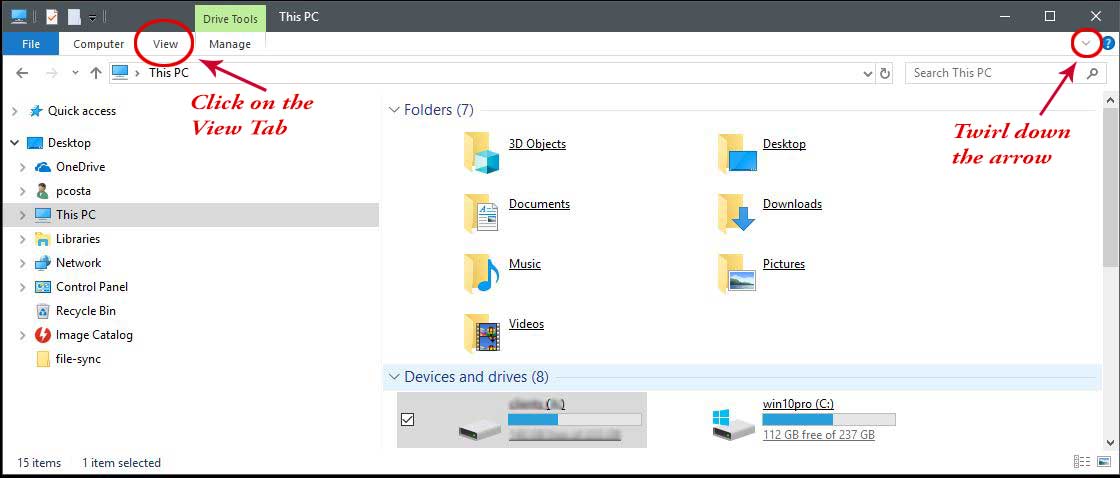
- In the ribbon, on the far right click on the "arrow below the Options icon" then click on the " Change folder and search options"
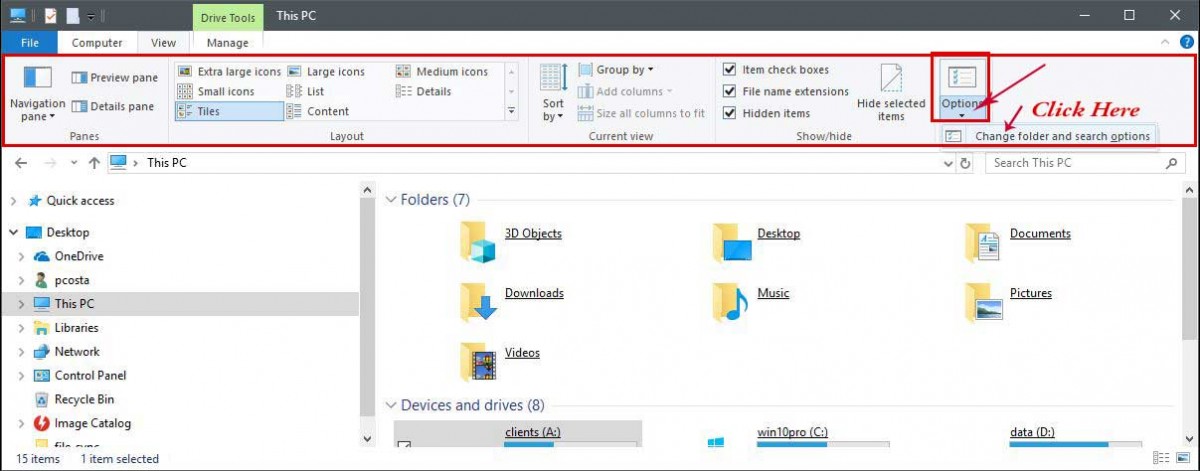
- In the Folder Options dialog window click the view tab.

- Under the Advanced Settings area uncheck the "Hide extensions for known file types"
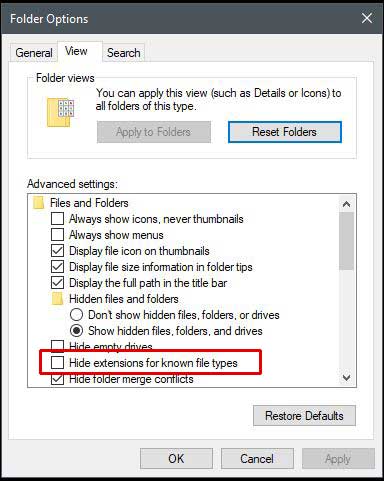
- Click OK. You should now see the file extensions
- You'll also need to input your Stickdog license